In the expansive and often overwhelming world of Stardew Valley, where every day presents new opportunities for growth and profit, optimizing your farm operations is paramount. While crops often take center stage, a truly successful farm hinges on diversifying income streams, and animal husbandry offers some of the most consistent and lucrative returns. Central to this animal kingdom strategy is a seemingly simple yet profoundly impactful tool: the Incubator. Far from being a minor convenience, the Incubator in Stardew Valley is a genuine game-changer, fundamentally altering how players approach animal production, population management, and ultimately, farm profitability. Understanding its mechanics, acquisition, and strategic deployment can revolutionize your farm from a modest plot into a thriving agricultural empire.
Understanding the Stardew Valley Incubator: A Core Mechanic
The Incubator is a foundational piece of equipment for any farmer serious about animal products. At its core, it’s a device that allows you to hatch eggs laid by your livestock directly within your coop. This might sound straightforward, but its implications for early game cost savings and late-game scaling are immense. Instead of purchasing every new animal from Marnie’s Ranch, which can become prohibitively expensive as you expand, the Incubator provides a self-sustaining method for growing your flock and herd. It simplifies animal acquisition, allowing you to convert readily available eggs into new livestock at no monetary cost, only an investment of time. This passive growth system ensures a steady supply of animals, which in turn leads to a consistent output of high-value products like eggs, milk, wool, and specialty items, forming the backbone of a robust agricultural economy.
Acquiring Your First Incubator: The Path to Animal Prosperity
You won’t find the Incubator as a standalone craftable item or a purchasable tool in Stardew Valley. Instead, it’s an integrated feature that becomes available as you upgrade your animal housing. This design choice ties the Incubator directly to the progression of your farm infrastructure.
Getting Started: The Coop
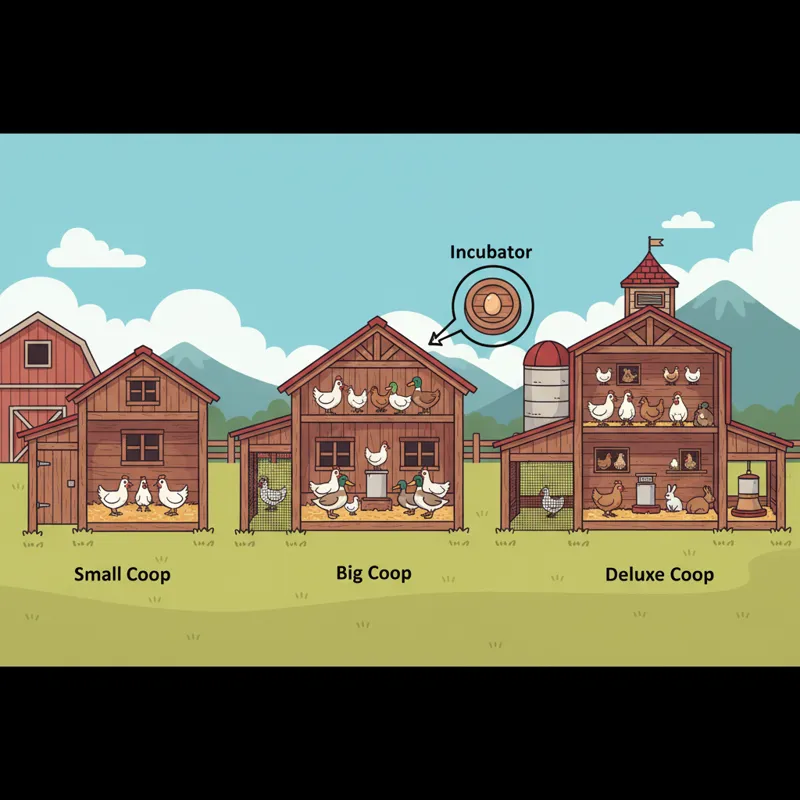
Your journey into poultry farming begins with constructing a basic Coop. This structure houses chickens, ducks, and eventually void chickens and dinosaurs. To get one, you’ll visit Robin at the Carpenter’s Shop. The initial Small Coop provides a home for up to four animals. However, this basic structure does not come equipped with an Incubator.
The Incubator is Standard with Upgrades
The critical detail often overlooked is that the Incubator is an automatic inclusion with specific Coop upgrades. You don’t buy it separately; it’s part of the package:
- Small Coop: No Incubator.
- Big Coop: This is your first step to self-sufficiency. Upgrading to a Big Coop adds a single Incubator slot and increases animal capacity to eight.
- Deluxe Coop: The ultimate poultry haven. The Deluxe Coop provides two Incubator slots, allowing for simultaneous hatching, and expands capacity to 12 animals. This upgrade also includes an auto-feed system, which is invaluable for daily efficiency.
Cost and Time Investment
Upgrading your Coop requires both materials and gold, alongside a construction period where Robin works on your farm. Planning these upgrades is crucial for strategic farm development.
- Small Coop:
- Cost: 4,000g
- Materials: 300 Wood, 100 Stone
- Build Time: 3 days
- Big Coop (Adds 1 Incubator):
- Cost: 10,000g
- Materials: 400 Wood, 150 Stone
- Build Time: 2 days
- Prerequisite: Small Coop built.
- Deluxe Coop (Adds a second Incubator slot):
- Cost: 20,000g
- Materials: 500 Wood, 200 Stone
- Build Time: 2 days
- Prerequisite: Big Coop built.
The investment in upgrading is significant, especially in the early game. However, the ability to hatch animals for free quickly offsets these costs, making the Incubator a highly profitable long-term asset.
How to Use the Incubator Stardew: A Step-by-Step Guide
Operating the Incubator is straightforward, but understanding the nuances ensures optimal use and consistent results. The process begins with acquiring an appropriate egg and ends with a new, named animal joining your coop.
Gathering Eggs
The most crucial ingredient for your Incubator Stardew operations is, naturally, an egg. Different animals lay different types of eggs, and each egg type hatches into a specific animal:
- Chicken Egg (and Large Chicken Egg): Hatches into a Chick.
- Duck Egg: Hatches into a Duckling.
- Void Egg: Hatches into a Void Chick.
- Dinosaur Egg: Hatches into a Dinosaur.
- Golden Egg: Hatches into a Golden Chicken (introduced in version 1.6).
Ensure you have the right type of egg for the animal you wish to hatch. Regular chicken eggs are often your first candidates for incubation due to their accessibility.
Placing an Egg
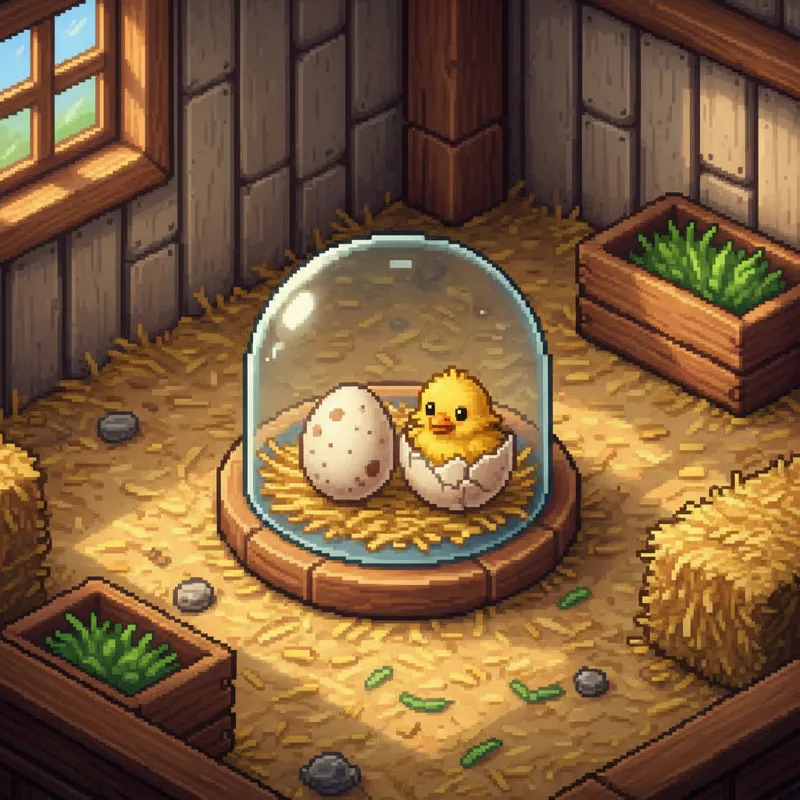
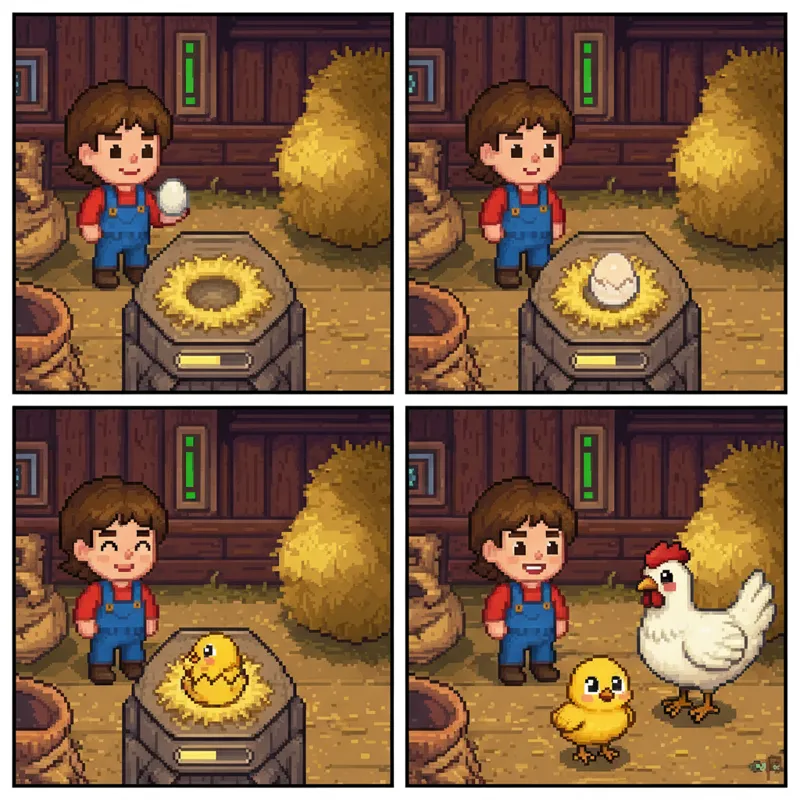
To place an egg, simply interact with the Incubator by right-clicking (or equivalent action on your platform) while holding an egg in your active inventory slot. The egg will appear in the Incubator, and the incubation process will begin immediately. You’ll see a visual cue of the egg resting within the device.
Incubation Times
The time it takes for an egg to hatch varies depending on the type of animal. These durations are consistent across seasons, weather conditions, or any other in-game factors.
- Chicken Egg: 3 days
- Duck Egg: 6 days
- Void Egg: 6 days
- Dinosaur Egg: 12.5 days
- Golden Egg: 3 days
It’s important to plan your hatching schedule, especially for longer incubation periods like the Dinosaur Egg, to ensure you have space and are ready for the new arrival.
The Hatching Process
When the incubation period is complete, you’ll see a notification indicating an egg has hatched. Entering the coop will reveal a new baby animal. You’ll then be prompted to give your new arrival a name. After naming, the animal will become a permanent resident of your coop.Important Note on Space: Your coop must have an open slot for the new animal to hatch. If your coop is already full, the egg will remain in the Incubator until space becomes available. This is a common oversight that can delay your breeding efforts. Always ensure you have an empty slot or plan to sell an existing animal before an egg is due to hatch. In the wider context of animal husbandry, creating an optimal environment for newborn animals is key, whether it’s a virtual chick in Stardew or real-world young requiring specialized care, often in environments like those provided by dog incubators designed to support vulnerable newborns.
Maximizing Animal Production and Profits with Your Incubator
The true power of the Incubator isn’t just in creating new animals; it’s in creating a self-sustaining, highly profitable animal product empire. Strategic use transforms your coop from a minor revenue stream into a cornerstone of your farm’s economy.
Strategic Animal Selection
Different animals yield different products with varying profit margins. Your Incubator Stardew strategy should align with your financial goals:
- Chickens: Produce Eggs and Large Eggs. These are excellent for early-game income and are the primary source for Mayonnaise, a staple processing item.
- Ducks: Produce Duck Eggs and Duck Feathers. Duck Feathers are a decent artisan good, and Duck Mayonnaise fetches a higher price than regular Mayonnaise.
- Void Chickens: Lay Void Eggs, which convert into Void Mayonnaise. This is a consistently high-value artisan product, making Void Chickens a lucrative investment for your Deluxe Coops.
- Dinosaur Eggs: Once hatched, Dinosaurs produce Dinosaur Eggs approximately every seven days. These are high-value artifacts if donated, but processing them into Dinosaur Mayonnaise is a significant late-game income source.
- Golden Chickens: Hatched from Golden Eggs, these rare birds lay Golden Eggs daily. These convert into Golden Mayonnaise, which boasts an exceptionally high selling price, making Golden Chickens the pinnacle of poultry profit.
The Power of Auto-Grabbers
As your animal population grows, daily collection can become tedious. The Auto-Grabber, available from Marnie once you reach Farming Level 10, automatically collects all produce inside a coop or barn each morning. This frees up valuable in-game hours, allowing you to focus on other tasks like mining, fishing, or tending to crops. It’s an essential upgrade for any large-scale animal operation.
Mayonnaise Machines & Loom Synergy
Raw animal products like eggs are only part of the story. Processing them through artisan equipment dramatically increases their value.
- Mayonnaise Machines: Convert Eggs, Duck Eggs, Void Eggs, Dinosaur Eggs, and Golden Eggs into their respective Mayonnaise versions. This is where the bulk of your animal profits will come from. A fully stocked coop with multiple Mayonnaise Machines running daily is a passive income powerhouse.
- Looms: While primarily for processing Wool from Sheep and Rabbits (barn animals), understanding the artisan goods chain reinforces the concept of maximizing raw material value.
Breeding for Animal Population Growth
The most obvious benefit of the Incubator is the ability to expand your animal population without paying Marnie. This becomes incredibly cost-effective as you scale up. Instead of spending thousands of gold per animal, you convert an existing egg into a new life. This is especially useful for quickly filling multiple coops or replacing older animals you’ve sold. This free propagation is a powerful economic engine.
Friendship and Star Quality Products
Newborn animals start with zero friendship. Petting your animals daily, ensuring they have food, and keeping them warm (by closing the coop door in winter, or generally having a heater inside during cold seasons) increases their friendship levels. Higher friendship leads to better quality products (silver, gold, iridium star quality), which sell for more. This cycle of care, hatching, and processing is central to maximizing your profit.
Advanced Strategies: Beyond Basic Hatching
Once you grasp the basics, there are further layers of strategy to explore that leverage the Incubator for even greater gains and unique farm experiences.
The Dinosaur Egg Hunt
The Dinosaur Egg is one of the most exciting items to find and incubate. Finding your first one is often a challenge – it can drop from Pepper Rexes in Skull Cavern, be found in artifact spots, obtained through fishing treasure chests, or even as a rare drop from breaking crates. Once you find one, the critical decision is whether to donate it to the Museum or incubate it. Incubating is almost always the superior choice, as it allows you to start a population of dinosaurs that will continually produce more Dinosaur Eggs. These eggs, when processed into Dinosaur Mayonnaise, are incredibly profitable.
Void Egg Generation
Void Eggs can be obtained in a few ways. Sometimes, a random witch event can turn a regular egg into a Void Egg or cause a Void Chicken to appear in your coop. You can also purchase Void Eggs (and the recipe for Void Mayonnaise) from Krobus in the sewers. However, once you have one Void Egg, the Incubator allows you to endlessly propagate Void Chickens, ensuring a steady supply of this highly valuable product.
Optimizing Coop Layout and Management
For maximum efficiency, consider the layout of your coops and the placement of hay and auto-feeders. In Deluxe Coops, hay is automatically dispensed, but ensuring a consistent supply in your silos is vital. Positioning multiple Deluxe Coops close to your processing machines (Mayonnaise Machines) minimizes travel time, maximizing your productive hours in a day. Just as in real-world animal care, where the comfort and safety of pets are considered, items like a back seat extender for dogs might enhance travel for a beloved pet, efficient layout ensures your Stardew animals are productive and easy to manage.
The Golden Egg: A 1.6 Update Highlight
Introduced in the 1.6 update, the Golden Egg adds a new layer to animal husbandry. These eggs are incredibly rare, primarily found by foraging after consuming a Golden Animal Cracker or as a very rare random drop. Incubating a Golden Egg hatches a Golden Chicken, which lays Golden Eggs daily. These eggs can be turned into Golden Mayonnaise, the most valuable form of mayonnaise in the game. Dedicated farmers will want to prioritize acquiring and incubating a Golden Egg to establish a Golden Chicken population for peak profitability.
Things People Usually Miss About the Stardew Valley Incubator
Even seasoned Stardew Valley players can overlook certain aspects of the Incubator, which can impact efficiency and profit. Here are a few common points people often miss:
- The “Full Coop” Trap: This is perhaps the most frequent oversight. An egg will not hatch if your coop is at maximum capacity. The egg simply stays in the Incubator indefinitely until a space opens up. Many players discover this when they’re expecting a new animal but find the egg still there days later. Always check your animal count before an incubation period ends.
- Not All Eggs Are for Hatching: While many eggs can be incubated, some, like the prehistoric ‘Strange Bun’ or ‘Void Mayonnaise’ (which uses a Void Egg but is a cooked item), are not meant for the Incubator. Only raw animal eggs (Chicken, Duck, Void, Dinosaur, Golden) can be hatched.
- The Long-Term Economic Advantage: It’s easy to just buy animals from Marnie for immediate gratification. However, the true economic power of the Incubator lies in the long game. Each animal you hatch for free represents 800g (for a chick) to 8,000g (for a void chick) saved. Over dozens of animals across multiple coops, this adds up to hundreds of thousands of gold, turning those initial coop upgrade costs into a stellar return on investment.
- Managing Animal Lifespans and Space: While Stardew Valley animals don’t “die” of old age, you might want to cycle your population. Selling older animals, especially those with lower friendship if you haven’t been regularly interacting with them, can make space for new, freshly hatched animals. This allows you to maintain a high-friendship, high-productivity flock without having to build endless coops.
- Incubators Don’t Speed Up Friendship: A common misconception is that hatching an animal gives it a friendship boost. Newborns start at the base level, requiring daily petting and care to build their friendship, which is crucial for producing higher quality goods. The incubator is about population, not instant affection. Similarly, a real-world pet might benefit from a comfortable setup like an insulated dog bowl for fresh water, but true bond building always comes from consistent interaction and care.
Frequently Asked Questions (FAQ)
How long does it take for a void egg to hatch in Stardew?
A void egg takes 6 days to hatch in a Stardew Valley Incubator.
Can you put any egg in the Incubator in Stardew Valley?
No, only specific types of eggs can be incubated: Chicken Eggs, Duck Eggs, Void Eggs, Dinosaur Eggs, and Golden Eggs. Other eggs found in the game, or items that resemble eggs, cannot be hatched.
Do I need to feed baby animals in Stardew Valley?
Yes, baby animals, once hatched, consume hay just like adult animals. In upgraded coops (Big and Deluxe), the auto-feed system will automatically provide hay as long as your silos have a supply.
What are the benefits of upgrading my coop in Stardew Valley?
Upgrading your coop increases its animal capacity, and crucially, provides you with an Incubator (one with the Big Coop, two with the Deluxe Coop). The Deluxe Coop also adds an auto-feed system, significantly reducing your daily chores.
How do I move an animal after it hatches?
Once an animal hatches in a specific coop, it is permanently assigned to that coop. You cannot “move” animals between coops in Stardew Valley. If you want an animal in a different coop, you’ll need to hatch another egg in that desired coop or purchase one from Marnie directly into the new location.
Can I have more than one Incubator per coop?
A Big Coop comes with one built-in Incubator, and a Deluxe Coop comes with two built-in Incubators. You cannot craft or purchase additional Incubators to place in a coop beyond these standard inclusions.
Conclusion: Hatching Success in Stardew Valley
The Incubator in Stardew Valley is more than just a convenient tool; it’s a strategic asset that underpins efficient and profitable animal farming. By understanding how to acquire it through coop upgrades, mastering its simple operation, and employing advanced strategies for animal selection and product processing, you unlock a powerful self-sustaining system. From basic chicks to elusive dinosaurs and the highly lucrative golden chickens, the Incubator empowers you to cultivate a thriving animal population at virtually no cost, maximizing your artisan goods production and overall farm income. Embrace the Incubator, and watch your Stardew Valley farm truly flourish.
Disclaimer: The tips, guides, and strategies provided in “Best Incubator Stardew Tips: 5 Ways to Farm Smarter” on bangladeshcountry.com are based on general internet research and gameplay experience. This content is intended for general informational and entertainment purposes only.
Please note that video game mechanics, features, and strategies may change over time due to developer updates or patches. While we strive to provide accurate and up-to-date information, we cannot guarantee that every tip will apply exactly to future versions of the game.