
Learning how to create a compelling bed drawing is a foundational skill for anyone interested in illustration, interior design, or simply enhancing their observational drawing abilities. A bed, often the focal point of a bedroom, presents unique challenges in capturing accurate perspective, soft textures, and structural integrity. This isn’t just about sketching a simple rectangle; it’s about understanding how light interacts with fabric, how cushions compress, and how a seemingly straightforward piece of furniture sits within a three-dimensional space. By mastering the art of bed drawing, you’ll not only render a crucial element of any home but also sharpen your overall artistic perception and technical precision. Let’s delve into a systematic approach that will help you bring your bedroom visions to life on paper, starting from the ground up.
The Foundational Principles: Understanding Perspective for Bed Drawing
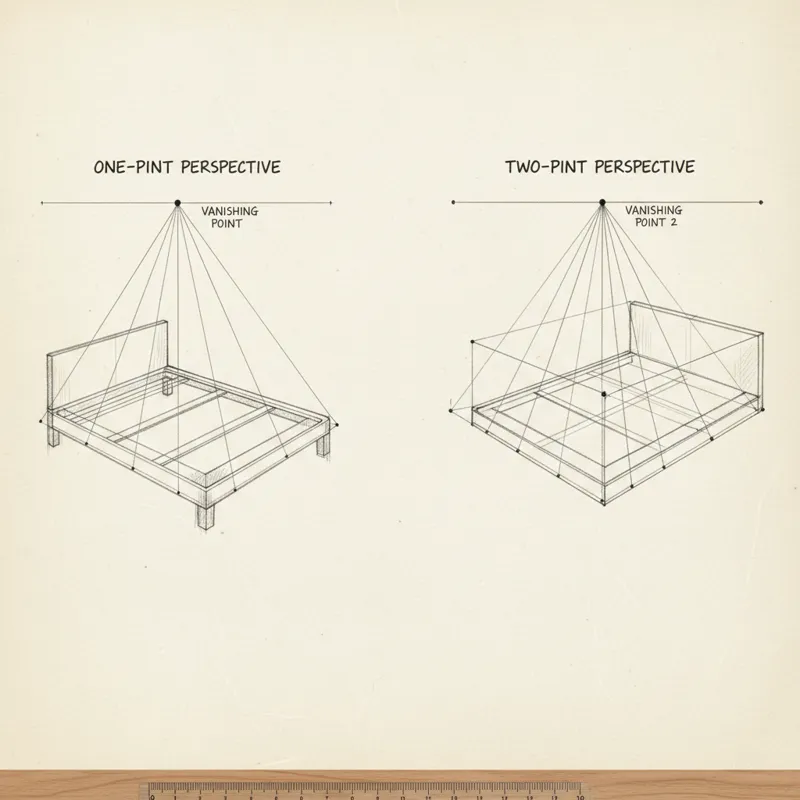
Before you even think about sketching a duvet, understanding perspective is paramount for any realistic bed drawing. Beds are fundamentally rectangular solids, and depicting them convincingly requires a solid grasp of how objects recede into space. Two primary types of linear perspective are most commonly applied when illustrating a bed: one-point and two-point perspective.
One-Point Perspective
This technique is ideal when you’re viewing the bed straight on, with one face (usually the footboard) parallel to your picture plane. All lines that recede away from you will converge at a single vanishing point on the horizon line. It’s excellent for creating a sense of depth directly into the scene. Think of standing at the end of a long hallway; all the parallel lines of the walls, floor, and ceiling appear to meet at one point in the distance. When drawing a bed, if its length is directly facing you, one-point perspective keeps it feeling aligned and grounded within the room.
Two-Point Perspective
More frequently, you’ll find yourself viewing a bed from an angle, making two-point perspective your go-to method. Here, two faces of the bed (e.g., the front and one side) are angled relative to your picture plane. Consequently, two sets of parallel lines will recede to two separate vanishing points, both located on the horizon line. This creates a more dynamic and naturalistic view, mimicking how we typically perceive objects in a room. Most bedroom layout diagrams benefit immensely from this approach, as it allows for a more comprehensive illustration of the room’s elements.
Establishing Your Horizon Line and Vanishing Points
The horizon line represents your eye level. If you’re standing, it’s higher; if you’re sitting on the floor, it’s lower. Everything below your eye level will appear to angle upwards towards the horizon, and everything above will angle downwards. Vanishing points, placed on this horizon line, are the imaginary points where parallel lines appear to converge. Correctly establishing these initial parameters is the critical first step to ensuring your bed drawing doesn’t look distorted or float unnaturally in space. Without this groundwork, even the most detailed bedding will seem off.
Essential Tools for Your Bed Drawing Journey
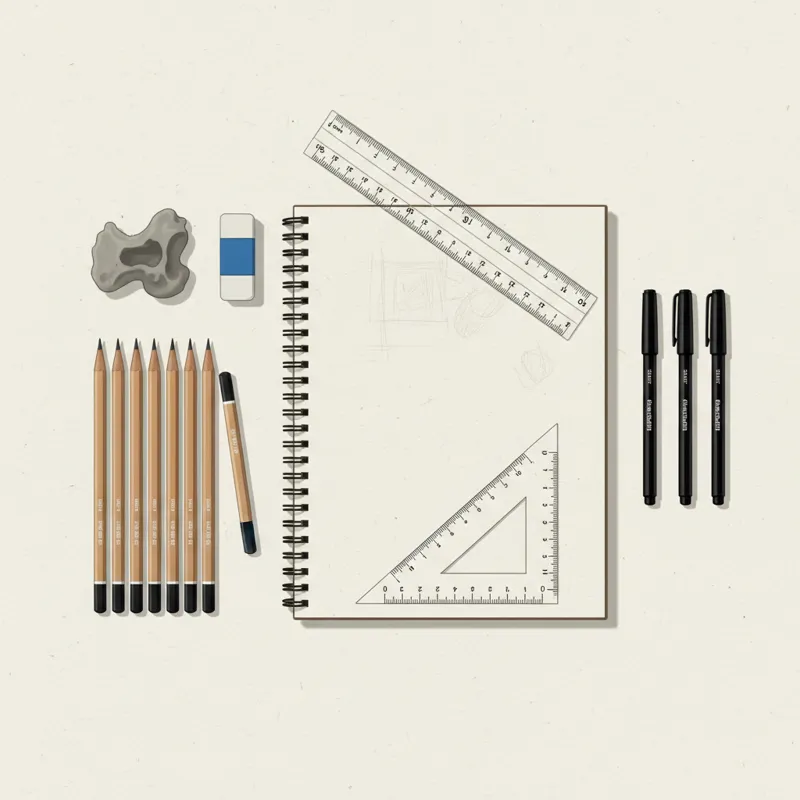
Having the right tools can significantly impact the quality and ease of your bed drawing process. You don’t need an elaborate setup to start, but a few key items will make a world of difference.
Graphite Pencils
A small selection of graphite pencils is crucial.
- HB Pencil: A good all-around pencil for initial sketches and light lines. It’s balanced between hard and soft.
- 2B Pencil: Slightly softer, producing darker lines. Excellent for refining outlines and beginning to establish mid-tones in your bed sketches.
- 4B or 6B Pencil: Much softer, perfect for deep shadows, rich darks, and adding contrast, which is essential for making your bed drawing pop and giving it depth.
Erasers
- Kneaded Eraser: This pliable eraser is fantastic for lifting graphite gently without damaging the paper. It’s ideal for lightening areas or cleaning up guide lines without completely erasing them.
- Vinyl or Plastic Eraser: For more precise or complete removal of lines, a good quality vinyl eraser works wonders.
Rulers and Straightedges
For accurate perspective bed drawing, a ruler is non-negotiable. A transparent ruler allows you to see your drawing underneath, which is helpful. A T-square or a set square can also be incredibly useful for drawing perfectly parallel or perpendicular lines, especially when setting up your initial bed frame design blueprints.
Drawing Surfaces
Any standard drawing paper will work to start. However, if you’re serious about honing your skills, consider a slightly heavier paper (around 80-100lb or 180-220gsm) with a medium tooth. This texture holds graphite well and can withstand some erasing.
Pens for Inking and Detail
While pencils are for the initial sketch, you might want to ink your final bed drawing for sharper lines and a more finished look. Fine-liner pens in various thicknesses are excellent for this. Some artists also enjoy the unique qualities of more traditional tools. For instance, a glass pen offers a smooth, consistent line and can be refilled with various inks, providing a different tactile experience. Similarly, for intricate details or a vintage aesthetic, a quill pen might be an interesting choice for exploring line variation. For those seeking modern precision and vibrant colors, specialized tools like Tul Pens offer consistent ink flow and a comfortable grip, making them suitable for detailed work and adding color accents to your bed sketches.
Deconstructing the Bed: Basic Shapes and Proportions
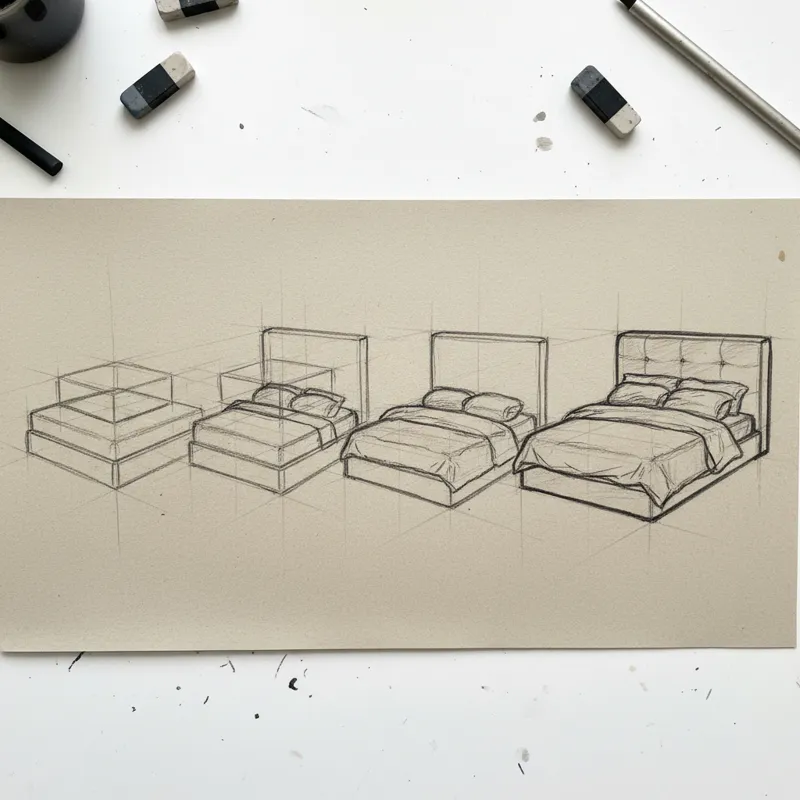
Before adding any intricate details, break down the bed into its most fundamental geometric components. This approach simplifies the complex forms and helps maintain accurate proportions and perspective.
Start with a Simple Cuboid
Every bed, regardless of its style, starts as a rectangular prism or cuboid. This is your foundational block. Envision the entire bed—frame, mattress, headboard, and footboard—as if it were carved from a single block of wood. This initial cuboid will guide all subsequent elements and ensure your perspective is consistent. If you’re aiming for realistic bedroom furniture illustration, beginning with this structural box is non-negotiable.
Defining the Main Components
Once you have your primary cuboid, you can subdivide it into the bed’s distinct parts:
- Bed Frame: This is the structural base. It might be a simple box, a platform, or have legs. Its thickness and height are crucial for grounding the bed.
- Mattress: The mattress sits atop the frame. It’s another cuboid, usually slightly smaller in width and length than the frame to allow for bedding, but with significant height. Pay attention to how it sits within or on the frame.
- Box Spring (Optional but Common): Many beds have a box spring beneath the mattress. This is another, thinner cuboid that adds height and support. If present, it should be drawn as a separate layer.
- Headboard: This can be a simple panel or an elaborate upholstered piece. It extends upwards from the bed frame at one end.
- Footboard: Less common in modern designs but present in many traditional beds, the footboard is a shorter panel at the opposite end.
Establishing Relative Proportions
Observe real beds or reference images. How tall is the mattress compared to the frame? How wide is the headboard relative to the mattress? These relationships are vital. A common mistake is making mattresses too thin or headboards too small. Remember, a standard queen or king-sized mattress has significant volume. Accurately capturing these relative sizes will make your bed drawing instantly more believable. Think in terms of ratios rather than absolute measurements, especially when drawing freehand. This initial proportioning is key to any successful bedroom layout diagram or interior design room rendering.
Step-by-Step Guide: How to Sketch a Bed with Accurate Perspective
This systematic approach will guide you from the fundamental construction to the refined details, ensuring your bed drawing exhibits both structural integrity and realistic softness.
Step 1: Establish the Horizon Line and Vanishing Points
Begin by lightly drawing your horizon line across your paper. This line defines your eye level. Next, choose your vanishing points (VPs). For a two-point perspective, place two VPs on the horizon line, far apart, typically towards the edges of your paper or even off the page if using a large format. For a one-point perspective, place a single VP centrally on the horizon line. Use light, erasable lines for these initial guides. This step is critical for a strong perspective bed drawing tutorial outcome.
Step 2: Draw the Basic Cuboid for the Bed Frame
From your chosen vanishing points, draw light lines towards the center of your page. These will form the receding edges of your bed. Start by drawing the vertical front corner of your bed frame. From the top and bottom of this line, extend lines back to your vanishing points. Then, determine the overall length and width of your bed by drawing two more vertical lines for the back corners, ensuring they align with the perspective lines. Connect these vertical lines to complete your basic bed frame cuboid. This is your foundational ‘box’ that dictates the entire bed’s position and scale within the room.
Step 3: Define the Mattress and Box Spring
Within your established bed frame cuboid, draw another, slightly smaller cuboid to represent the mattress. Remember to account for its height. If you’re including a box spring, draw another, thinner cuboid beneath the mattress, ensuring both adhere to the same perspective lines established in Step 2. Pay close attention to the slight overhang or inset of the mattress relative to the frame—this adds realism.
Step 4: Add the Headboard and Footboard (Using Perspective)
Extend the vertical lines from the appropriate corners of your bed frame upwards to create the headboard. The top and any horizontal elements of the headboard should also recede back to your vanishing points. Repeat this for the footboard, if your bed has one. Consider its height and thickness relative to the mattress and frame. This is where your bed frame design blueprints start to take on specific character.
Step 5: Sketch Pillows and Bedding
Now, introduce the soft elements. Start with the basic shapes of the pillows—they are essentially soft, rounded cuboids. Place them at the head of the bed, ensuring they follow the bed’s perspective. Then, lightly sketch the contours of the duvet, comforter, or sheets. Don’t make them flat; show folds, wrinkles, and the way they drape over the mattress. This is where observational clarity regarding fabric movement becomes important. Look at how fabric sags and bunches.
Step 6: Refine Details and Textures
Once the basic forms are established, begin refining the lines. Add details to the headboard (tufting, wood grain, decorative trim). Define the seams and edges of the mattress and box spring. Pay attention to the subtle curves of a pillow or the specific way a blanket falls. Use varied line weights: darker, bolder lines for prominent edges closer to you, and lighter lines for elements receding into the distance or for subtle texture. This step transitions your bed drawing from a mere sketch to a more polished bedroom furniture illustration.
Step 7: Apply Shading and Lighting for Depth
This is where your bed drawing truly comes to life. Decide on a light source—where is the light coming from?
- Cast Shadows: Areas where the bed blocks light will have darker shadows. Think about the shadow cast by the mattress onto the frame, or the pillows onto the bedding.
- Form Shadows: These are the shadows on the object itself, caused by its curves and angles turning away from the light. The underside of a folded duvet or the recessed areas of a tufted headboard will have form shadows.
- Highlights: The areas directly hit by light will be the brightest.
Use your range of pencils (2B, 4B, 6B) to build up tones gradually, from light grays to deep blacks. Blending tools or your finger can soften transitions, but avoid over-blending to retain textural quality. This careful application of light and shadow will give your bed drawing its three-dimensional form and make it feel realistic.
Beyond the Basics: Enhancing Your Bed Drawings
Once you’ve mastered the fundamental structure and perspective, you can push your bed drawings further by focusing on realism and contextual elements.
Adding Realistic Bedding and Textiles
The bedding is where a bed truly expresses comfort and style. Don’t just draw flat sheets. Instead, observe:
- Wrinkles and Folds: These are not random. Fabric folds naturally where it’s compressed or drapes. Notice how a duvet wrinkles when someone has been lying on it, or how a throw blanket gathers at the foot of the bed. Understanding how light and shadow interact with these forms is crucial for conveying softness.
- Pillow Compression: Pillows aren’t rigid. Show subtle indentations where they meet the headboard or other pillows.
- Material Textures: A silky sheet will drape differently than a thick wool blanket. Suggest these textures through your line work and shading. For instance, subtle cross-hatching can suggest the weave of a linen fabric.
Incorporating Specific Bed Styles
Beds come in countless designs, each with unique characteristics that offer excellent opportunities for practice in bedroom furniture illustration.
- Platform Beds: Often low to the ground with a minimalist frame, sometimes with built-in storage.
- Canopy Beds: Feature four posts that extend upwards, often with a fabric drape. This introduces interesting vertical elements and drapery challenges.
- Sleigh Beds: Characterized by a curved, rolled headboard and footboard, resembling a sleigh. These require careful rendering of curves in perspective.
- Upholstered Beds: Involve fabric-covered headboards and frames, often with tufting or button details.
Each style presents different challenges in terms of form, detail, and material representation, allowing you to continually refine your bed frame design blueprints.
Considering the Bedroom Layout and Accessories
A bed rarely exists in isolation. Integrating it into a larger scene elevates your bed drawing.
- Bedroom Layout Diagrams: Think about how the bed fits into the overall room. Where are the walls, windows, and doors? This reinforces the perspective you’ve established.
- Nightstands and Lamps: These add context and scale. Ensure they also adhere to the same perspective grid.
- Rugs: A rug beneath the bed provides a textural element and helps define the bed’s space on the floor. Remember that the rug’s pattern will also distort in perspective.
- Wall Art and Curtains: These elements help frame the bed and complete the interior design room rendering.
By thinking about the entire environment, your bed drawing becomes a more compelling and believable piece of art.
Common Pitfalls: Things People Usually Miss in Bed Drawing
Even experienced artists can overlook subtle details that diminish the realism of a bed drawing. Being aware of these common pitfalls can significantly improve your results.
Ignoring or Misinterpreting Perspective
This is arguably the most common and impactful mistake. A bed that doesn’t correctly recede into space looks like it’s floating, tilted, or squashed. Even minor errors in the vanishing points or the angle of receding lines can throw off the entire drawing. The bottom line is, if your initial cuboid isn’t in perspective, nothing else will be. Always double-check your guide lines before committing to details.
Making Bedding Look Stiff or Unrealistic
Fabric has weight, drapes, and wrinkles. A common error is drawing blankets and pillows as rigid, perfectly smooth rectangles. This robs the bed of its inviting softness. People often miss:
- The natural sag of a mattress or pillow under gravity.
- The way a sheet bunches when pulled tight, or folds loosely when draped.
- The subtle indentations left by a body or the weight of other bedding.
Observe real blankets and pillows to see how they behave. Focus on flowing lines and organic forms rather than sharp angles for soft elements.
Inconsistent Proportions
Sometimes, artists focus too much on details and forget the overall proportions. A headboard that’s too small for the mattress, or a mattress that’s too thin for the frame, can make the bed look cartoonish or unstable. Always compare the sizes of components against each other. Is the pillow half the height of the headboard? Is the duvet thickness proportional to the mattress height? These proportional checks are critical for believable bedroom furniture illustrations.
Lack of Variety in Bed Styles and Textures
Many beginner bed drawings can look generic because they stick to a single, simple frame and basic bedding. Not exploring different bed frame design blueprints—like a platform bed versus a four-poster, or an upholstered headboard versus a wrought-iron one—misses opportunities to practice diverse forms and textures. Similarly, failing to suggest material differences (e.g., distinguishing between crisp cotton sheets and a plush velvet comforter) makes the drawing less engaging.
Flatness Due to Insufficient Shading and Lighting
A drawing without proper shading lacks depth and dimension. If you don’t define a clear light source and render the corresponding shadows and highlights, your bed will appear flat and two-dimensional. This often includes:
- Neglecting cast shadows from pillows onto the bed, or from the bed onto the floor.
- Not showing the subtle shifts in tone on curved surfaces like pillows or draped fabric.
- Using a uniform shade of gray instead of a full range of values from darkest darks to brightest highlights.
Proper shading is what transforms your initial line drawing into a volumetric object existing in space.
Practice Makes Perfect: Exercises to Improve Your Skills
Consistent practice is the most effective way to improve your bed drawing skills. These exercises are designed to target different aspects of your artistic development.
Drawing Beds from Different Angles
Don’t get stuck drawing the same frontal view. Challenge yourself by sketching beds from:
- High Angle (Bird’s Eye View): Emphasizes the top surface, mattress, and pillows, offering a unique perspective for bedroom layout diagrams.
- Low Angle (Worm’s Eye View): Makes the bed appear grander and more imposing, focusing on the underside of the frame and legs.
- Extreme Angles: Experiment with very sharp two-point perspectives, where one side of the bed is much more foreshortened than the other.
This helps solidify your understanding of how perspective works in varied situations.
Experimenting with Various Materials and Textures
Practice rendering different materials found in a bed drawing:
- Wood Grain: Use subtle lines and shading to suggest the texture of a wooden headboard or frame.
- Upholstered Fabric: Focus on the softness, folds, and potentially tufted details of a fabric headboard.
- Metal: For a wrought-iron or brass bed frame, emphasize reflective surfaces and clean lines.
- Bedding: Sketch different types of fabric – thick duvets, thin sheets, plush throws. Each will have distinct characteristics in how it drapes and folds.
This builds your visual vocabulary for interior design room rendering.
Sketching from Reference Photos and Life
One of the best ways to improve is to draw what you see.
- Reference Photos: Find high-quality images of beds online (Pinterest, architectural photography sites) and try to replicate them. Pay close attention to lighting, shadows, and how the fabric behaves.
- Drawing from Life: If you have a bed in front of you, sketch it! This provides invaluable real-world observation practice, helping you understand how light truly falls and how forms exist in three dimensions. Don’t just draw the outline; try to understand its structure.
This direct observation is key to making your bed sketches more realistic.
Speed Sketching
Set a timer (e.g., 2, 5, or 10 minutes) and try to capture the essence of a bed drawing quickly. This exercise isn’t about perfection; it’s about training your eye to see major forms, proportions, and perspective rapidly. It helps loosen your hand and improves your ability to identify the most crucial elements in a short amount of time, a valuable skill for any artist or designer creating quick bedroom layout diagrams.
Frequently Asked Questions About Bed Drawing
You’ve got questions about how to sketch a bed, and we’ve got answers. Here are some of the most common inquiries aspiring artists have:
How do I make my bed drawing look realistic?
Realism in a bed drawing comes from a combination of accurate perspective, correct proportions, and detailed rendering of light, shadow, and texture.
- Master Perspective: Ensure your bed adheres strictly to one-point or two-point perspective.
- Observe Details: Pay attention to how pillows compress, how sheets wrinkle, and how light creates subtle shifts in tone on fabric.
- Use a Full Value Range: Don’t be afraid to use darks and brights to create depth.
- Practice Regularly: The more you draw from life and reference photos, the better your eye will become.
What’s the easiest way to draw a bed in perspective?
The easiest way is to start with a simple cuboid (rectangular box) that represents the entire volume of the bed.
- Establish your horizon line and vanishing points.
- Draw the front vertical edge of your bed.
- Extend lines from the top and bottom of that edge to your vanishing points.
- Complete the box by adding the other vertical edges and connecting lines, ensuring all receding lines go to the correct vanishing point.
- Once this basic bed frame is solid, you can add the mattress, headboard, and bedding within that established framework.
This method ensures your bed drawing remains consistently in perspective from the start.
How do you draw a bed from above (plan view)?
Drawing a bed from above (a plan view or top-down perspective) doesn’t involve vanishing points in the traditional sense, as you’re looking directly down.
- Start with a simple rectangle for the mattress.
- Add a slightly larger rectangle around it for the bed frame.
- Draw a rectangle for the headboard at one end, and a smaller one for the footboard if present.
- Sketch in pillows as rounded rectangles or ovals at the top.
- Indicate bedding with flowing, simplified lines to suggest folds or drapes. This view is crucial for creating accurate floor plans or bedroom layout diagrams in architecture or interior design.
What kind of pencils are best for bed sketches?
A good range of graphite pencils is ideal for bed sketches.
- HB: For initial light outlines and guide lines.
- 2B/4B: For refining contours, adding mid-tones, and basic shading.
- 6B/8B: For deep shadows, creating strong contrast, and rich dark areas that add significant depth to your bed drawing.
A kneaded eraser is also invaluable for lifting graphite gently and cleaning up without smudging. For adding color or ink, consider high-quality fineliner pens for precision or even a Tul pen for consistent lines.
How do I draw wrinkles and folds in bedding convincingly?
Drawing realistic wrinkles and folds requires observation and understanding of form.
- Study Reference: Look at real blankets and pillows. Notice where folds naturally occur (where fabric gathers, drapes, or is compressed).
- Think in 3D: Folds are not just lines; they are valleys and ridges. Use shading to show the light side and the shadow side of each fold, giving it volume.
- Vary Line Weight: Use darker, sharper lines for the edges of deep folds and lighter, softer lines for subtle creases.
- Avoid Repetition: Don’t draw identical wrinkles. Make them varied and organic.
Practice drawing fabric studies specifically to improve this skill for your bedroom furniture illustration guide.
Mastering the art of bed drawing is a deeply rewarding endeavor that hones your understanding of perspective, form, and texture. From laying down the initial structural cuboid to delicately rendering the folds of a duvet, each step in this process builds not just a drawing, but a fundamental skillset applicable to countless other subjects. Remember that every artist, regardless of their current proficiency in 2026, started with the basics. The key isn’t perfection from the first line, but consistent practice and a keen eye for observation. So, grab your pencils, set up your vanishing points, and unleash your creative skills. You’ll soon find yourself creating mesmerizing bed sketches that not only impress but also solidify your foundational artistic abilities. Keep sketching, keep observing, and enjoy the journey of bringing these essential elements of interior design to life on your page.


