If you’re looking to infuse your wardrobe with unparalleled individuality and discover captivating hand embroidery designs on shirts, you’re exploring a craft that seamlessly blends tradition with contemporary style. In 2026, personalized fashion isn’t just a trend; it’s a statement about unique expression and conscious consumption. While many think of large-scale embroidered pictures for home decor, applying this intricate art to your garments offers a different kind of canvas—one that moves with you and tells your story. This guide delves into the practicalities and creative inspirations behind transforming ordinary shirts into wearable art, ensuring your efforts result in professional-looking, durable designs.
Why Choose Hand Embroidery for Your Shirts?

Hand embroidery offers an unmatched level of personalization and charm that mass-produced garments simply can’t replicate. It’s a deliberate act of creation, adding a unique signature to your clothing. This craft allows you to express your personality, interests, or even a subtle message directly onto your fabric canvas.
The Enduring Appeal of Unique Expression
In a world increasingly dominated by fast fashion, hand-embroidered shirts stand out. Each stitch carries the mark of the maker, transforming a simple garment into a one-of-a-kind piece. Whether it’s a small, intricate detail on a collar or a larger, bold design across the back, the uniqueness factor is undeniable. People appreciate the artistry and effort involved, making these shirts conversation starters and treasured items.
Sustainable Fashion and Mindful Crafting
Choosing to hand embroider your shirts also aligns with sustainable fashion practices. Instead of constantly buying new clothes, you can refresh existing garments, extend their lifespan, and reduce waste. It’s about giving new life to forgotten pieces or customizing new ones to make them truly last. This mindful approach to clothing also fosters a deeper connection to what you wear, valuing craftsmanship over disposability. For more on the broader environmental impacts of textiles, you might find resources like those from the U. S. Environmental Protection Agency insightful.
Understanding Shirt Fabrics for Embroidery Success
The fabric of your shirt is arguably the most critical factor influencing the success and appearance of your hand embroidery designs on shirts. Different fabrics behave differently under the needle, affecting stitch tension, design transfer, and overall durability. Understanding these characteristics before you start can save you a lot of frustration.
Best Fabrics for Crisp Designs
For beginners and experienced embroiderers alike, certain fabrics are more forgiving and produce excellent results:
- Cotton (Quilting Cotton, Broadcloth, Poplin): These are often considered the gold standard. They’re stable, hold stitches well, and their tight weave prevents threads from disappearing or puckering easily. They’re also readily available and come in a vast array of colors.
- Linen: Known for its natural texture and strength, linen is another excellent choice. Its slightly looser weave can be beautiful for certain design styles, adding an organic feel. However, ensure it’s a medium-weight linen; very fine linen can be more challenging.
- Denim: Durable and sturdy, denim is fantastic for hand embroidery, especially for bolder or more rustic designs. Its weight provides a stable base, preventing distortion even with denser stitching.
Challenging Fabrics and How to Approach Them
Some fabrics require a more considered approach:
- Jersey Knits and T-Shirt Material: These fabrics are stretchy, which can make embroidery tricky. Stitches can pull and distort the fabric. You’ll almost always need a good stabilizer (more on this later) to prevent stretching and help maintain design integrity.
- Silk and Rayon: While beautiful, these slippery, delicate fabrics can fray easily and are challenging to hoop securely without leaving marks. Use a very fine needle and a light touch. A water-soluble stabilizer can be invaluable here.
- Very Thin or Sheer Fabrics (Voile, Chiffon): These are advanced choices. The embroidery can become heavy and pull the fabric, and knots or ends might show through. Often, you’d choose very delicate, sparse designs for these, or use a backing fabric.
Fabric Preparation: Washing, Ironing, and Stabilization
Proper preparation is non-negotiable:
- Wash and Dry: Always pre-wash your shirt. Fabrics can shrink, and dyes can bleed. Pre-washing ensures your embroidery won’t pucker or get distorted after the first wash, and prevents unexpected color transfer.
- Iron Smooth: A crisp, smooth surface is essential. Iron out all wrinkles before you begin, as wrinkles can lead to uneven stitching and distorted designs.
- Stabilize: For most shirt fabrics, especially knits or anything with a medium to light weight, a stabilizer is your best friend. This material, placed behind the embroidery area, provides support, prevents puckering, and helps maintain the fabric’s original shape. There are various types, including tear-away, cut-away, and wash-away, each suited for different fabric weights and project needs.
Essential Tools and Materials for Shirt Embroidery
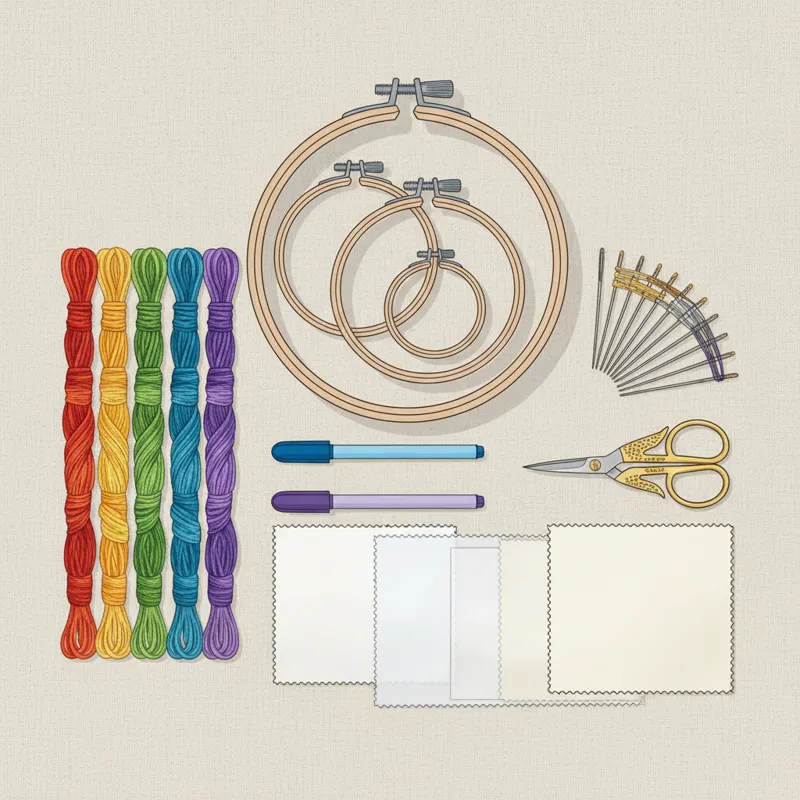
Having the right tools makes all the difference in achieving professional-looking hand embroidery designs on shirts. Quality tools not only make the process easier but also contribute to the longevity and appearance of your finished piece.
Needles and Hoops: Your Core Companions
- Embroidery Needles: These are sharper than regular sewing needles and come in various sizes (from 1 to 12). Lower numbers mean thicker needles. For shirts, a size 7-9 is generally versatile, but match the needle size to your fabric and thread thickness. Finer fabrics and threads need finer needles.
- Embroidery Hoops: Hoops keep your fabric taut, preventing puckering and making stitches even. Wooden hoops are traditional, but plastic ones are also common. Choose a hoop size that comfortably fits your design, allowing some extra fabric around the edges for secure hooping. Ensure the hoop is clean and smooth to avoid marking your fabric.
Threads: A Spectrum of Color and Texture
The thread you choose significantly impacts the aesthetic of your hand embroidery designs on shirts.
- Cotton Embroidery Floss (DMC, Anchor): This is the most popular choice, made of six divisible strands. You can use all six for a bold, thick line, or separate them for finer, more delicate work. It’s colorfast and durable.
- Perle Cotton: This thread is non-divisible, has a lovely sheen, and comes in different weights (e.g., #5, #8, #12). It’s excellent for creating texture and bolder outlines.
- Specialty Threads: Consider silk, rayon, or even metallic threads for added luxury or sparkle. Be aware that these can be more challenging to work with due to their slipperiness or tendency to fray.
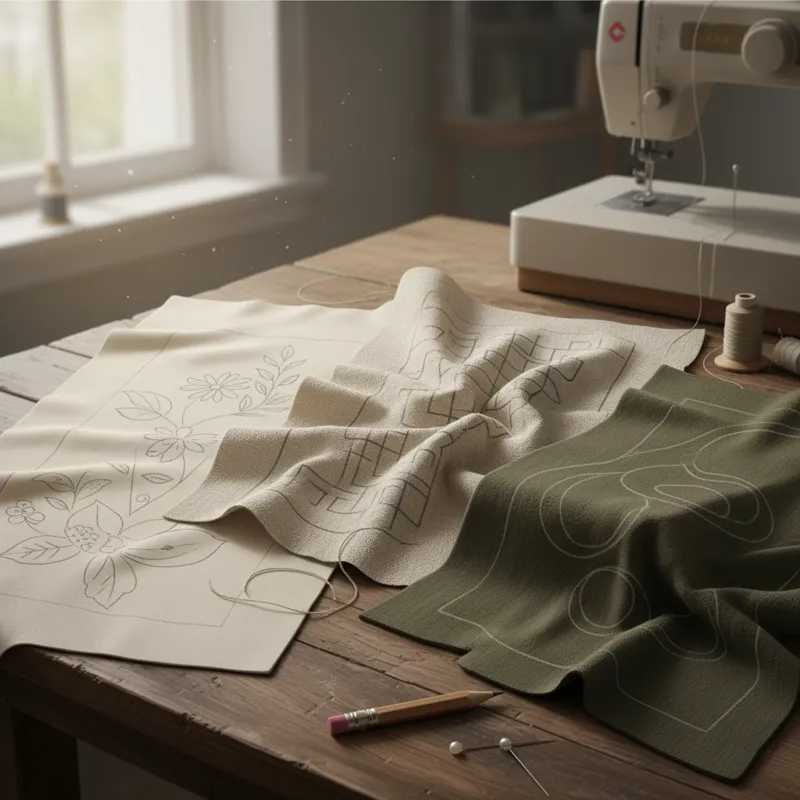
Design Transfer Methods
Getting your design accurately onto the shirt fabric is crucial.
- Water-Soluble Pens/Pencils: These draw directly onto the fabric, and the lines disappear with water or heat. Always test on a scrap piece of your fabric first.
- Heat Transfer Pens/Pencils: These leave a permanent, iron-on line. Be cautious; the line won’t wash out, so your stitches must cover it completely.
- Tracing Paper and Light Box: For lighter fabrics, you can place the design underneath the fabric and trace it with a fabric marker.
- Stick-and-Stitch Stabilizer: This is a game-changer for many. You print your design onto a special adhesive, water-soluble stabilizer, stick it to your shirt, embroider over it, and then rinse it away. It’s particularly useful for intricate designs or dark fabrics.
Stabilizers: The Unsung Heroes
As mentioned earlier, stabilizers provide crucial support.
- Tear-Away: Ideal for woven fabrics, it provides temporary support and is easily torn away after stitching.
- Cut-Away: Best for stretchy knits, it offers permanent support and helps maintain the fabric’s shape, preventing distortion over time. You trim the excess after finishing.
- Wash-Away (Water-Soluble): Available in film or fabric-like sheets, these dissolve completely in water, leaving no trace. Perfect for delicate fabrics or when no stabilizer residue is desired.
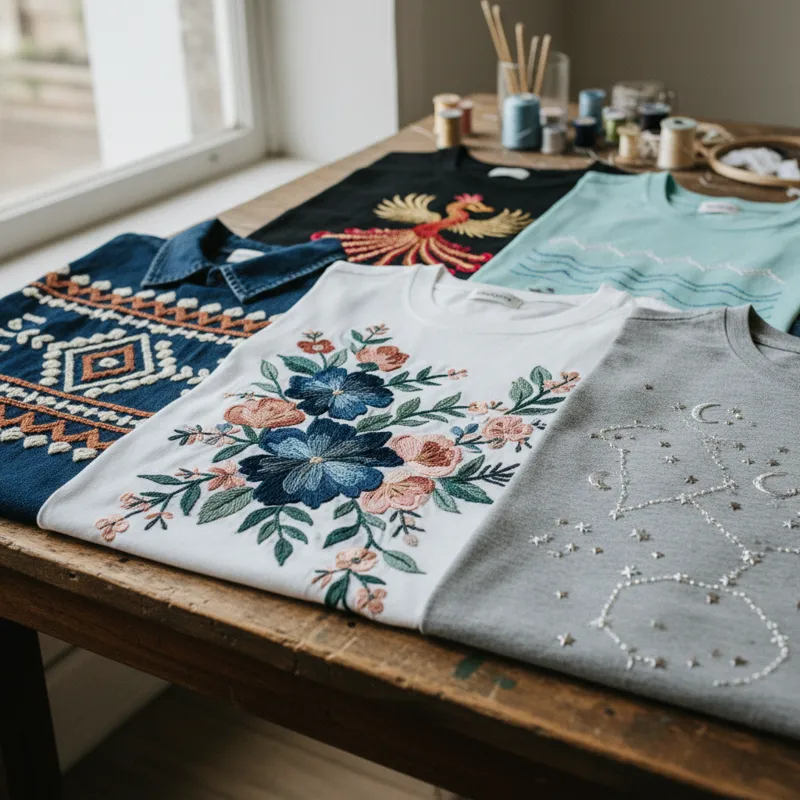
Popular Hand Embroidery Designs for Shirts in 2026
The landscape of hand embroidery designs on shirts is constantly evolving, with a strong lean towards unique, personal expressions. In 2026, we see a blend of classic motifs, contemporary minimalism, and nature-inspired themes taking center stage.
Minimalist and Subtle Accents
Less is often more, especially for everyday wear.
- Single Line Art: Simple outlines of faces, geometric shapes, or continuous line drawings offer a modern, understated elegance. Think a single, flowing line creating a delicate silhouette on a crisp white shirt.
- Small Monograms or Initials: A classic that never fades. Embroidering your initial or a loved one’s on a cuff, pocket, or collar adds a sophisticated, personal touch.
- Tiny Motifs: A small star, a single delicate flower, a tiny bee, or a heart placed discreetly on a shirt placket, collar tip, or near the hem. These add charm without overwhelming the garment.
Bold Statements and Feature Designs
For those who want their shirts to truly stand out.
- Large Back Pieces: The back of a denim jacket or a sturdy cotton shirt provides a fantastic canvas for expansive designs – intricate florals, illustrative scenes, or even abstract patterns. Consider how this can transform the garment, much like an embroidered tapestry transforms a wall.
- Abstract Color Blocks or Geometric Shapes: Using a variety of stitches and thread colors to create impactful, modern designs. These can be particularly striking on plain, solid-colored shirts.
- “Word Art” or Phrases: Short, impactful words or phrases embroidered in an appealing font. This can be playful, inspiring, or a subtle nod to pop culture.
Nature-Inspired Motifs
Always a popular choice, drawing inspiration from the natural world.
- Botanicals: From delicate wildflowers scattered across a yoke to a single, bold rose on a pocket, floral designs are timeless. Consider native flora for a regional touch.
- Foliage and Vines: Cascading leaves, trailing vines, or a subtle leaf pattern around a neckline can add an organic, flowing feel.
- Animals and Insects: Small, realistic, or stylized animals (like a fox on a lapel, a bird on a shoulder) or insects (bees, butterflies, ladybugs) bring life to a shirt. These can be surprisingly detailed, similar to the intricate work seen in embroidered canvas art.
Geometric and Abstract Patterns
For a contemporary and artistic flair.
- Mandala-Inspired Designs: Symmetrical, intricate circular patterns can be mesmerizing, often using a variety of stitches to build texture and depth.
- Abstract Swirls and Shapes: Organic or sharp geometric forms that don’t represent anything specific but add visual interest through color and line.
- Border Patterns: Repeating patterns along hems, cuffs, or collars, offering a refined finish.
Personalized Text and Monograms
Beyond initials, this category allows for truly unique expressions.
- Custom Quotes: A meaningful quote or inside joke subtly stitched on the inside placket or visible on the outside.
- Names and Dates: Commemorate special occasions, friendships, or family ties with embroidered names and dates.
- Pet Portraits: Miniaturized, stylized portraits of beloved pets, often appearing on pockets or chest areas.
Strategic Placement: Where to Embroider on Your Shirt
The impact of your hand embroidery designs on shirts is heavily influenced by where you place them. Strategic placement enhances the design, complements the garment’s structure, and dictates the overall statement you’re making.
Collar and Cuffs: Classic Elegance
These areas are fantastic for subtle, sophisticated details.
- Collar Tips: Small flowers, initials, stars, or simple geometric patterns add an unexpected pop when the collar is open or folded.
- Under the Collar: For a hidden surprise, embroider a meaningful phrase or design that’s only visible when the collar is popped or lifted.
- Cuffs: A line of delicate stitching, a small initial, or a tiny motif on one or both cuffs offers a refined touch that’s often admired up close.
Pockets and Plackets: Subtle Details
These functional areas can become focal points.
- Chest Pockets: The corner of a pocket is perfect for small, whimsical designs like a tiny planet, a whimsical animal, or a minimalist floral spray. The whole pocket can also be a canvas for an embroidery patch design, stitched directly onto the fabric.
- Placket: The strip of fabric where buttonholes are located. A thin, vertical design or a series of small, spaced motifs can draw the eye and add interest without being overpowering.
Yoke and Back: Broad Canvases
For making a bolder statement.
- Yoke: The fabric panel across the upper back of a shirt is an ideal spot for a design that spans the shoulders or cascades down. This area offers a flatter surface than curved parts of the shirt.
- Full Back: Especially on denim or sturdy cotton shirts, the entire back can become a mural for large, intricate designs – think a sprawling botanical scene, a detailed landscape, or an elaborate text piece. This placement makes the shirt a true statement piece.
Sleeve Hems and Shoulders: Unexpected Flair
These spots offer opportunities for playful or unique placements.
- Sleeve Hems: A continuous border design or small, repeating motifs around the bottom edge of a sleeve can add a distinct character.
- Shoulders: A delicate vine trailing from the shoulder seam, a cluster of stars, or a small, symbolic design can add an artistic flair, drawing attention to the upper body. This works well on casual tops and blouses.
Stitching Techniques for Shirt Embroidery
The magic of hand embroidery designs on shirts truly comes alive through the stitches you choose. Mastering a few fundamental stitches and experimenting with more advanced ones will open up a world of creative possibilities.
Foundational Stitches Every Beginner Needs
These stitches form the backbone of most embroidery projects and are excellent starting points for shirt embellishment.
- Running Stitch: The simplest stitch, creating a dashed line. Great for outlines or filling in large areas with texture.
- Backstitch: Creates a solid, continuous line. Perfect for outlines, text, and fine details. It’s often the first stitch people learn after the running stitch.
- Stem Stitch: Forms a rope-like, slightly raised line. Excellent for stems of flowers, delicate outlines, and creating flowing curves.
- Satin Stitch: Used for filling in shapes smoothly. Stitches lie close together, creating a solid block of color with a beautiful sheen. Requires precision to look neat.
- French Knot: A small, textured knot that adds dimension. Perfect for flower centers, eyes, or creating a dotted pattern.
- Chain Stitch: Creates a series of interlocking loops, resembling a chain. Good for outlines, borders, and bold lines.
Adding Texture and Dimension with Advanced Stitches
Once you’re comfortable with the basics, these stitches can elevate your designs.
- Lazy Daisy Stitch (Detached Chain Stitch): Creates individual, petal-like loops. Ideal for making small flowers, leaves, or scalloped edges.
- Fly Stitch: Forms a V-shape, often used for leaves, feathers, or as a decorative border.
- Feather Stitch: A branching, open stitch that works beautifully for creating organic textures, leaves, or a soft, feathery look.
- Woven Wheel Stitch: Creates a circular, raised, woven effect. Fantastic for realistic roses or other dimensional flower centers.
- Long and Short Stitch: A versatile filling stitch that allows for smooth color blending, making it ideal for realistic portrayals of animals, flowers, or shading effects.
Things People Usually Miss: Common Pitfalls in Shirt Embroidery
Embroidery on shirts comes with its own set of challenges, and even experienced crafters can overlook certain details. Addressing these common pitfalls beforehand ensures a smoother process and a more satisfying finished product.
Overlooking Fabric Stretch and Weight
This is perhaps the most frequent oversight. A shirt isn’t a static piece of fabric; it moves, stretches, and drapes.
- The Mistake: Treating a stretchy knit t-shirt the same way you’d treat a crisp cotton broadcloth. This often leads to designs that distort, pucker, or look lumpy when the shirt is worn.
- The Fix: Always consider the fabric’s natural properties. For stretchy fabrics, choose designs with lower stitch density, use a robust cut-away stabilizer, and avoid pulling the fabric too taut in the hoop. For heavy fabrics like denim, ensure your needle is strong enough to pass through without bending.
Skipping Proper Stabilization
Many beginners see stabilizers as an optional extra, but they are fundamental for good results on most shirt fabrics.
- The Mistake: Not using any stabilizer, or using the wrong type, leading to puckering, sagging, and stitches sinking into the fabric.
- The Fix: Always use a stabilizer, especially on light to medium-weight woven fabrics and almost always on knits. Match the stabilizer to your fabric and design density. A good cut-away stabilizer for knits or a tear-away for wovens will make a significant difference. You might find a guide on different stabilizer types from textile craft resources like Wikipedia’s entry on embroidery stabilizers helpful.
Rushing the Design Transfer
The excitement of starting can sometimes lead to shortcuts in preparing the design.
- The Mistake: Using an unreliable transfer method, drawing a design freehand without confidence, or not checking if the transfer lines will wash out. This can result in crooked designs or permanent, visible lines.
- The Fix: Invest in quality fabric pens or use the stick-and-stitch method for accuracy. Take your time to position the design perfectly. Always test transfer methods on a scrap of your shirt fabric to ensure lines disappear as expected.
Forgetting About the Garment’s Future Wash and Wear
An embroidered shirt will likely be worn and washed regularly.
- The Mistake: Not properly securing thread ends, using non-colorfast threads, or using too many loose, raised stitches that can snag easily. This leads to unraveling designs, faded colors, or damaged embroidery after washing.
- The Fix: Always secure your thread ends with small, neat knots or by weaving them securely into the back of your stitches. Use colorfast embroidery floss (most reputable brands are). Choose stitches appropriate for everyday wear; while highly dimensional stitches are beautiful, they may not be ideal for a shirt that goes through a heavy wash cycle frequently.
Caring for Your Embroidered Shirts
Once you’ve invested time and effort into creating beautiful hand embroidery designs on shirts, proper care is essential to ensure they last. Thoughtful washing and storage will keep your unique creations looking fresh and vibrant for years.
- Hand Wash Gently: For most hand-embroidered items, hand washing in cool water with a mild detergent is the safest option. Turn the shirt inside out to protect the embroidery. Avoid harsh scrubbing or twisting, which can distort stitches.
- Machine Wash (with precautions): If you must machine wash, turn the shirt inside out and place it in a mesh laundry bag. Use a delicate cycle with cold water and a mild detergent. Avoid hot water, which can shrink fabric or cause colors to bleed.
- Avoid Harsh Chemicals: Do not use bleach or strong stain removers directly on the embroidery. If you need to treat a stain, do so gently and test any product on an inconspicuous area first.
- Air Dry Flat: Lay your embroidered shirt flat on a clean towel or hang it on a padded hanger to air dry. Avoid machine drying if possible, as the high heat can shrink the fabric, distort the embroidery, or damage delicate threads. If using a dryer is unavoidable, use the lowest heat setting and remove while still slightly damp.
- Ironing: If ironing is needed, iron the shirt inside out, with a pressing cloth over the embroidery, using a low to medium heat setting. This protects the stitches and prevents them from flattening.
- Storage: Store embroidered shirts folded or hung carefully to prevent the embroidery from snagging on other garments.
Frequently Asked Questions (FAQ) About Hand Embroidery on Shirts
Here are some common questions people have when exploring hand embroidery designs on shirts.
How long does hand embroidery on a shirt take?
The time commitment varies wildly depending on the design’s complexity, size, and your skill level. A small, simple initial might take 15-30 minutes, while a detailed, full-back floral piece could easily require 20-50 hours or more. It’s a process that rewards patience.
Can I hand embroider on stretchy shirts?
Yes, you absolutely can, but it requires careful preparation. Always use a cut-away stabilizer, which provides permanent support and prevents the fabric from stretching and puckering as you stitch. Keep your stitch density moderate to avoid making the embroidered area too stiff.
What’s the best thread for shirt embroidery?
Cotton embroidery floss (like DMC or Anchor) is generally the best choice. It’s durable, colorfast, widely available, and comes in a huge range of colors. For a slightly bolder look, Perle cotton can also work well.
Will hand embroidery damage my shirt?
When done correctly, hand embroidery should not damage your shirt. Using the right needle size for your fabric, avoiding pulling stitches too tight, and using a stabilizer all help protect the fabric’s integrity. Incorrect technique can lead to puckering or small holes, but these are preventable.
How do I wash an embroidered shirt?
For the longest life, hand wash your embroidered shirts inside out in cool water with a mild detergent, then air dry flat. If machine washing, use a delicate cycle, cold water, inside out in a mesh bag, and air dry. Avoid harsh chemicals and high heat.
Is hand embroidery durable on everyday shirts?
Yes, hand embroidery can be very durable, especially when using quality threads and appropriate stitches. Stitches like backstitch, stem stitch, and satin stitch are generally robust. Proper care, as outlined above, will significantly extend the life and appearance of your embroidered designs, making them perfectly suitable for everyday wear.
Hand embroidery designs on shirts offer a rewarding way to personalize your wardrobe and express your creativity. From selecting the right fabric and tools to mastering various stitches and caring for your finished piece, each step contributes to creating a unique garment that stands apart. Embrace the process, enjoy the meditative rhythm of stitching, and wear your custom creations with pride.


