Embroidered canvas represents a fascinating intersection of traditional textile art and modern creative expression. It’s an art form where a needle and thread transform a plain fabric surface into a textured, visually rich piece. Whether you’re aiming to create a delicate wall hanging, personalize a sturdy tote bag, or develop intricate fine art, understanding the nuances of the materials and techniques involved is key. This guide will take a deep dive into everything you need to know about working with embroidered canvas, from selecting the ideal base fabric and threads to mastering stitches and displaying your finished artwork. We’ll explore the options available in 2026, helping you choose the best supplies and methods to bring your unique vision to life.
Understanding Embroidered Canvas: More Than Just a Surface
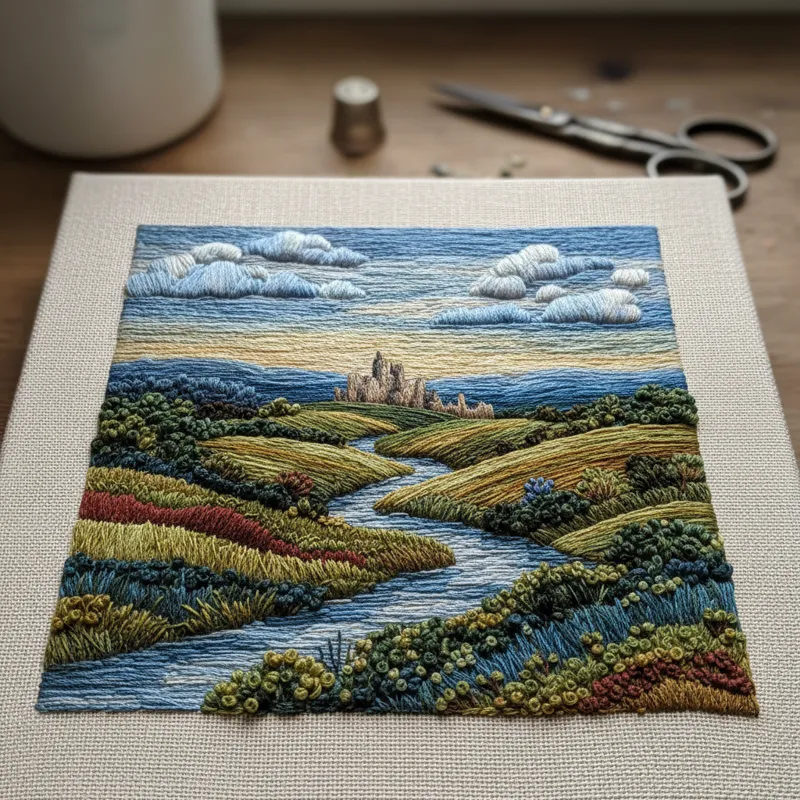
At its core, embroidered canvas involves using various stitches with a needle and thread to create patterns, images, or textures on a woven fabric known as canvas. This isn’t always the rigid, pre-primed painter’s canvas, though that’s certainly a viable option for specific projects. More broadly, ‘canvas’ in embroidery often refers to a sturdy, closely woven fabric that provides a robust foundation for needlework. The beauty of embroidered pictures and artwork lies in its tactile quality and depth, something paint alone can’t quite replicate.
The history of embroidery stretches back millennia, with examples found in ancient Egypt, China, and Europe. Early forms often adorned clothing and religious artifacts. As techniques evolved and materials became more accessible, embroidery blossomed into a versatile craft and art form. Today, the appeal of embroidered canvas is multifaceted: it offers a meditative creative outlet, a way to personalize everyday items, and a medium for producing unique, gallery-worthy textile art. Unlike traditional needlepoint, which typically uses a grid-like mesh canvas and specific tent stitches to fill every hole, general embroidered canvas allows for much more freedom in stitch type, coverage, and the texture of the base fabric itself.
Why Choose Canvas for Your Embroidery?
Canvas fabrics, whether cotton, linen, or blends, offer several distinct advantages for embroidery:
- Durability: Canvas is inherently strong and can withstand the tension of numerous stitches and repeated handling. This makes it ideal for items that see wear, like bags or cushions, as well as framed art designed to last.
- Stability: Its tight weave minimizes distortion, keeping your design true to form as you work. This is particularly helpful for larger or more intricate pieces.
- Texture: The natural texture of canvas can add an organic depth to your embroidery, complementing the stitches rather than simply serving as a blank slate.
- Versatility: From fine, detailed work to bold, chunky designs, canvas can accommodate a wide range of threads and techniques.
Choosing Your Canvas: The Foundation of Your Project
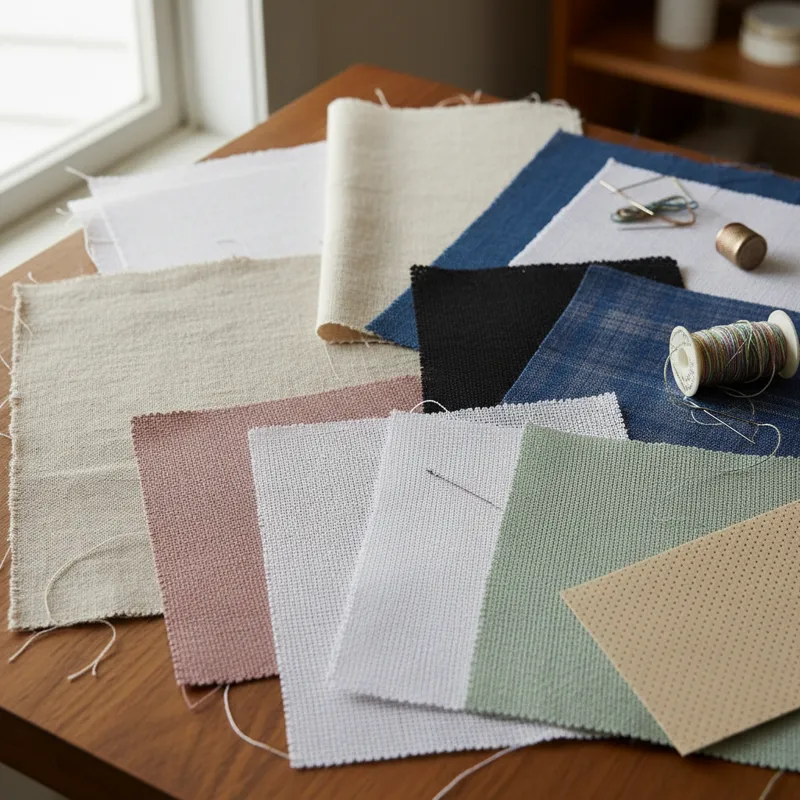
The term “canvas” can be surprisingly broad when it comes to embroidery. Your choice of fabric significantly impacts the final look, feel, and even the ease of your project. Think about what you want your finished piece to be: a soft wall hanging, a durable accent pillow, or a finely detailed art piece.
Common Types of Canvas Fabric for Embroidery
- Cotton Canvas: This is perhaps the most popular and accessible option.
- Pros: Affordable, widely available, easy to work with, comes in various weights and weaves. It takes dye well and provides a stable surface.
- Cons: Can sometimes fray more easily than linen, and lower-quality cottons might have inconsistent weaves.
- Best for: Beginners, practice pieces, tote bags, patches, and general decorative embroidery. Often, a medium-weight cotton duck canvas works wonderfully for projects needing resilience.
- Linen Canvas: A more luxurious and traditional choice, often favored by artists.
- Pros: Known for its strength, natural luster, and characteristic slubs (slight irregularities in the weave) that add unique texture. Linen becomes softer with age and washing. It’s highly durable and resistant to stretching.
- Cons: Generally more expensive than cotton, can be harder to find in a wide variety of colors, and the slubs might be challenging for very precise, uniform stitches.
- Best for: Fine art embroidery, heirloom pieces, crewel embroidery (which often uses wool threads on linen), and pieces where the fabric itself is part of the aesthetic.
- Aida Cloth and Evenweave Fabrics: While technically not “canvas” in the same woven sense as cotton or linen, these are commonly used for projects that mimic the full coverage often associated with needlepoint on a grid.
- Aida Cloth: Features a distinct grid of holes, making it ideal for counted cross-stitch and other counted-thread techniques. The holes guide your needle, ensuring uniform stitch placement.
- Evenweave Fabrics: Have an equal number of threads per inch in both warp and weft directions, but without the pronounced grid of Aida. This offers a smoother, more refined look while still allowing for counted-thread work over two threads. Common materials include linen, cotton, or blends.
- Best for: Cross-stitch designs, sampler work, and any embroidery where precise, counted stitches are paramount.
- Artist’s Blank Canvas (Stretched or Unstretched): For those looking to create true mixed media art.
- Considerations: These are typically primed with gesso for painting. While you can embroider directly onto them, the gesso might make piercing the fabric more difficult and can dull your needles. For best results, consider embroidering on an unstretched canvas fabric first and then stretching it over bars, or carefully selecting areas on a pre-stretched canvas that aren’t heavily primed.
- Best for: Combining embroidery with paint, mixed media wall art, or creating textile sculptures.
Weight, Weave, and Thread Count
Just like with other fabrics, canvas comes in different weights, measured in ounces per square yard (oz/yd²) or grams per square meter (GSM). A heavier canvas (e.g., 10-12 oz) will be more robust and less prone to stretching, suitable for functional items. Lighter canvases (e.g., 5-7 oz) offer more drape and are easier to manipulate for delicate designs.
The weave refers to how the threads are interlaced. A tighter, more even weave provides a smoother surface for detailed work, while a looser, more textured weave can add character and work well with thicker threads. Always check the fabric before you buy; feel it, stretch it gently to gauge its stability, and consider how your chosen embroidery floss will interact with its texture.
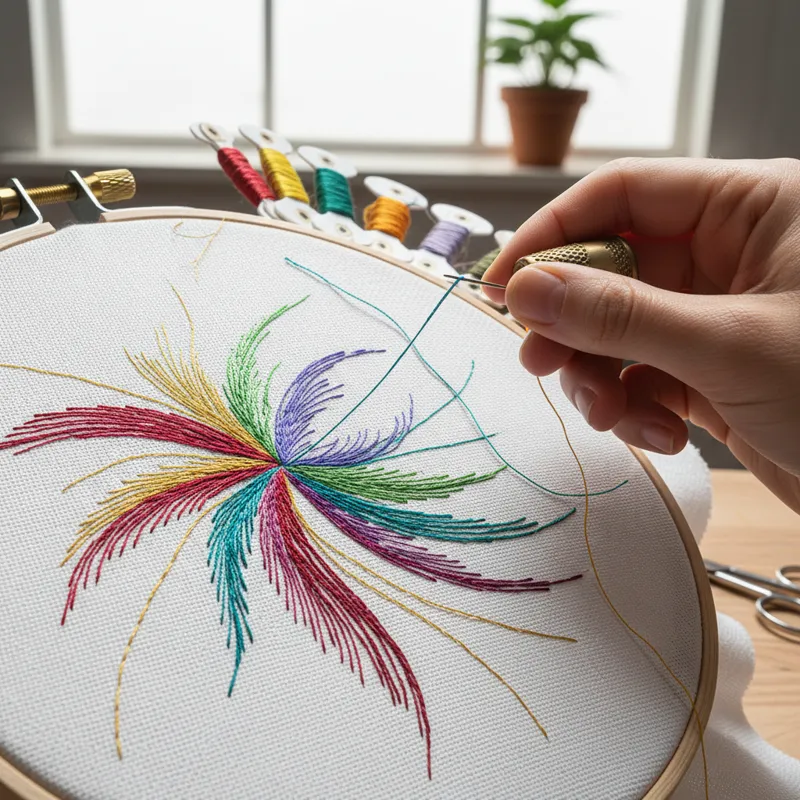
Selecting the Right Threads (Floss): Color, Texture, and Durability
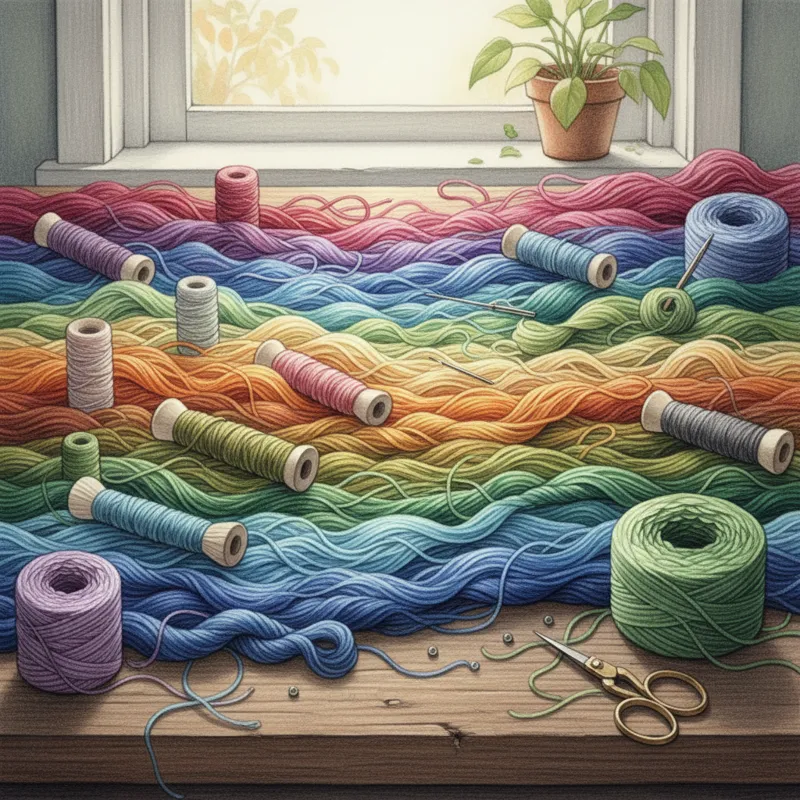
The threads you choose are the “paint” of your embroidered canvas, bringing color, texture, and dimension to your design. Each type of thread offers unique qualities that can dramatically alter the final appearance of your work.
- DMC Six-Strand Cotton Floss: The undisputed workhorse of embroidery.
- Qualities: Made from long-staple cotton, mercerized for strength and luster. Each skein consists of six easily separable strands, allowing you to vary the thickness of your stitches (e.g., using one strand for fine detail, three for medium coverage, or all six for bold texture). It’s colorfast, meaning it won’t bleed when washed.
- Best for: Virtually all types of surface embroidery, cross-stitch, and general decorative work. Its vast color range makes it incredibly versatile. You can find detailed charts and color information on resources like Wikipedia’s entry on DMC embroidery floss.
- Perle Cotton: Also known as Pearl Cotton.
- Qualities: A non-divisible, tightly twisted, lustrous cotton thread that comes in various sizes (e.g., #3, #5, #8, #12 – lower numbers are thicker). Its twist gives stitches a raised, defined appearance.
- Best for: Outline stitches, creating texture, redwork, blackwork, and projects where a distinct, slightly raised stitch is desired. It’s often used for needlepoint as well, but works beautifully on general embroidered canvas.
- Embroidery Silk: The ultimate in luxury and sheen.
- Qualities: Extremely fine, incredibly strong, and boasts a natural sheen that catches the light beautifully. Available in divisible strands or spun single strands. It can be delicate to work with but yields exquisite results.
- Best for: Heirloom pieces, fine art embroidery, delicate details, and projects where a subtle shimmer and luxurious feel are paramount.
- Wool Yarn (Crewel and Tapestry Wool): For a softer, more dimensional look.
- Crewel Wool: A fine, two-ply wool yarn, specifically designed for crewel embroidery. It offers a soft, matte finish and comes in a rich palette.
- Tapestry Wool: Thicker and usually four-ply, often used for needlepoint because it provides good coverage on mesh canvas. It can be used on open-weave canvas fabrics for a chunky, textured effect.
- Best for: Crewel embroidery, pieces requiring a soft, warm texture, filling large areas, or creating dimensional wool wall art.
- Specialty Threads: Add unique effects to your embroidered canvas.
- Metallic Threads: Add sparkle and shine but can be trickier to work with due to fraying. Use shorter lengths and consider a thread conditioner.
- Rayon and Viscose Threads: Offer a silky sheen and vibrant colors, often used for machine embroidery but also available for handwork.
- Variegated Threads: Feature multiple shades of the same color or contrasting colors within a single strand, creating interesting color shifts without changing threads.
- Blends: Cotton-silk, wool-acrylic, etc., combining the best qualities of different fibers.
Thread Care and Storage
Proper storage keeps your threads tangle-free and pristine. Use floss bobbins, storage boxes, or clear zip-top bags. Keep threads away from direct sunlight to prevent fading and away from excessive humidity to avoid mildew.
Essential Tools for Embroidered Canvas Projects
Having the right tools makes all the difference in achieving clean stitches and an enjoyable process.
Needles: The Right Point for the Right Job
Choosing the correct needle prevents fabric damage and makes stitching easier.
- Embroidery Needles (Sharps): These have a sharp point and a medium-to-long eye. They are ideal for piercing through tightly woven fabrics like cotton or linen canvas. Different sizes are available; smaller numbers indicate thicker needles. Match the needle size to your fabric and the number of thread strands you’re using.
- Tapestry Needles: Distinguished by their blunt tip and large eye. These are perfect for counted-thread work on Aida or evenweave fabrics where you pass the needle between existing fabric threads rather than piercing them. The blunt tip prevents splitting threads.
- Chenille Needles: A versatile hybrid, featuring a sharp point like an embroidery needle but a larger eye like a tapestry needle. They’re excellent for thicker threads (like perle cotton or crewel wool) on more tightly woven fabrics where you still need to pierce the material.
As a general rule, your needle’s eye should be large enough to thread easily, and the shaft should be fine enough to pass through the fabric without leaving a noticeable hole or distorting the weave. If you’re struggling to pull your thread through, you likely need a larger needle or fewer strands of floss.
Hoops and Frames: Maintaining Tension
Good fabric tension is crucial for even, consistent stitches and to prevent puckering.
- Wooden Hoops: The traditional choice, consisting of two concentric wooden rings that hold the fabric taut. They come in various sizes and depths. Look for hoops with a good quality screw mechanism for consistent tension.
- Plastic Hoops: Lighter and often less expensive than wooden ones, plastic hoops can be effective. Some have a lip or groove that helps grip the fabric.
- Q-Snaps: These are square or rectangular frames made of PVC tubing, with clips that hold the fabric taut on all four sides. Many embroiderers prefer Q-snaps because they keep the fabric flat, preventing the creasing often seen with hoops, and they’re easy to assemble and disassemble.
- Stretcher Bars: For larger, more permanent embroidered canvas pieces, stretcher bars (like those used for painting canvases) are an excellent option. You embroider on the unstretched fabric, then lace or staple it onto the assembled bars for display.
Regardless of your choice, ensure the fabric is drum-tight. If it sags, your stitches will become uneven.
Other Essential Tools
- Embroidery Scissors: Small, sharp-pointed scissors are essential for precise thread snipping. Keep them dedicated to thread to maintain their sharpness.
- Fabric Marking Tools:
- Water-soluble pens: Mark your design, and the lines wash away with water.
- Heat-erasable pens: Marks disappear with the application of heat (e.g., an iron). Always test on a scrap piece first.
- Tracing paper and pencils: A low-tech but effective method.
- Light box: Excellent for tracing designs onto lighter-colored fabrics.
- Thimble: Protects your finger when pushing needles through denser fabrics.
- Needle Threader: A simple tool that makes threading fine needles much easier.
Mastering Techniques for Your Canvas
Embroidery on canvas offers an immense range of stitch possibilities. While some techniques, like needlepoint, rely on a limited set of stitches (primarily tent stitch), surface embroidery on canvas leverages a vast stitch library to create diverse textures and effects. Learning a few fundamental stitches opens the door to countless design possibilities.
Basic Stitches for Embroidered Canvas
Even with a basic repertoire, you can create intricate and beautiful designs.
- Running Stitch: The simplest stitch, forming a dotted line. Great for outlines, light fills, and creating a dashed effect.
- Back Stitch: Creates a solid, unbroken line, perfect for detailed outlines, lettering, and strong borders. It’s formed by taking a stitch backward to meet the previous one.
- Stem Stitch: A graceful, rope-like stitch often used for curves, stems of flowers, and elegant outlines. It creates a slightly raised, textured line.
- French Knot: A small, decorative knot that adds texture and can represent dots, flower centers, or eyes. It takes a little practice to get uniform.
- Satin Stitch: Used to fill shapes completely with smooth, parallel stitches that lie close together. Achieving a truly smooth satin stitch requires even tension and consistent stitch length.
- Chain Stitch: Forms a series of interconnected loops, resembling a chain. Excellent for bold outlines, filling areas, and creating interesting textures.
Transferring Your Design
Before you stitch, you need a design on your canvas.
- Tracing: For lighter fabrics, a light box or even a sunny window allows you to trace your design directly onto the canvas using a water-soluble or heat-erasable pen.
- Iron-on Transfers: Available commercially or you can create your own with special pens/papers. These apply the design directly to the fabric with heat.
- Stenciling: Use a stencil and a fabric marking pen for repetitive patterns or specific shapes.
- Freehand: If you’re confident, you can sketch your design directly onto the canvas with a fabric pencil.
Always ensure your chosen transfer method is appropriate for your fabric and will disappear completely without leaving residue. Testing on a scrap piece of canvas is always a good practice.
Finishing Your Embroidered Canvas
Once your stitching is complete, proper finishing ensures your work looks its best and lasts.
- Washing and Pressing: Gently hand wash your finished piece in cool water with a mild detergent (unless specific threads or embellishments prohibit it). Roll it in a clean towel to remove excess water, then iron it face down on a soft towel while still damp, using the appropriate heat setting for your fabric. This smooths out any puckering and sets your stitches.
- Mounting:
- In a Hoop: Trim excess fabric, then gather and secure it to the back of the hoop with glue or running stitch. This makes a simple, ready-to-hang display.
- On Stretcher Bars: Stretch your finished embroidery over wooden stretcher bars, similar to how a painter would stretch a canvas. Use a staple gun or tacks, ensuring even tension across all sides.
- Framing: For a more formal presentation, you can mat and frame your embroidered canvas like a painting. Consider using acid-free materials to protect your artwork.
Project Ideas and Kits for Every Skill Level
The versatility of embroidered canvas means there’s a project for everyone, regardless of skill level or interest.
Starting with Kits
If you’re new to embroidery or want a structured project, kits are an excellent starting point. They typically include:
- Pre-printed or pre-stamped canvas with the design.
- All necessary threads (often pre-sorted).
- Needles.
- A hoop or frame (sometimes).
- Clear instructions.
When choosing a kit, look for one that specifies a cotton or linen canvas for general embroidery rather than strictly a pre printed needlepoint canvas if you’re aiming for surface embroidery techniques. Starter kits often focus on basic stitches, making them perfect for learning without feeling overwhelmed.
Designing Your Own Embroidered Canvas
Once you’re comfortable with the basics, designing your own pieces is incredibly rewarding.
- Inspiration: Look to nature, abstract patterns, quotes, or even photographs for inspiration. Websites like Pinterest, Instagram, and even museums’ online collections are fantastic resources.
- Sketching: Don’t be afraid to sketch out ideas directly onto your canvas or on paper first. Experiment with different colors and stitch types.
- Personalization: Embroider names, dates, or meaningful symbols onto items like baby blankets, family heirlooms, or wedding gifts. A personalized sweater embroidery idea could also translate well to a canvas patch.
Functional and Decorative Projects
Embroidered canvas isn’t just for framed art; it can also bring beauty to everyday items.
- Wall Hangings: From small, hoop-framed pieces to larger, elaborate textile art on stretcher bars, wall hangings are a classic use for embroidered canvas. They can serve as stunning focal points and are a great way to introduce unique wall art for living room nearby.
- Tote Bags and Pouches: Embroidering on canvas bags adds a unique, handmade touch and makes a statement. Choose a sturdy canvas and durable threads.
- Throw Pillows: Personalize your home decor with embroidered pillow covers. These can be simple monograms or elaborate scenes.
- Patches and Appliqués: Create embroidered canvas patches to sew onto clothing, backpacks, or other textiles.
- Mixed Media Art: Combine embroidery with painting, drawing, or other fiber arts on a single canvas for truly unique creations.
What Most People Get Wrong About Embroidered Canvas
Even experienced crafters can sometimes make avoidable mistakes when working with embroidered canvas. Understanding these common pitfalls can save you frustration and lead to better results.
- Mistaking “Canvas” for One Thing: Many assume all canvas is the same, or that embroidery canvas is identical to painter’s canvas. As discussed, there’s a wide range of fabric canvases, and using the wrong type for your project (e.g., a too-thin canvas for heavy stitches or a heavily primed painter’s canvas for delicate work) can lead to disappointment. Always consider the fabric’s weight, weave, and composition.
- Ignoring Needle Choice: Using a blunt tapestry needle on tightly woven cotton canvas will be a struggle and can damage the fabric, pushing threads apart rather than piercing cleanly. Conversely, a sharp embroidery needle on Aida cloth can split the woven squares. Matching your needle to your fabric and thread type is fundamental for smooth stitching and fabric integrity.
- Poor Tension Control (Fabric and Thread):
- Fabric: Not keeping your canvas drum-tight in its hoop or frame is a leading cause of puckering and distorted designs. Sagging fabric leads to uneven stitch tension.
- Thread: Pulling your stitches too tightly can cause the fabric to pucker and make your work look stiff or warped. Each stitch should lie flat and smoothly, without pulling the fabric out of shape.
- Overlooking Thread Type and Ply: Using the wrong thread for a specific effect, or not separating divisible floss correctly, can ruin the intended look. For instance, trying to fill a large area with a single strand of cotton floss will look sparse, while using all six strands for fine detail can appear clumsy. Understanding the qualities of DMC, Perle, wool, and specialty threads is crucial.
- Not Finishing Properly: Neglecting to wash and press your finished piece, or mounting it incorrectly, can detract significantly from its appearance. A wrinkled, un-stretched piece might look unfinished, even if the embroidery itself is perfect.
- Thinking It’s Only for “Fine Art”: While embroidered canvas can be fine art, its versatility means it’s also fantastic for practical, everyday items. Don’t limit your thinking to framed pieces; consider bags, pillows, or even adding embroidered elements to clothing. The market for textile art for sale is broad, encompassing both functional and purely decorative pieces.
Caring for Your Embroidered Canvas Art
Once you’ve invested time and effort into creating your embroidered canvas, proper care and display are essential to ensure its longevity and beauty.
Cleaning and Maintenance
- Dusting: For framed or mounted pieces, a soft brush (like a clean, dry paintbrush or a soft-bristled toothbrush) can gently remove surface dust. Use a light touch.
- Spot Cleaning: If a small area gets dirty, use a clean white cloth dampened with a very mild soap solution (like baby shampoo or a pH-neutral fabric cleanser). Blot gently; do not rub. Always test on an inconspicuous area first.
- Washing: For most cotton or linen canvas pieces with colorfast cotton or perle cotton threads, gentle hand washing is possible. Submerge the piece in cool water with a small amount of mild detergent. Swish gently, do not wring or scrub. Rinse thoroughly until the water runs clear. Roll in a clean towel to absorb excess water, then air dry flat, reshaping as needed.
- Avoid Harsh Chemicals: Never use bleach, harsh stain removers, or put delicate pieces in a washing machine or dryer, as this can damage the fabric, distort stitches, or cause colors to bleed.
Display Considerations
- UV Light: Direct sunlight and even strong indoor lighting can cause threads to fade over time. Display your embroidered canvas art away from direct light sources, or consider using UV-protective glass when framing.
- Humidity and Temperature: Extreme fluctuations in humidity can cause fabric to warp or stitches to loosen. Display in a stable environment. Avoid displaying near heat vents or in very damp areas like bathrooms.
- Framing: When framing, use acid-free matting and backing materials to prevent discoloration of the fabric over time. Ensure the embroidery isn’t pressing directly against the glass.
Storage
For pieces not currently on display or unfinished projects:
- Store flat if possible, or gently rolled around an acid-free tube.
- Place a layer of acid-free tissue paper between the embroidery and any other materials.
- Keep in a clean, dry, dark, and temperature-controlled environment, away from pests.
Frequently Asked Questions (FAQs) About Embroidered Canvas
This section addresses some common questions you might have as you embark on your embroidered canvas journey.
Is embroidered canvas hard to do?
No, not inherently. Like any craft, it requires practice, but basic stitches are quite easy to learn. Starting with a simple kit or a small design on a good quality cotton canvas with DMC floss will make the learning process enjoyable. The key is patience and not being afraid to make mistakes.
What’s the best canvas for beginners?
For surface embroidery, a medium-weight cotton canvas (like a 7-9 oz duck canvas) is often recommended. It’s affordable, durable, and stable. If you’re doing counted cross-stitch or similar techniques, 14-count Aida cloth is a popular choice for its clear grid.
Can I embroider on painted canvas?
Yes, you absolutely can! This is a fantastic way to combine painting and embroidery for mixed media art. However, be aware that heavily primed or thickly painted canvas can be harder to pierce with a needle, potentially dulling it faster. Use a sharp, strong needle (like a chenille needle) and consider painting lighter areas where you plan to embroider heavily. Testing on a scrap piece is always recommended.
How do I transfer a design to my embroidered canvas?
Common methods include tracing with a water-soluble or heat-erasable pen (especially good for lighter fabrics and using a light box), using iron-on transfers, or carefully sketching freehand with a fabric pencil. Always test your marking method on a scrap to ensure it removes completely.
What’s the difference between embroidery and needlepoint?
This is a crucial distinction, especially with “canvas” in the name.
- Needlepoint: Typically uses a specific type of mesh canvas (a stiff, open-weave fabric with uniform holes) and primarily employs tent stitches (half cross-stitch, continental, basketweave) to completely cover the canvas with wool or perle cotton threads.
- Embroidery (on canvas): Refers to a broader range of techniques where you use various stitches (running, back, satin, French knots, etc.) on a woven fabric (like cotton or linen canvas). The stitches might cover the entire surface, or they might leave portions of the fabric visible, allowing the canvas’s texture and color to be part of the design.
How do you display embroidered canvas?
The most common ways are to display it directly in the embroidery hoop it was made in, stretch it over wooden stretcher bars (like a painter’s canvas), or frame it behind glass (with a mat to ensure it doesn’t touch the glass). For functional pieces, it can be sewn onto bags, pillows, or clothing.