Custom needle point offers a unique blend of traditional craft and personal expression, allowing you to transform cherished memories, original artwork, or meaningful symbols into tactile, enduring pieces. It’s more than just a hobby; it’s a detailed journey from an initial concept to a tangible textile art form. For many, the appeal lies in creating something truly one-of-a-kind, whether as a heartfelt gift, a family heirloom, or a distinctive addition to home decor. As we move through 2026, the demand for personalized, handcrafted items continues to grow, and custom needle point stands out as a sophisticated, rewarding avenue for this artistic pursuit. This guide will walk you through everything you need to know about commissioning or creating your own bespoke needlepoint projects, ensuring quality and value.
What Exactly is Custom Needle Point?
At its core, custom needle point is the art of stitching a personalized design onto a canvas mesh using yarn. Unlike general embroidery, which involves a wide range of stitches and fabrics, needle point typically uses a single stitch type (most commonly the tent stitch, or variations like continental or basketweave) to completely cover a stiff, open-weave canvas. The “custom” aspect means the design isn’t a pre-made kit you buy off the shelf. Instead, it’s tailored specifically to your vision, whether that’s a portrait of a beloved pet, a family crest, a significant landscape, or an abstract pattern you’ve conceived.
The canvas itself comes in various mesh counts, determining the detail level and the size of the stitches. A finer mesh (e.g., 18 stitches per inch) allows for intricate details and smaller stitches, while a coarser mesh (e.g., 10 stitches per inch) results in larger, bolder stitches, often suitable for rugs or pillows. The design is either hand-painted directly onto this canvas or digitally printed, serving as a guide for your stitching. This process allows for incredible precision and customization, making each custom needle point piece unique.
Why Go Custom? The Allure of Personalized Stitches
The decision to pursue a custom needle point project often stems from a desire for something that off-the-shelf options simply can’t provide. It’s about more than just a picture; it’s about capturing sentiment, expressing identity, or creating a truly unique aesthetic statement.
Gifts That Truly Speak
Few gifts carry the emotional weight of a custom needle point piece. Imagine presenting a new parent with a canvas depicting their baby’s footprint, or a newlywed couple with a design featuring their wedding date and initials. These aren’t just decorative items; they’re tangible memories, hand-stitched with care and thought. They become instant heirlooms, deeply personal and impossible to replicate. This kind of customization elevates a gift from generic to profoundly meaningful, often evoking a stronger emotional response than something mass-produced.
Heirloom Potential
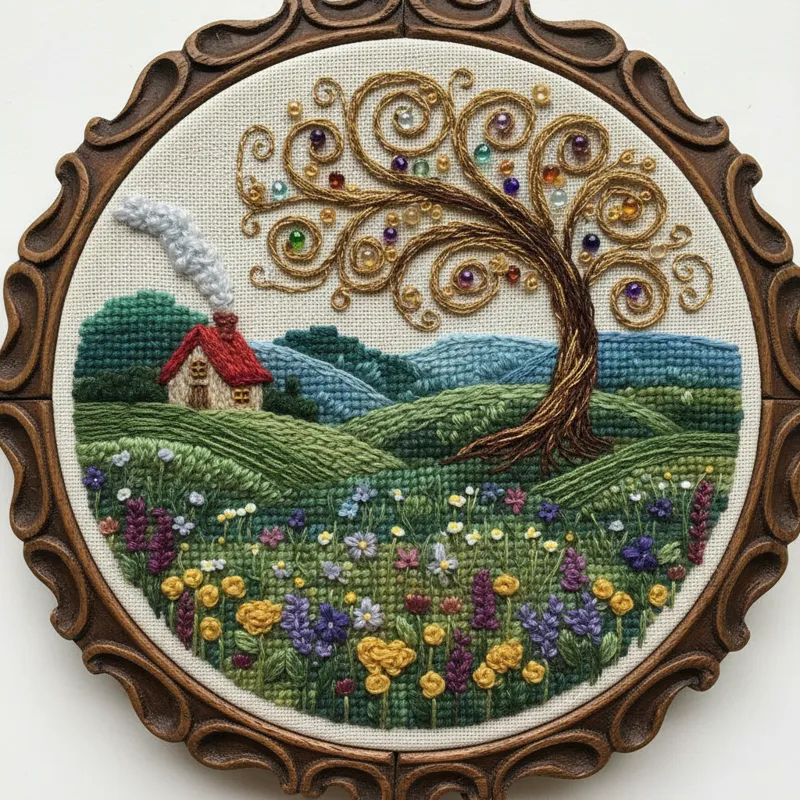
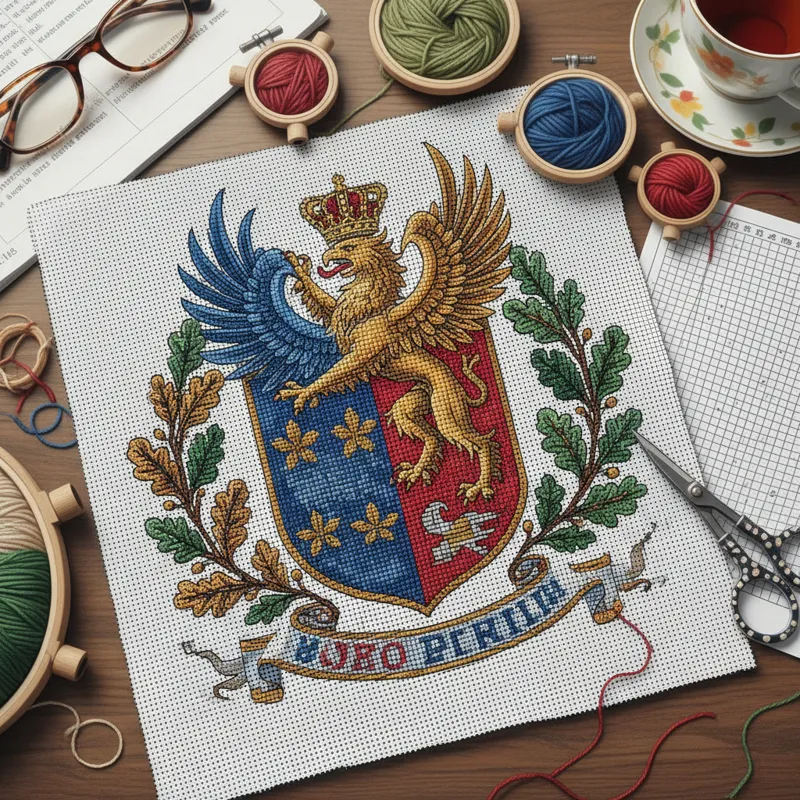
Needle point, by its nature, is durable. When stitched with quality materials and properly finished, these pieces can last for generations. A custom design means you’re creating a unique piece of family history. It might be a detailed rendering of your ancestral home, a family tree depicted in stitches, or a coat of arms. Passing down a custom needle point piece means passing down a story, a connection to the past, and a unique artistic legacy. Unlike fleeting trends, these items hold their value and meaning over time.
Unique Home Decor
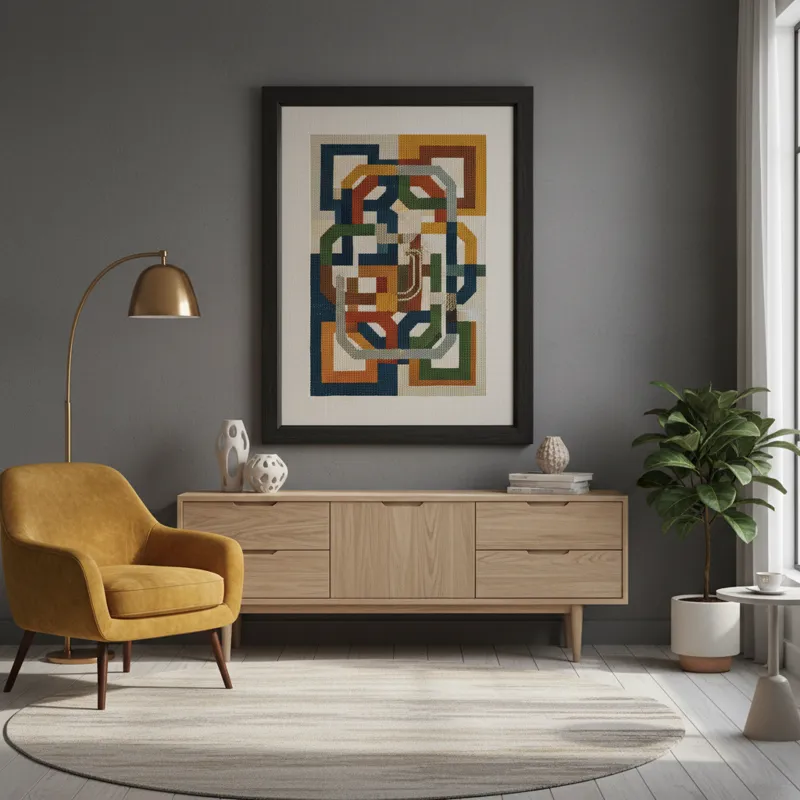
Beyond sentimental value, custom needle point offers unparalleled opportunities for interior design. You can commission a piece that perfectly matches your color scheme, reflects your personal style, or integrates seamlessly with a room’s theme. Whether you want a cushion featuring your pet’s portrait, a wall hanging with an abstract design in specific hues, or a footstool top that echoes your favorite artwork, custom needle point allows for complete creative control. This level of personalization ensures your decor isn’t just stylish, but also deeply reflective of who you are and what you cherish. You can also explore embroidery designs for men to find inspiration for masculine decor elements that can be translated into needle point.
The Process: From Concept to Canvas
Creating a custom needle point piece involves several distinct stages, whether you’re doing it yourself or working with a professional. Understanding this flow helps manage expectations and ensures a smoother, more satisfying outcome.
Step 1: Ideation & Inspiration
Every custom needle point project begins with an idea. What do you want to represent? Common inspirations include photographs (pets, houses, landscapes, people), significant dates, family crests, abstract art, patterns, or even literary quotes. The key here is to consider how the image or concept will translate into stitches. Simpler designs with clear lines and distinct color blocks often translate well, but skilled designers can handle complex imagery too. Gather your source material, whether it’s a high-resolution photo, a hand-drawn sketch, or a digital illustration. The clearer your initial vision, the easier the subsequent steps will be. For ideas on creating your own unique patterns, you might also look into resources for design your own embroidery designs, as many principles cross over.
Step 2: Choosing Your Path – DIY vs. Commissioning
Once you have an idea, you face a critical decision: design and create the custom needle point yourself, or commission a professional.
DIY Custom Needle Point
If you’re an experienced stitcher with a knack for design or a willingness to learn, the DIY route offers maximum control and can be more cost-effective. You’ll need to translate your design onto a blank canvas. This often involves using graphic design software to create a pixelated chart from your image, which you then transfer (or have printed) onto a blank needlepoint canvas. Some artists prefer to sketch directly onto the canvas with permanent markers. There are also online tools and software specifically designed to convert photos into stitchable charts, allowing you to choose your mesh count and palette. This approach requires patience, a good eye for color, and a willingness to troubleshoot.
Commissioning a Professional
For those who lack the design skills, time, or simply want a professional finish, commissioning a custom needle point designer is the way to go. You provide your source material and communicate your vision. The designer then takes this information and creates a digital mockup, often showing colorways and how the design will appear on the chosen mesh count. This iterative process allows for feedback and revisions until you’re satisfied with the design. Once approved, the designer will either hand-paint the design onto a blank canvas or have it professionally printed. This option generally yields a higher quality, more polished result, especially for complex or highly detailed imagery. If you’re considering incorporating specific branding, many of these same professionals also offer services like logo embroidery, demonstrating their versatility in translating graphics to thread.
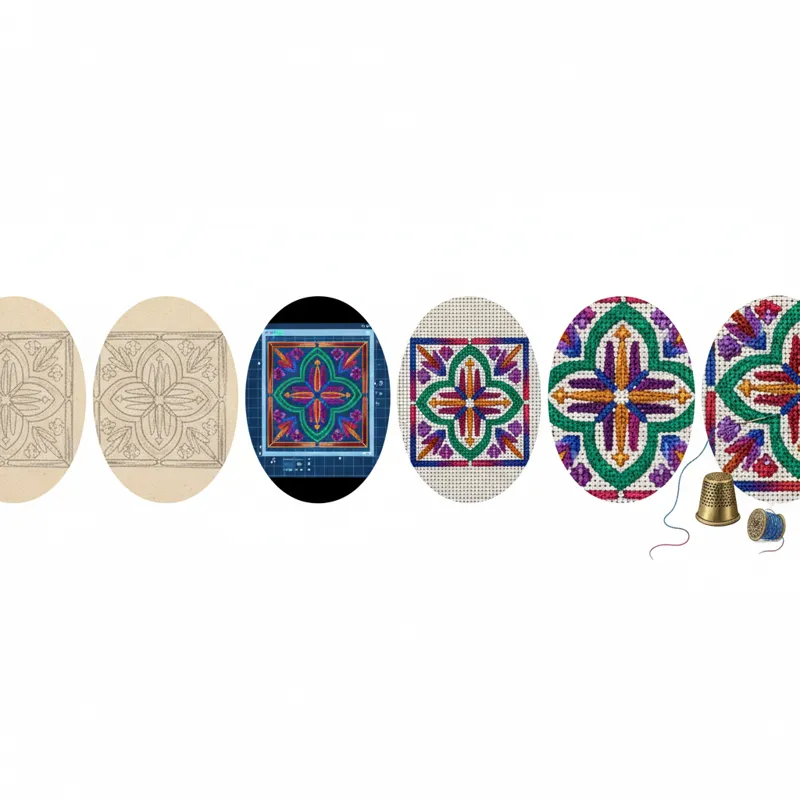
Step 3: Design Translation & Canvas Preparation
Regardless of whether you DIY or commission, this stage is where your concept becomes a stitchable guide. For professional commissions, the designer will use specialized software or artistic skill to translate your image into a needle point design, often selecting appropriate yarn colors. They’ll then transfer this design to the chosen canvas. Hand-painted canvases offer vibrant, nuanced color transitions and can capture fine details, while digitally printed canvases provide photographic accuracy and consistent color reproduction. The mesh count, which dictates the number of stitches per inch, is crucial here. A higher mesh count (e.g., 18-mesh) allows for finer detail but requires more stitches, while a lower count (e.g., 10-mesh) is quicker to stitch but yields a less detailed image. Your choice of mesh will depend on the design’s complexity and your desired stitching speed.
Step 4: Stitching and Finishing
Once you have your custom canvas and chosen yarns, the stitching begins. Most needle point uses a tent stitch, but variations like continental, basketweave, or half cross-stitch are common. Consistency in your stitching tension is key for an even, smooth result. This stage is meditative and can take many hours, depending on the canvas size and mesh count. After stitching is complete, the piece needs to be “finished.” This might involve blocking to ensure it’s square, then transforming it into a pillow, a framed artwork, a stand-up, a brick cover, or even an eyeglass case. Professional finishing services are highly recommended to ensure your hard work is presented beautifully and durably.
Navigating the Market: Services, Costs, and Quality
When considering custom needle point, understanding the market can save you time, money, and potential frustration. The landscape of services varies widely, impacting both cost and the final product.
Understanding Service Models
The custom needle point market generally offers a few distinct service models:
- Full-Service Custom Canvas Designers: These artists manage the entire design process, often hand-painting canvases based on your specifications. They provide expert advice on design translation, mesh count, and yarn selection. This is typically the most expensive but offers the highest level of customization and artistic interpretation.
- Digital Pattern Creators: These services focus on converting your image into a digital pattern or chart, which you can then print yourself onto blank canvas or use as a guide for stitching a pre-gridded canvas. This is a more budget-friendly option if you’re comfortable sourcing your own canvas and yarns.
- Print-Your-Own Canvas Services: Some companies specialize in printing your approved digital design directly onto a needle point canvas. You provide the high-resolution image, they handle the conversion and printing. This offers a good balance between professional quality and cost-effectiveness if you have your own design ready.
Cost Factors for Custom Needle Point
The cost of a custom needle point project can range significantly, typically from a few hundred dollars to well over a thousand, depending on several variables:
- Design Complexity: Highly detailed images with many colors and fine gradients require more design time and often a finer mesh canvas, increasing costs.
- Canvas Size: Larger canvases naturally require more material and more design work.
- Mesh Count: Finer mesh canvases (e.g., 18-mesh) are more expensive to produce and paint due to the precision required.
- Materials Included: Some services provide just the canvas, while others offer full kits including all the necessary yarn, needles, and even finishing instructions.
- Artist Reputation and Experience: Highly sought-after designers with extensive portfolios often command higher fees.
- Turnaround Time: Rush orders typically incur additional charges.
As of 2026, you can expect a digitally printed 12×12 inch canvas from a reputable service to start around $150-$250, while a hand-painted canvas of similar size might begin at $300-$500, often increasing with complexity and the artist’s renown. Full kits will add the cost of yarn, which varies widely by fiber type and quantity.
What to Look for in a Provider
When choosing a custom needle point provider, consider these points:
- Portfolio: Review their past work. Does their style align with your vision? Can they handle the complexity you’re looking for?
- Communication: A good provider will be responsive, clear in their explanations, and open to revisions during the design phase.
- Reviews and Testimonials: Look for feedback from previous clients regarding quality, accuracy, and customer service.
- Material Quality: Inquire about the type of canvas (mono, interlock, plastic) and yarn they recommend or include. High-quality materials make a significant difference in the final look and durability.
- Design Clarity: Ensure the design translation is clear and easy to follow, whether it’s painted or printed.
- Revision Policy: Understand how many revisions are included in the price and what additional changes might cost.
For more general guidance on finding skilled artisans and craft professionals, resources like the American Craft Council can be a helpful starting point, providing directories and insights into quality craftsmanship across various mediums.
Materials Matter: Canvas, Yarn, and Tools
The quality and type of materials you use for custom needle point directly influence the stitching experience, the appearance of the finished piece, and its longevity. Making informed choices here is key.
Canvas Choices: Mesh Count and Material
Needle point canvas is typically a stiff, open-weave fabric that serves as the foundation for your stitches. The “mesh count” refers to the number of threads per inch, determining the size of each stitch and thus the detail level of your finished piece.
- Mesh Counts:
- 10-mesh: Large stitches, quick to complete, good for beginners, pillows, or bold designs.
- 12-mesh: A popular, versatile choice, balancing detail and stitching speed.
- 13-mesh: Often called “congress cloth,” offering slightly more detail than 12-mesh.
- 14-mesh: Provides good detail, common for general projects.
- 18-mesh: Fine detail, requires more stitches, suitable for intricate designs, portraits, or smaller items.
- Canvas Types:
- Mono Canvas: A single-thread weave, durable and often used for painted canvases.
- Interlock Canvas: A double-thread weave that locks the intersections, providing a stable grid, popular for printed canvases.
- Plastic Canvas: Stiff, durable plastic sheets with pre-punched holes, ideal for 3D projects or items needing extra rigidity.
Your choice of mesh count depends on the complexity of your design and your patience. A complex portrait will lose significant detail on a 10-mesh canvas, while a simple geometric pattern might feel overly intricate on an 18-mesh.
Yarn Types for Needle Point
The yarn you select impacts the texture, sheen, and durability of your custom needle point. Different fibers offer distinct qualities:
- Wool:
- Persian Wool: A plied, three-strand yarn, usually separated for stitching. It’s durable, has a matte finish, and covers canvas well.
- Tapestry Wool: A non-divisible, single-strand yarn, thicker than Persian wool, perfect for coarser canvases (10-12 mesh) and quick coverage.
Wool is excellent for pieces that will see wear, like pillows or rugs, and offers a traditional, rich look.
- Silk: Offers a luxurious sheen and drape. Often used in blends or for highlight areas on finer mesh. It’s more delicate than wool and typically more expensive.
- Cotton: Matte finish, good for finer details, but can be less durable for high-wear items. Pearl cotton is a common choice for smaller stitches.
- Specialty Fibers: Metallics, mohair, and various synthetic blends can add unique textures and sparkle, often used for embellishments or specific effects.
Selecting yarn often involves considering both the aesthetic you want and the practical use of the finished piece. For a deep dive into specific yarn qualities and options, a resource like Wikipedia’s entry on yarn can provide extensive background.
Essential Tools
While the canvas and yarn are primary, a few essential tools make the stitching process more comfortable and efficient:
- Tapestry Needles: These have a blunt tip to avoid splitting canvas threads and a large eye for easy threading of yarn. Sizes vary based on yarn thickness and canvas mesh.
- Frames or Hoops: A stretcher bar frame or a sturdy embroidery hoop keeps your canvas taut, preventing distortion and making stitching easier and more consistent.
- Good Lighting: Essential for seeing your stitches clearly, especially on finer mesh or with complex designs.
- Magnifier (Optional): Helpful for those working on very fine mesh or who need a closer look at their work.
Things People Usually Miss About Custom Needle Point
While custom needle point is incredibly rewarding, there are common misconceptions and overlooked aspects that can impact your experience and the final outcome. Being aware of these can help you approach your project with realistic expectations.
Underestimating Design Complexity
A beautiful photograph doesn’t always translate directly into a beautiful needle point design without significant artistic interpretation. What looks great as a continuous tone image might become blocky or lose subtle details when pixelated into stitches. Complex designs with many shades, gradients, or tiny features often require finer mesh counts (16-18 mesh or higher) to retain clarity. Attempting a very intricate design on a coarser canvas (10-12 mesh) usually results in a simplified, sometimes unrecognizable, version of the original. Honest designers will advise you on what’s feasible for your chosen mesh and budget, helping you simplify without losing the essence of your image.
The Time Commitment
Custom needle point projects are not quick crafts. The design phase alone, especially for a commissioned piece, can take several weeks with revisions. The stitching itself is a significant time investment. A 12×12 inch canvas on 13-mesh, for example, can easily take 80-100 hours or more of dedicated stitching time, depending on the stitcher’s speed and the design’s complexity. Larger pieces or finer mesh counts will extend this considerably. Many people underestimate this commitment, leading to unfinished projects. View it as a marathon, not a sprint, and enjoy the meditative process rather than rushing to the finish line.
Value vs. Cost
The cost of a custom needle point canvas or kit can seem high compared to mass-produced kits. However, you’re paying for specialized artistic skill, hours of design work, often hand-painting, high-quality materials, and the unique exclusivity of a bespoke item. This isn’t just a craft supply; it’s a piece of art tailored to you. Understanding that the value lies in its personalized nature, the craftsmanship involved, and its potential as an heirloom helps justify the investment. It’s akin to commissioning a painting or a custom piece of furniture—you’re paying for unique design and skilled execution.
Finishing is Half the Battle
Many stitchers focus intensely on the canvas itself, only to realize the “finishing” stage is equally critical. A perfectly stitched canvas can look amateurish if poorly finished. Blocking (to square up the canvas) and professional fabrication (into a pillow, frame, brick cover, etc.) transform your stitched piece into a polished, durable item. Attempting complex finishing yourself without experience can damage your hard work. Factor in the cost and time for professional finishing when planning your project budget and timeline. It truly elevates the custom needle point from a canvas to a treasured object.
Caring for Your Custom Needle Point Heirloom
Once you’ve invested time and effort into creating or commissioning a custom needle point piece, proper care and preservation are essential to ensure its longevity as an heirloom or a lasting piece of decor. These items are durable, but not indestructible.
Display Best Practices
How you display your custom needle point significantly impacts its preservation. Direct sunlight, for instance, is a primary enemy of textiles. UV rays can cause irreversible fading of yarns, especially natural fibers like wool and silk. Always position framed pieces or pillows where they won’t receive direct sun exposure throughout the day. If a particular spot is unavoidable, consider UV-filtering glass for framed pieces. Additionally, avoid areas with extreme temperature fluctuations or high humidity, as these can promote mold growth or cause materials to degrade over time. Maintaining a stable, moderate environment (around 68-72°F and 45-55% humidity) is ideal for textiles.
Cleaning and Storage
Regular, gentle maintenance can prevent the need for more intensive cleaning. For items like pillows or stand-ups, light dusting or vacuuming with a low-suction, soft-brush attachment can remove surface dirt. Never machine wash or aggressively rub needle point pieces, as this can distort stitches, felt wool, and damage the canvas. For deeper cleaning, especially for older or heavily soiled items, professional textile conservation or dry cleaning by a specialist experienced with delicate fibers is highly recommended. These professionals understand how to clean without damaging the fibers or the canvas. When storing needle point, ensure it’s clean and completely dry. Wrap it in acid-free tissue paper or unbleached muslin, and store it flat or loosely rolled (never folded) in a breathable container away from pests, light, and moisture. Avoid plastic bags, which can trap humidity and accelerate degradation.
For additional information on textile preservation, the National Park Service provides excellent guidelines for the care of textile collections, many of which are applicable to personal needle point heirlooms.
People Also Ask
What’s the difference between custom needle point and custom embroidery?
Custom needle point uses a specific stitch (like tent stitch) to completely cover a stiff, open-weave mesh canvas, creating a dense, tapestry-like fabric. Custom embroidery involves a wider variety of stitches applied to almost any fabric, often leaving parts of the fabric visible, and can include anything from simple monograms to complex artistic scenes.
How long does a custom needle point project take?
The timeline varies significantly. The design phase for a custom canvas can take 2-6 weeks, including revisions. The stitching itself depends on canvas size, mesh count, and stitcher speed, but a medium-sized project (e.g., 12×12 inches, 13-mesh) typically requires 80-150 hours of stitching. Finishing adds another 2-4 weeks.
Can I use a photo for a custom needle point design?
Yes, photographs are a very common source for custom needle point. A designer will convert your photo into a stitchable chart, often simplifying colors and details to best translate into stitches on canvas. High-resolution photos with good contrast and clear subjects work best.
Is custom needle point expensive?
It can be, but costs vary widely. Factors like design complexity, canvas size, mesh count, and whether you choose a hand-painted or printed canvas all influence the price. Expect to pay anywhere from $150 for a basic printed canvas to $500+ for a complex hand-painted design (canvas only), plus the cost of yarn and professional finishing.
What’s the best mesh count for a beginner custom needle point project?
For beginners, a coarser mesh count like 10-mesh or 12-mesh is often recommended. The stitches are larger, easier to see, and the project progresses more quickly, making it less daunting. This allows you to focus on learning the basic stitch without getting overwhelmed by intricate detail.
Creating a custom needle point piece is a deeply personal and rewarding endeavor. It’s an investment in artistry, patience, and sentiment, resulting in a unique object that tells a story, preserves a memory, or simply beautifies a space in a way no mass-produced item ever could. Whether you embark on the design and stitching journey yourself or collaborate with a skilled artisan, the outcome is a tangible testament to thoughtful creation, destined to be cherished for years to come.