When you’re exploring options for dining table sets with bench, it’s easy to overlook the significant impact a built-in dining room bench can have. In 2026, home design increasingly prioritizes clever space utilization and personalization. A built-in bench isn’t just a seating arrangement; it’s a foundational design element that blends utility with style, transforming a dining area from a mere eating spot into a functional, inviting hub of the home. It’s about creating a custom solution that adapts to your life, whether you have a sprawling open-plan space or a cozy kitchen nook.
What Exactly is a Built-In Dining Room Bench?

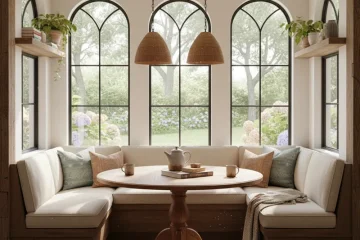
A built-in dining room bench is, as the name suggests, a permanent or semi-permanent seating structure integrated directly into the architecture of your home. Unlike freestanding benches that you can move around, a built-in bench typically fastens to a wall, corner, or even under a window. This design approach creates a seamless look, making the bench feel like an intentional part of the room rather than an added piece of furniture. You often see these referred to as banquettes, and they come in various configurations, from simple straight runs along a wall to L-shaped or U-shaped arrangements that hug a corner. The core idea is to maximize seating capacity and optimize the use of often-underutilized wall space.
Why Consider a Built-In Dining Room Bench in 2026?

The appeal of a built-in dining room bench has only grown, driven by evolving home design trends and practical considerations. Here’s why it’s a smart choice for many homeowners today:
Optimized Space Utilization
This is often the primary driver. A built-in bench can reclaim significant floor space compared to traditional chairs. Because it eliminates the need for chair-push-back clearance on one or more sides, you can fit more seating into a smaller footprint. This is especially valuable in urban homes, apartments, or open-concept layouts where every square foot counts. It allows you to create a comfortable dining area even in tight corners or along narrow walls.
Custom Aesthetics and Integration
A built-in bench offers unparalleled opportunities for customization. You can match its materials, finishes, and upholstery to your existing décor, creating a cohesive and polished look. Whether your style is modern minimalist, rustic farmhouse, or classic traditional, the bench can be designed to blend seamlessly. It becomes a permanent architectural feature that elevates the entire room’s design, rather than just another piece of furniture. Many homeowners find that a thoughtfully designed built-in bench provides a high-end, bespoke feel.
Enhanced Seating Capacity
Benches, by their nature, allow for more flexible seating than individual chairs. You can comfortably fit more people around a table when using a built-in bench, which is ideal for families or for entertaining guests. Children, in particular, often find bench seating more comfortable and engaging.
Integrated Storage Solutions
This benefit is a game-changer for many. A well-designed built-in dining room bench can incorporate hidden storage underneath, either through lift-up seats or pull-out drawers. This is incredibly practical for storing linens, seasonal items, less-frequently used serveware, or even board games. It helps keep your dining area clutter-free and organized, turning unused space into valuable storage. If you’re looking to maximize functionality, exploring a kitchen bench with storage alongside your dining setup can create a highly efficient space.
Durability and Stability
Because they’re fixed to the structure of your home, built-in benches are inherently more stable and durable than most freestanding furniture. They don’t wobble, scratch floors from being dragged, or require constant realignment. This longevity makes them a sound investment.
Designing Your Built-In Dining Bench: Key Considerations

Successful integration of a built-in dining room bench starts with careful design. You’ll need to think through several practical and aesthetic factors.
Spatial Planning and Layout
Start by assessing the available space. Is it a corner nook, a long wall, or an area under a window?
- Corner Banquette: An L-shaped or U-shaped bench maximizes corner space, creating a cozy and efficient dining zone. This is often seen with a banquette dining sets approach.
- Wall-Mounted Bench: A straight bench along a wall can open up the center of the room, providing a sleek line and allowing for dining chairs on the opposite side.
- Window Bench: Placing a bench under a window leverages natural light and often offers pleasant views, creating a bright and airy dining experience.
Consider the flow of traffic in the room. Ensure there’s enough clearance for people to move around the table and for chairs on the non-bench sides.
Ergonomics: Comfort is Key
A beautiful bench is useless if it’s uncomfortable. Pay close attention to dimensions:
- Seat Height: A standard dining chair seat height is typically 18 inches from the floor. For a built-in bench, aim for 17-19 inches, assuming you’ll add a 2-3 inch thick cushion. This ensures comfortable leg room under a standard 29-30 inch high dining table.
- Seat Depth: Aim for a minimum of 18-20 inches for comfortable adult seating without a backrest. If you have a backrest, 16-18 inches of usable seat depth is often sufficient, allowing for a few inches for the backrest itself.
- Backrest Angle: A slight recline (around 5-10 degrees off vertical) significantly improves comfort. A perfectly upright backrest can feel rigid during long meals.
- Table Pairing: The dining table should allow for at least 12-18 inches of clearance between the tabletop edge and the bench seat edge, providing enough space for diners to slide in and out comfortably.
Aesthetic Integration and Style
The bench should complement your home’s existing décor.
- Modern: Clean lines, minimal ornamentation, often using sleek wood, metal, or upholstered panels.
- Farmhouse/Rustic: Distressed wood, shiplap backrests, often paired with more substantial, perhaps a solid wood dining table with bench.
- Traditional: Paneling details, classic wood finishes, possibly tufted upholstery.
Consider the visual weight. A solid base might feel substantial, while legs can offer a lighter, more open feel, especially in smaller spaces.
Material Selection: Building for Beauty and Durability
The materials you choose for your built-in dining room bench will dictate its appearance, durability, and maintenance requirements.
Structural Elements: The Foundation
- Plywood: A go-to for DIYers and pros alike. High-quality Baltic birch or furniture-grade plywood offers excellent stability and strength. It’s ideal for frames, seat bases, and back panels.
- MDF (Medium-Density Fiberboard): Great for smooth, painted finishes, as it has no grain. It’s denser and heavier than plywood but can be less moisture-resistant and structurally weaker in unsupported spans.
- Solid Wood: For exposed elements, solid hardwoods like oak, maple, or walnut provide exceptional beauty and longevity. They can be stained or clear-coated to highlight their natural grain. For the structural frame, common lumber like 2x4s or 2x6s is often used, clad later with finished panels.
Finishing Materials: The Visible Touch
- Paint: A versatile and cost-effective finish. High-quality, durable paint (e.g., cabinet-grade enamel) is essential for areas that will see regular use and potential spills.
- Stain & Sealer: If you’re using solid wood or a plywood with an attractive veneer, a stain can enhance the natural grain, followed by a robust clear coat (polyurethane, lacquer) for protection.
- Upholstery: This adds comfort and a significant design element.
- Fabric: Choose durable, easy-to-clean upholstery fabrics. Look for high double-rub counts (indicating resistance to wear) and stain-resistant treatments. Polyester blends, crypton, or performance velvets are popular choices.
- Vinyl/Faux Leather: Excellent for high-traffic areas and families, as they are often liquid-resistant and easy to wipe clean. Modern faux leathers can look incredibly realistic.
- Natural Leather: A premium, durable option that ages beautifully but requires more significant investment and specialized care.
DIY vs. Professional Installation: What’s Right for You?
Deciding whether to tackle a built-in dining room bench yourself or hire a professional largely depends on your skill level, tools, budget, and desired complexity.
The DIY Route: Empowerment and Savings
If you have some carpentry experience, a good set of tools (miter saw, drill, level, sander), and a willingness to learn, building a built-in bench can be a rewarding project.
- Cost Savings: This is the biggest advantage. You’ll save significantly on labor costs, paying only for materials.
- Customization: You have complete control over every detail, from the exact dimensions to the choice of wood and finish.
- Learning Experience: It’s an excellent way to hone your woodworking skills and gain a deeper understanding of your home’s structure.
However, DIY isn’t without its challenges. It requires precision, patience, and problem-solving. Mistakes can be costly in terms of time and materials. Be realistic about your abilities. Many online resources and YouTube channels offer detailed tutorials for various built-in projects. For instance, reputable woodworking sites often provide plans and tips that can guide you. (External link example: Wood Magazine)
Hiring a Professional: Expertise and Peace of Mind
For complex designs, tight timelines, or if you prefer a flawless finish without the hassle, a professional carpenter or cabinet maker is the way to go.
- Precision and Quality: Professionals bring expertise, specialized tools, and a keen eye for detail, ensuring a high-quality, durable, and aesthetically pleasing result.
- Time-Saving: They can complete the project much faster than most DIYers, minimizing disruption to your home.
- Complex Designs: If you envision intricate paneling, sophisticated storage mechanisms, or unusual shapes, a professional can execute these with greater accuracy.
- Warranties: Reputable contractors often offer warranties on their work, providing peace of mind.
The trade-off is the increased cost, as you’re paying for their labor, expertise, and overhead. Get multiple quotes and check references before committing. Websites like Angie’s List or HomeAdvisor can help you find qualified local professionals. (External link example: Angie’s List)
Planning Your Project: The Blueprint to Success
Whether DIY or professional, thorough planning prevents headaches down the line.
1. Measure Everything, Twice (or Thrice)
Accuracy is paramount.
- Measure the length and width of the space where the bench will go.
- Account for any irregularities: wall bumps, outlets, window sills, baseboards.
- Determine the desired height, depth, and backrest angle (as discussed in ergonomics).
- Consider the existing or planned dining table. You need to ensure proper clearance. If you’re planning on a table with 2 benches and 2 chairs, for instance, you’ll need to know the table’s width and leg placement.
2. Sketch and Design
Draw out your plans. Simple hand sketches are fine, but a more detailed CAD drawing (even using free online tools) can help visualize the final product and identify potential issues.
- Indicate dimensions for all components: frame, panels, seat base, backrest.
- Detail any storage solutions (drawers, lift-top) and their mechanisms.
- Plan for electrical outlets if you want to integrate charging ports or lighting.
3. Material and Tool List
Based on your design, create a comprehensive list of materials.
- Lumber/Sheet Goods: Plywood, MDF, solid wood for frames and panels.
- Fasteners: Screws (various lengths), wood glue, pocket hole screws.
- Finishing Supplies: Paint, primer, stain, clear coat, sandpaper.
- Upholstery (if applicable): Foam, batting, fabric, staple gun, adhesive.
- Tools: Miter saw, circular saw, drill/driver, level, measuring tape, stud finder, safety glasses, hearing protection.
4. Budget and Timeline
Estimate material costs and factor in any tool rentals or professional fees. Set a realistic timeline for construction, allowing for unforeseen delays.
The Construction Process: A Simplified Overview
While a full construction guide is beyond this article’s scope, here’s a general sequence for building a basic built-in dining room bench:
1. Prepare the Area
Clear the space. Remove baseboards if the bench will sit flush against the wall. Mark stud locations on the wall where the bench frame will attach. Ensure the floor is level.
2. Build the Base Frame
Construct a sturdy rectangular frame using 2x4s or similar lumber. This will form the bottom perimeter of your bench. Use wood glue and screws for strong joints. Ensure it’s perfectly level and square.
3. Attach to Walls and Floor
Secure the base frame to the wall studs using long construction screws. If applicable, also secure it to the floor (especially if it’s not against a wall) using appropriate fasteners, remembering to check for any plumbing or electrical lines.
4. Construct Internal Supports and Dividers
Add vertical supports and horizontal cross-braces within the frame to support the seat platform and create compartments for storage. These should be spaced appropriately for strength and to accommodate any planned drawers or lift-top sections.
5. Add Side and Front Paneling
Cut and attach plywood or MDF panels to the exposed sides and front of the bench frame. Use wood glue and finish nails or screws. This creates the clean, finished exterior. If incorporating drawers, ensure precise openings are cut.
6. Install the Seat Platform
Cut sturdy plywood (at least 3/4-inch thick) for the seat top. If you’re making a lift-top storage bench, use piano hinges or heavy-duty cabinet hinges to attach the seat sections to the frame, ensuring they open smoothly and safely.
7. Construct the Backrest (if desired)
Build a separate frame for the backrest and attach it securely to the wall studs and the bench frame. Panel it with plywood or MDF. A slight angle for comfort is recommended.
8. Finishing Touches
Fill all screw holes and seams with wood filler, then sand thoroughly. Apply primer, then paint or stain and seal according to your chosen finish. If upholstering, wrap foam and batting in fabric, then staple or tack it onto separate panels that attach to the bench frame. This makes future re-upholstering easier.
Maximizing Functionality and Style
Once the built-in dining room bench is physically constructed, its true potential is unlocked through strategic accessorizing and integration.
Comfort with Cushions and Pillows
This is non-negotiable for comfort. Custom-made cushions offer the best fit and appearance. Choose high-density foam for durability and support, wrapped in batting for softness. Select upholstery fabric that complements your décor and is suitable for dining use (durable, easy to clean). Add throw pillows for extra comfort and a pop of color or texture.
Thoughtful Lighting
Proper lighting can dramatically enhance the ambiance.
- Pendant Lights: Hanging a beautiful pendant light or a series of smaller ones directly over the dining table defines the eating area and provides focused illumination.
- Wall Sconces: Sconces flanking the bench or mounted above the backrest can add soft ambient light and a touch of elegance.
- Under-Bench Lighting: LED strip lighting installed discreetly under the bench can create a sophisticated, floating effect and provide useful low-level lighting.
Complementary Dining Table and Chairs
The table is the centerpiece.
- Shape: Rectangular or oval tables work well with straight benches. Round or square tables are ideal for L-shaped or U-shaped banquettes, allowing easier access.
- Size: Ensure the table is appropriately sized for the bench and the number of people you expect to seat. Leave enough room for comfortable movement. If you’ve considered a dining table sets with bench, this integrated approach might mean selecting a table specifically designed to pair with a built-in bench.
- Additional Seating: On the non-bench sides, use chairs that complement the bench’s style. This is where options like a table with 2 benches and 2 chairs come into play, offering versatility in seating.
Decorative Elements
Don’t underestimate the power of décor.
- Wall Art: A gallery wall or a large piece of art above the backrest can define the space.
- Shelving: Floating shelves above the bench can display decorative items, plants, or often-used dishes.
- Window Treatments: If the bench is under a window, select curtains, blinds, or shades that enhance the overall design and control light.
What Most People Get Wrong with Built-In Dining Benches
Even with careful planning, some common missteps can detract from the functionality and appeal of a built-in dining room bench. Knowing these pitfalls can help you avoid them.
1. Underestimating Ergonomics
The most frequent mistake is getting the dimensions wrong, especially seat height and depth. A bench that’s too low, too high, or too shallow will be uncomfortable, making long meals unbearable. Always factor in the thickness of your cushions before determining the frame height. Forgetting the backrest angle also leads to stiff, upright seating.
2. Neglecting Table Clearance
Many people build the bench and then realize their dining table is too close or too far away. There needs to be adequate space (12-18 inches) between the table edge and the bench seat to allow diners to slide in and out without scraping their legs or feeling trapped. Test this with your actual table or a mock-up.
3. Ignoring Wall and Floor Irregularities
Few walls are perfectly straight, and floors are rarely perfectly level. Attempting to build a perfectly square bench against an uneven surface will result in gaps, awkward angles, or a wobbly structure. Always check for plumb and level, and be prepared to scribe cuts or use shims to ensure a tight, professional fit.
4. Poor Material Choice for Durability
Using low-quality plywood for the structural components or a delicate fabric for upholstery in a high-traffic dining area is a recipe for premature wear. Invest in furniture-grade plywood, strong fasteners, and durable, stain-resistant fabrics to ensure the bench withstands daily use. This is particularly true for items like a solid wood dining table with bench where material quality is evident.
5. Inadequate Access for Maintenance or Repairs
While built-in, think about future needs. If you build a bench with hidden storage but make the lid too heavy or difficult to open, you won’t use it. Similarly, if electrical outlets are needed behind the bench, ensure they are accessible or relocated during construction. Consider how you’ll clean underneath or behind the bench if it’s completely sealed.
6. Overlooking Electrical Needs
In 2026, integrating technology is standard. Many people forget to plan for outlets or USB charging ports within or near the built-in bench for devices. Running electrical wiring after construction is far more complex and costly.
Maintaining Your Built-In Dining Bench
A built-in dining room bench is a long-term fixture, and proper maintenance ensures its beauty and functionality endure.
Upholstered Benches:
- Regular Vacuuming: Use a brush attachment to remove crumbs and dust.
- Spot Cleaning: Address spills immediately. Use a fabric-appropriate cleaner and blot, don’t rub. Test cleaners on an inconspicuous area first.
- Professional Cleaning: Depending on use, consider professional upholstery cleaning every 1-2 years to refresh and deep clean.
- Cushion Rotation: If your cushions are removable, rotate and flip them periodically to ensure even wear.
Wood or Painted Benches:
- Regular Wiping: Use a damp cloth with mild soap for daily spills, followed by a dry cloth.
- Avoid Harsh Chemicals: Stick to gentle cleaners to prevent damage to the finish.
- Protective Measures: Use coasters and placemats on the adjacent table to protect against scratches and heat.
- Touch-ups: Minor scratches or chips in paint or finish can often be touched up with matching paint or stain.
Future Trends for Built-In Dining in 2026 and Beyond
As homes become smarter and more adaptable, so too will built-in dining solutions.
- Integrated Smart Tech: Expect more benches with discreetly integrated wireless charging pads for phones, USB-C ports, and even hidden smart speakers for ambient sound.
- Modular Components: While “built-in” implies permanent, future designs might incorporate more modular sections that can be reconfigured or updated more easily, offering flexibility without sacrificing the custom look.
- Sustainable Materials: A continued push towards eco-friendly and recycled materials in construction and upholstery will be prominent, focusing on low-VOC finishes and responsibly sourced wood.
- Multifunctional Zones: Built-in benches will increasingly serve multiple purposes beyond just dining, perhaps featuring pull-out desks for remote work or easily convertible sections for lounging. Forbes often highlights these trends in home innovation (External link example: Forbes Home Improvement).
Frequently Asked Questions About Built-In Dining Room Benches
How much does a built-in dining bench typically cost?
The cost varies wildly depending on whether you DIY or hire a professional, the materials chosen, and the complexity of the design. DIY can range from $300-$1,500 for materials, while professional installation could start at $1,500 and easily go up to $5,000+ for custom, high-end work, especially with integrated storage or complex upholstery.
Can a built-in bench work in a really small kitchen?
Absolutely. A built-in dining room bench is often one of the best solutions for small kitchens or dining nooks. By eliminating the need for chair clearance, it maximizes seating in compact spaces. An L-shaped corner banquette is particularly effective.
What’s the ideal depth for a comfortable dining bench?
For comfortable adult seating, aim for a usable seat depth of 16-18 inches if there’s a backrest, or 18-20 inches if it’s a backless bench. This allows enough room to sit without feeling like you’re perched on the edge.
Are built-in benches comfortable for long meals?
Yes, provided they are designed correctly. The key is proper ergonomics: adequate seat depth, an appropriate seat height (factoring in cushions), and a slight angle for the backrest (5-10 degrees). High-quality, supportive cushions are also crucial for comfort during extended dining.
Can I add storage to an existing built-in bench?
It depends on the original construction. If the bench was built with a hollow frame, it might be possible to add lift-top access or even drawers, though this would require significant modification. If it’s a solid, structural bench, adding storage might be difficult or impractical without rebuilding major sections. It’s always best to plan for storage from the outset.