
In the evolving landscape of nail artistry, trends come and go, but some innovations possess a truly transformative quality, changing how we perceive and achieve intricate designs. Among these, cat eye gel polish stands out as a genuine game-changer. It’s not just another color; it’s an interactive, dynamic effect that brings a mesmerizing depth to your manicure. With 2026 well underway, the technology behind these polishes has matured, offering more vibrant effects and easier application than ever before. If you’re looking to elevate your nail game from standard solids to something truly captivating, understanding the unique appeal and application of cat eye gel polish is your next logical step.
7 Stunning Reasons to Try Cat Eye Gel Polish
Cat eye gel polish isn’t merely a fleeting trend; it’s a staple for anyone seeking to add a sophisticated, almost magical touch to their nails. Its unique properties create a look that standard polishes simply cannot replicate. Here are seven compelling reasons why you should consider making this magnetic marvel a regular part of your beauty routine.
1. Unparalleled Visual Depth and Dimension
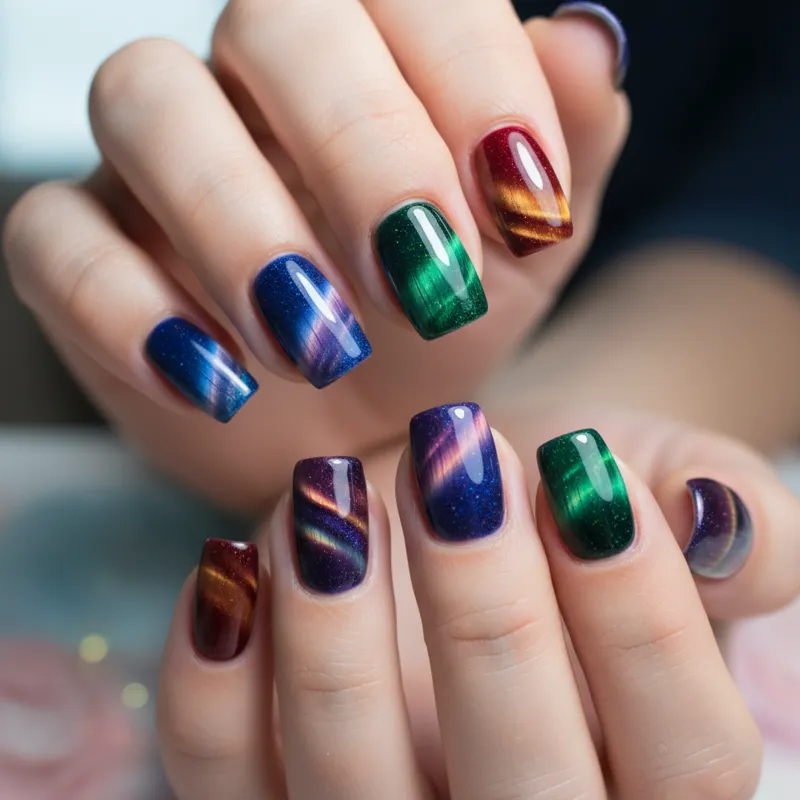
The most striking feature of cat eye gel polish is its incredible ability to create a multi-dimensional effect that appears to float on the nail surface. Unlike flat, opaque colors or even glitter polishes, the metallic particles within cat eye gel polish respond to a magnetic force, allowing them to be drawn into specific patterns. This results in a concentrated line of shimmer that resembles a feline’s pupil, creating an illusion of depth that makes your nails seem to hold a secret. This isn’t just a surface shine; it’s a visible shift in light and shadow, giving your manicure an almost three-dimensional quality.
2. Versatility Across Styles and Occasions
Whether you’re aiming for understated elegance or bold, avant-garde artistry, cat eye gel polish offers immense versatility. A subtle, single stripe down the center of a nude or muted shade can provide a sophisticated highlight perfect for professional settings or formal events. On the other hand, a vibrant jewel-toned polish with a dramatic, sweeping magnetic line can be the ultimate accessory for a night out or a creative expression of personal style. Its adaptability means it complements everything from casual wear to high fashion, making it a truly flexible choice in your beauty arsenal.
3. Effortless Salon-Quality Finish at Home
One of the most appealing aspects of modern cat eye gel polish kits is how accessible they’ve made achieving professional-looking results without a salon visit. The process, while requiring precision, is surprisingly straightforward. With a quality magnetic nail polish and a specially designed magnet, you can create intricate patterns that once seemed only possible in a nail salon. This DIY potential not only saves time and money but also provides the satisfaction of mastering a new skill, allowing you to replicate and experiment with magnetic gel nail designs on your own terms.
4. Durability and Longevity of Gel
At its core, cat eye polish is still a gel polish. This means you benefit from all the inherent advantages of gel formulations: incredible durability, chip resistance, and a long-lasting, high-gloss finish. Properly applied and cured, a cat eye gel manicure can easily last two to three weeks without dulling or chipping, significantly outperforming traditional lacquers. This longevity is crucial for intricate designs, ensuring your stunning magnetic effect remains pristine for an extended period. Just as a professional might recommend the services of a best care pet clinic USA for your furry friends, taking the time to properly prep and apply your gel polish will ensure the best, longest-lasting results for your nails.
5. A True Conversation Starter
The unique, shifting appearance of cat eye gel polish rarely goes unnoticed. Its dynamic shimmer and optical illusion effect naturally draw attention, often leading to compliments and inquiries about how such a look is achieved. This makes it an excellent choice for those who appreciate a manicure that serves as a subtle yet distinct statement piece. It’s a design that reveals more the closer you look, inviting curiosity and admiration.
6. Endless Color and Effect Combinations
The market for cat eye gel polish has exploded, offering an almost limitless palette of colors. Beyond traditional silvers and golds, you’ll find deep emeralds, rich sapphires, fiery coppers, and ethereal purples, all infused with those special metallic particles. Furthermore, the type of magnet used and the technique of application allow for various patterns: from the classic straight line to diagonal slashes, wavy effects, or even abstract cloud-like formations. This expands the creative possibilities exponentially, making it possible to experiment with different magnetic gel nail designs every time.
7. The Mesmerizing “Aurora” or “Holographic” Effect
While the classic cat eye is a distinct linear shimmer, many modern formulations push the boundaries further, offering an “aurora effect polish” or a “holographic magnetic gel.” These variations often feature finer, more densely packed magnetic particles or a wider spectrum of interference pigments. The result is an even more ethereal, multi-colored glow that shifts with every angle of light, reminiscent of the Northern Lights or a rainbow encased in glass. This advanced iteration provides an even more complex and captivating visual experience, appealing to those who desire an ultra-dynamic and truly unique manicure.
Understanding the Mechanics: How Cat Eye Gel Polish Works
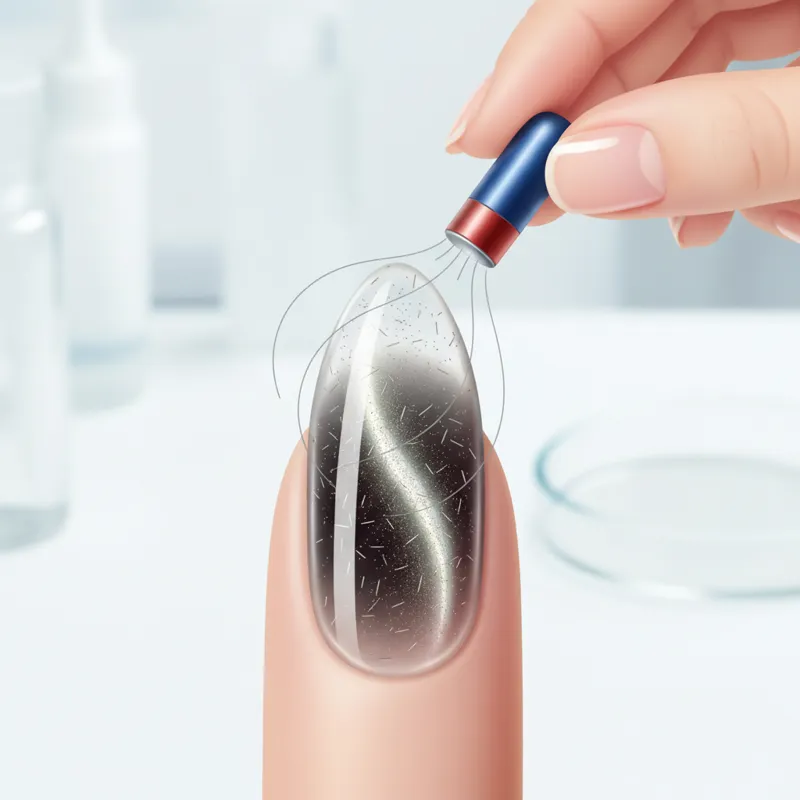
To truly appreciate cat eye gel polish, it helps to understand the underlying science. The magic isn’t in the color itself but in the specially formulated gel that contains microscopic metallic particles. These aren’t just shimmer or glitter; they are actual fine metal powders, typically iron-based, that are suspended within the viscous gel medium. When you apply a coat of this gel, the metallic particles are dispersed evenly throughout. The crucial step occurs before curing the gel under a UV or LED lamp. At this point, while the gel is still wet, a powerful, specially designed magnet is held close to the nail. The magnetic field exerts a force on the metallic particles, causing them to align themselves in a particular pattern. They are essentially pulled to the surface or pushed away, creating areas of high and low concentration. Once the desired pattern is achieved, the gel is immediately cured. The UV/LED light hardens the gel, locking the metallic particles in their newly aligned position. This is what permanently creates the “cat eye” line or other magnetic gel nail designs. The high concentration of particles reflects light differently than the surrounding gel, creating the striking, luminous stripe. The way light plays across the surface of a Northern Shoveler’s feathers can be just as captivating as the shifting patterns you can create with cat eye gel polish, highlighting nature’s own optical wonders.
Your DIY Guide: Achieving the Perfect Cat Eye Nails at Home
Achieving a flawless cat eye effect at home is entirely within your grasp, even for those new to DIY gel nails. The key lies in understanding the steps and having the right tools.
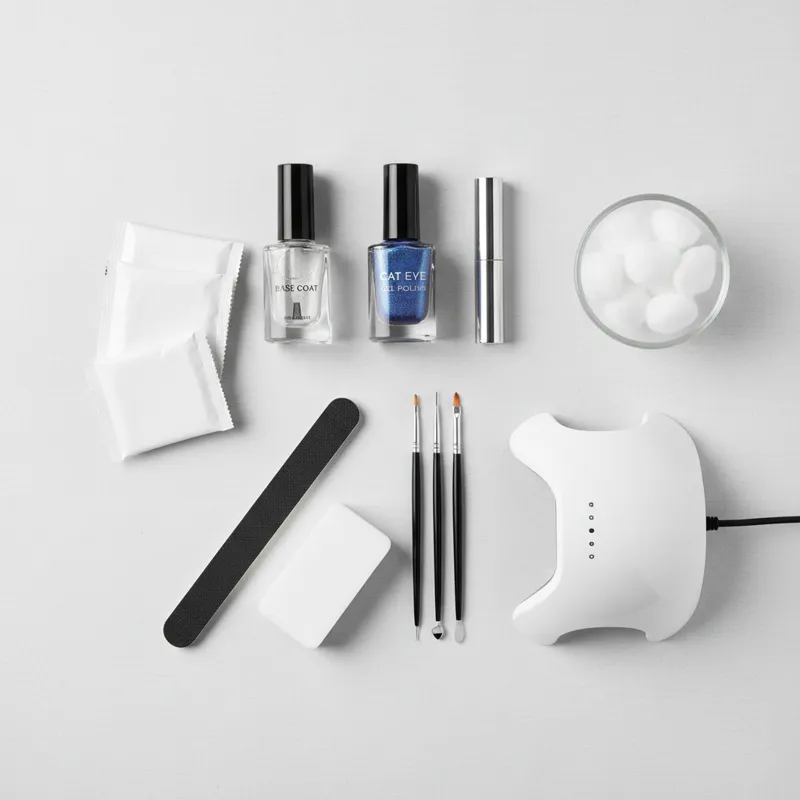
What You’ll Need: Essential Tools for Magnetic Nail Art
Before you begin, gather all your supplies. Having everything within reach streamlines the process and ensures smooth application.
- Nail File and Buffer: For shaping and preparing the nail surface.
- Cuticle Pusher and Nipper: For proper cuticle care.
- Nail Cleanser/Dehydrator: To remove oils and ensure adhesion.
- Gel Base Coat: A foundation for your gel manicure.
- Cat Eye Gel Polish: Your chosen color and effect.
- Dedicated Cat Eye Magnet: This is crucial. Many magnetic nail polish brands provide a magnet with their polish, or you can purchase specific magnetic wands or dual-ended magnets.
- Gel Top Coat: For a durable, glossy finish.
- UV/LED Nail Lamp: Essential for curing gel polish. Ensure it’s powerful enough for your gel system (typically 36W+ for UV, 48W+ for LED).
- Lint-Free Wipes and Isopropyl Alcohol (IPA): For wiping the tacky layer.
- Nail Oil (optional): For cuticle hydration post-manicure.
Step-by-Step Application for a Flawless Cat Eye
Follow these steps carefully for stunning results. Precision and timing are key.1. Prep Your Nails: * Start by shaping your nails with a file. Gently push back and trim any excess cuticles.
- Lightly buff the nail surface to remove shine and create a rough texture for better adhesion.
- Cleanse your nails thoroughly with a nail dehydrator or IPA on a lint-free wipe. This removes oils and dust, preventing lifting.2. Apply Base Coat: * Apply a thin, even layer of gel base coat to all nails, avoiding the skin.
- Cap the free edge (seal the tip of the nail) to prevent chipping.
- Cure under your UV/LED lamp according to the manufacturer’s instructions (usually 30-60 seconds for LED, 120 seconds for UV). Do not wipe the tacky layer.3. Apply First Layer of Cat Eye Gel Polish: * Apply a thin, even layer of your cat eye gel polish to one nail. If the color is very sheer, you might skip the magnet on this first coat to build opacity.
- Cure under the lamp.4. Apply Second Layer (The Magic Happens Here!): * Apply a second, slightly thicker but still even layer of cat eye gel polish to one nail at a time. This is critical because the gel must be wet for the magnet to work.
- Immediately after applying the polish (do NOT cure yet), hold your cat eye magnet close to the nail. Position it about 1-2 millimeters away, without touching the wet polish.
- Hold the magnet steady for 10-15 seconds. You’ll see the metallic particles shifting and forming the desired pattern. Experiment with holding the magnet vertically, horizontally, or diagonally to create different magnetic gel nail designs. For a classic cat eye, hold it vertically down the center of the nail.
- As soon as you achieve the desired effect, immediately cure the nail under your UV/LED lamp (again, follow manufacturer’s timing, usually 60-120 seconds). Curing locks the magnetic particles in place.
- Repeat this process, one nail at a time, for all remaining nails.5. Apply Top Coat: * Once all nails have their cat eye effect cured, apply a thin, even layer of gel top coat. Cap the free edge.
- Cure thoroughly under your lamp (typically 60-120 seconds).6. Cleanse and Hydrate: * If your top coat has a tacky inhibition layer, wipe it with IPA on a lint-free wipe to reveal the high shine.
- Finish by applying cuticle oil to nourish your cuticles and surrounding skin.
Advanced Techniques: Mastering Diverse Magnetic Gel Nail Designs
Once you’re comfortable with the basic linear cat eye, you can experiment with more complex magnetic gel nail designs.
- Diagonal Swipe: Hold the magnet diagonally across the nail.
- “X” Pattern: Hold the magnet diagonally in one direction for 5-7 seconds, then immediately switch to the opposite diagonal for another 5-7 seconds before curing.
- Circular Effect: Use a round magnet (often found on dual-ended wands) and hold it over the center of the nail.
- Dual Magnets: Some advanced kits include two magnets which can be used simultaneously to create a more intricate pattern, like a double “V” or side-by-side lines.
- Layering: Apply a cat eye polish over a different base color (e.g., black) for enhanced contrast and depth, then apply a sheer holographic magnetic gel as the second layer for an extra aurora effect polish. Much like the satisfaction of ‘producing’ something valuable in a game using an Incubator in Stardew Valley, mastering your cat eye gel polish technique brings a unique sense of accomplishment and creative freedom.
Common Pitfalls: What Most People Get Wrong with Cat Eye Gel Polish
While cat eye gel polish offers stunning results, several common mistakes can prevent you from achieving that perfect, crisp line. Being aware of these can significantly improve your application.
- Not Enough Polish on the Magnetic Layer: If your second coat of cat eye gel polish is too thin, there simply aren’t enough metallic particles to respond effectively to the magnet, resulting in a faint or absent cat eye effect. It needs to be a slightly thicker, but not gloppy, layer.
- Touching the Wet Polish with the Magnet: This is a very common error. Even a slight touch can drag the polish, create smudges, and ruin the alignment of the metallic particles. Keep the magnet 1-2mm above the surface without making contact.
- Holding the Magnet for Too Long or Too Short: If you hold the magnet for too long, the particles might disperse too much, or the gel might start to self-level and lose the defined line. Too short, and the effect won’t fully form. Experimentation is key, but 10-15 seconds is a good starting point.
- Curing Too Slowly After Magnet Application: The window between applying the magnet and curing is critical. Gel polish will naturally start to self-level, meaning the metallic particles will begin to resettle if you don’t cure immediately after achieving the desired effect. Work one nail at a time and cure swiftly.
- Using a Weak or Incorrect Magnet: Not all magnets are created equal. The small, often weak magnets found in some inexpensive kits might not be strong enough to properly manipulate the particles. Invest in a dedicated, powerful cat eye magnet, preferably a neodymium magnet.
- Improper Nail Prep: Like any gel manicure, poor preparation (not buffing, leaving oils, or cuticle on the nail plate) will lead to lifting and chipping, regardless of how good the cat eye effect looks initially. The foundation is paramount.
- Applying Too Many Thick Layers: While the magnetic layer needs to be slightly thicker, applying multiple thick layers overall can lead to an uneven, bulky manicure and potentially under-curing, which causes issues like lifting and allergic reactions. Always aim for thin, even coats.
- Not Capping the Free Edge: Forgetting to seal the tip of your nail with both the base coat and top coat is a primary cause of premature chipping and wear, compromising the longevity of your cat eye design.
Maintaining Your Mesmerizing Cat Eye Mani
Once you’ve invested the time and effort into creating a stunning cat eye gel polish manicure, you’ll want to ensure it lasts as long as possible. Proper maintenance is straightforward and helps protect both the design and the health of your natural nails.
- Wear Gloves: When doing housework, washing dishes, or engaging in activities that involve prolonged water exposure or harsh chemicals, wear gloves. Water can slowly degrade the seal of your gel, and chemicals can damage the top coat, dulling the shine and the cat eye effect.
- Moisturize Regularly: Keep your cuticles and hands well-hydrated. Dry cuticles can crack and peel, potentially snagging the edge of your gel polish and leading to premature lifting. Use a quality cuticle oil daily.
- Avoid Using Nails as Tools: Resist the urge to pick, pry, or scrape with your nails. This can cause chips, breaks, or even lift the entire gel layer, undoing all your hard work.
- Don’t Pick or Peel: If you notice any lifting or chipping, do not pick or peel the gel. This can severely damage your natural nail plate by pulling off layers of keratin. Instead, file down any snags gently or consider removing the polish properly and reapplying.
- Be Mindful of Extreme Heat: While cured gel polish is durable, prolonged exposure to extreme heat (like very hot baths or saunas right after application) can sometimes weaken the bond, though this is less common with modern formulations.
- Proper Removal is Key: When it’s time for a new manicure, remove your cat eye gel polish correctly. Don’t peel or force it off. Use the soak-off method with acetone, making sure to protect your skin, or opt for professional removal if you’re unsure. Proper removal prevents nail damage and keeps your nails healthy for your next stunning design. For more in-depth knowledge on cosmetic safety, you can always consult reliable sources like the U. S. Food and Drug Administration (FDA) website.
Frequently Asked Questions About Cat Eye Gel Polish
Here are some common questions people have when exploring cat eye gel polish.
Q: Is cat eye gel polish harder to apply than regular gel polish?
A: The application process for cat eye gel polish is very similar to regular gel polish, with the added step of using a magnet. The primary difference is the need to work one nail at a time and cure immediately after using the magnet to set the effect. With a little practice, it’s quite manageable.
Q: Do I need a special lamp for cat eye gel polish?
A: Yes, because cat eye polish is a type of gel polish, it requires a UV or LED nail lamp to cure and harden. Traditional air-dry nail polish will not work with cat eye gel formulations.
Q: Can I use any magnet with cat eye gel polish?
A: For best results, it’s highly recommended to use a dedicated cat eye magnet. These are specifically designed with the right magnetic strength and shape to manipulate the metallic particles in the polish effectively. Generic magnets might not be strong enough or have the right field pattern to create a crisp effect.
Q: How do I remove cat eye gel polish?
A: Cat eye gel polish is removed like any other soak-off gel polish. You’ll typically buff the top coat to break the seal, then soak your nails in acetone for 10-15 minutes, usually with foil wraps. Gently push off the softened gel, being careful not to scrape or damage your natural nail. For general information about the magnetic forces at play, you can refer to the Wikipedia page on Magnetism.
Q: Can I put a top coat over the cat eye effect?
A: Absolutely! A gel top coat is essential. It seals and protects the cat eye design, adds durability, and provides that high-gloss, long-lasting finish that gel polishes are known for. It also ensures the magnetic effect remains crisp and vibrant for weeks.
Q: What if my cat eye effect isn’t clear or fades?
A: A common reason for a faded or unclear effect is not holding the magnet close enough, not holding it long enough, or not curing immediately after using the magnet. The metallic particles may have resettled before hardening. Practice and swift curing are key. Ensure your magnet is strong enough and the polish layer is adequate.
Q: Can I combine cat eye gel polish with other nail art techniques?
A: Definitely! Cat eye gel polish serves as an excellent base or accent for other nail art. You can apply stamping, decals, hand-painted designs, or even encapsulate glitter or foils over a cured cat eye effect before applying your final top coat. This allows for truly unique and personalized magnetic nail art.
Cat eye gel polish represents a fantastic leap forward in DIY nail artistry, offering an accessible way to achieve truly dynamic and stunning manicures. Its unique optical effects, combined with the durability of gel, make it an irresistible choice for anyone looking to add a touch of sophistication and intrigue to their nails. With the right tools, a bit of practice, and an understanding of its mechanics, you’ll be creating mesmerizing cat eye designs that capture attention and spark conversation. It’s more than just polish; it’s a tiny, wearable work of art.
Disclaimer: The pet care information on bangladeshcountry.com is based on general internet research and is provided for informational and educational purposes only. We are independent publishers and researchers, not licensed veterinarians or animal health professionals. The content on this site is not a substitute for professional veterinary advice, diagnosis, or treatment. Always consult your veterinarian regarding your pet’s health, diet, or behavior. Reliance on this information is solely at your own risk.