
Diving into a new craft can feel overwhelming, especially when the finished products you see online look incredibly complex. However, if you’re looking for an accessible entry point into the world of needle and thread, finding quality simple embroidery designs can be your perfect starting line. This guide focuses on helping absolute beginners discover satisfying projects that require minimal supplies and can be completed quickly, ensuring you build confidence and enjoy the creative process from your very first stitch. We’ll cut through the noise, offering practical insights and concrete examples to help you elevate your personal style & aesthetic without needing years of experience or a vast collection of tools.
Why Start with Simple Embroidery Designs?
Beginning your embroidery journey with simple designs offers a significant advantage: it lowers the barrier to entry significantly. You don’t need a massive investment in specialized equipment or endless hours to master intricate techniques. Instead, you focus on fundamental stitches and straightforward patterns. This approach allows you to experience the meditative quality of embroidery almost immediately, offering a relaxing escape from daily stresses.
The quick gratification from completing a small project is incredibly motivating. Finishing a simple design in an hour or two boosts confidence and makes you eager to try another. It’s a tangible achievement that reinforces your newfound skill. Moreover, starting small helps you build a solid foundation in basic techniques, preparing you for more complex projects down the line without the frustration of tackling too much too soon. You’ll learn how to handle your needle and thread, manage tension, and understand how different stitches create various textures and effects.
Essential Tools and Materials for Simple Projects
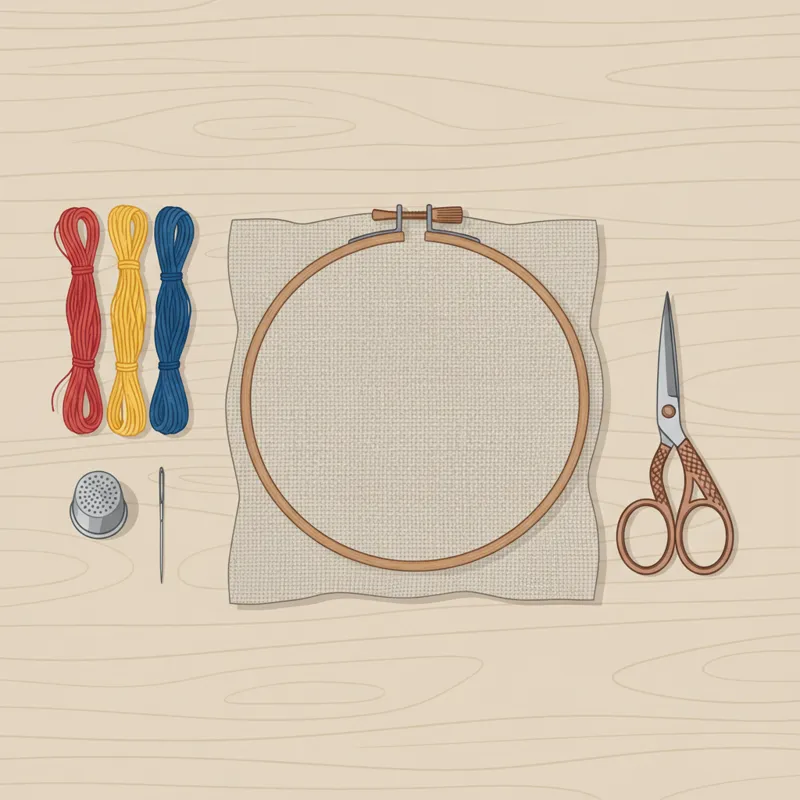
One of the great appeals of starting with hand embroidery is the minimal setup required. You likely have some of these items already, making it even easier to jump in. Here’s a concise list of what you truly need:
- Embroidery Hoop: A 4-inch to 6-inch wooden or plastic hoop works perfectly for most simple projects. It keeps your fabric taut, making stitching much easier.
- Embroidery Needles: Crewel needles (sizes 5-9) are ideal. They have sharp points for piercing fabric and large eyes for threading multiple strands of floss.
- Embroidery Floss: Start with a small selection of basic colors. DMC is a popular, readily available brand, offering a wide array of vibrant shades. Each skein contains six strands, which you can separate for different effects.
- Fabric: A plain-weave cotton or linen fabric is excellent for beginners. Muslin, calico, or even old cotton pillowcases work well. Aim for something not too thin, which can pucker, or too thick, which can be hard to needle.
- Small Scissors: Sharp, pointed scissors are essential for snipping floss cleanly.
- Fabric Marker/Pencil: A water-soluble pen or a light pencil helps you transfer your designs onto fabric.
With just these few items, you possess everything necessary to create beautiful, simple embroidery designs. Avoid getting caught up in buying every gadget; focus on mastering the basics with reliable tools.
Understanding Basic Stitches for Easy Embroidery
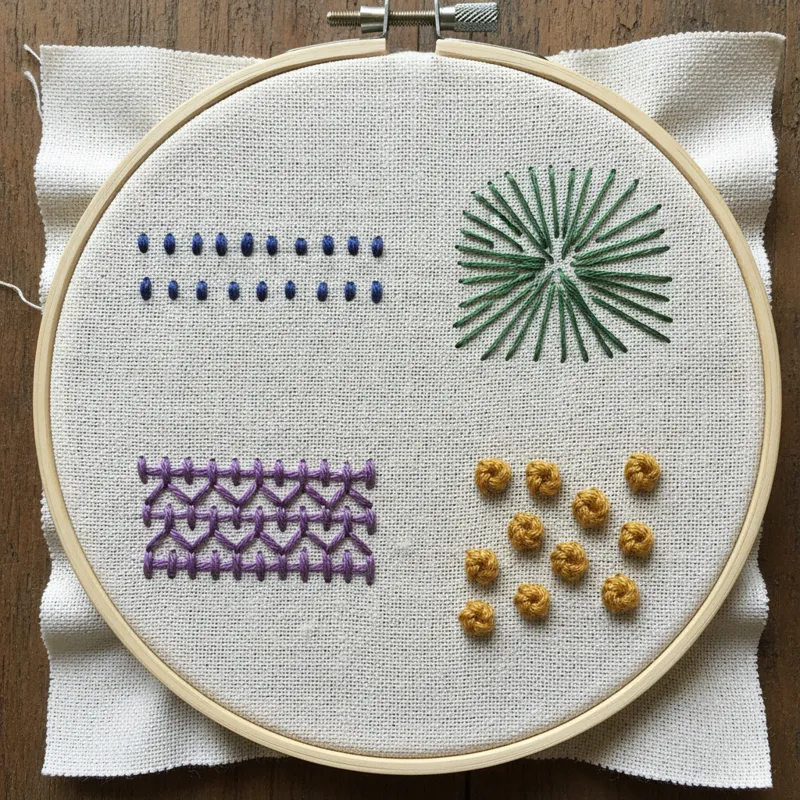
You don’t need to know dozens of stitches to create appealing embroidery. A handful of fundamental stitches form the backbone of countless designs. Mastering these few will open up a world of creative possibilities, especially for ‘easy hand embroidery designs’.
- Running Stitch: This is arguably the simplest stitch. You bring the needle up, then down, then up again in a continuous motion. It’s perfect for creating broken lines, outlining shapes, or adding texture with parallel rows.
- Backstitch: The go-to for crisp, continuous lines, ideal for outlines, text, and detailed shapes. You make a stitch forward, then bring the needle up a stitch length ahead, and go back down into the end of the previous stitch. It creates a solid, unbroken line.
- Straight Stitch: As the name implies, it’s just a single straight line from one point to another. Straight stitches are versatile for creating radiating patterns, starbursts, tiny leaves, or geometric fills.
- French Knot: This stitch adds texture and dimension. It’s fantastic for creating small dots, flower centers, or clustered patterns. You wrap the floss around your needle a few times, then re-insert the needle very close to where it emerged, pulling through to form a tiny knot.
- Satin Stitch: While it can be complex for large areas, simple satin stitch is excellent for filling small shapes smoothly. You lay straight stitches closely side-by-side, completely covering an area with thread. For beginners, focus on tiny shapes to keep it manageable.
These basic stitches, used individually or in combination, provide all the tools you need for a wide array of simple embroidery designs.
How to Transfer Simple Embroidery Designs
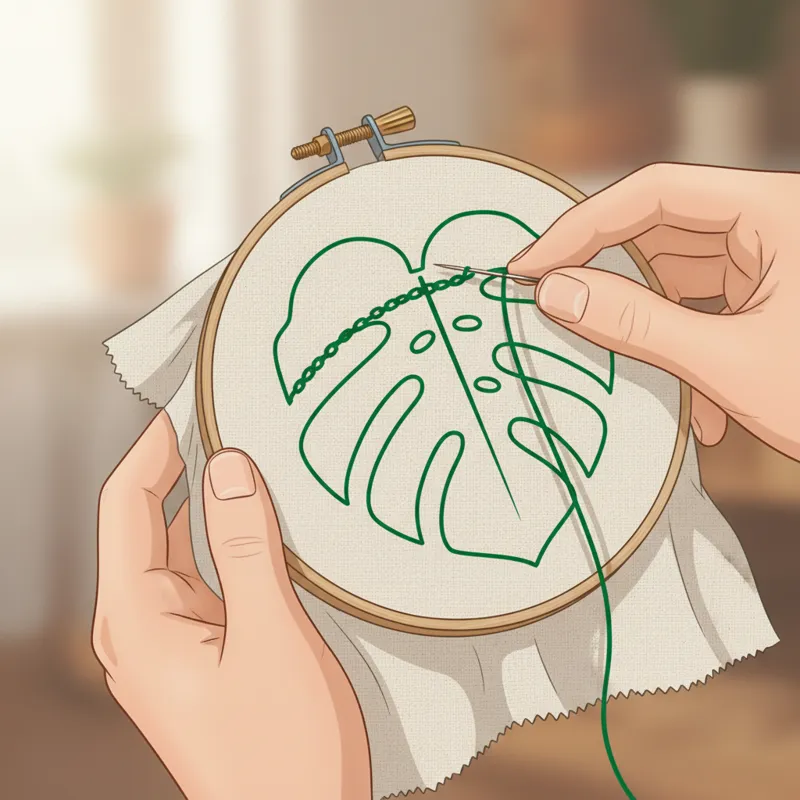
Accurately transferring your chosen design onto fabric is a crucial first step for clean, professional-looking embroidery. Don’t skip this part or rush it; a clear ’embroidery drawing’ makes stitching much easier and more enjoyable.
- Lightbox or Window Method: This is perhaps the simplest and most cost-effective method. Tape your printed design to a window or a lightbox, then tape your fabric directly over it. The light shines through, allowing you to easily trace the outline onto your fabric with a water-soluble pen or light pencil. This method works best for lighter-colored fabrics.
- Water-Soluble Pens/Markers: These pens draw visible lines that disappear completely when dabbed with water or rinsed. They are excellent for outlining designs and ensure no permanent marks are left on your finished piece. Always test on a scrap of your fabric first.
- Carbon Paper/Dressmaker’s Tracing Paper: For darker fabrics where the light method won’t work, use special carbon or tracing paper. Place the carbon paper face down on your fabric, then your design on top. Trace over the design with a blunt pencil or stylus, and the design will transfer as a clear line onto your fabric.
- Iron-on Transfers: While less common for custom designs, pre-made iron-on transfers offer a quick way to get a design onto fabric. You simply iron the pattern onto your chosen material. These can be great for specific motifs but offer less flexibility than tracing your own.
Whichever method you choose, make sure your fabric is taut in the hoop before you begin stitching. A clear, accurate outline simple embroidery designs provides a roadmap for your needle, helping you maintain consistent stitch length and shape.
Top 10 Simple Embroidery Designs for Absolute Beginners
Here’s a collection of simple embroidery designs perfect for anyone just starting out. Each one focuses on basic stitches and straightforward shapes, ensuring a rewarding experience.
1. Basic Geometric Shapes
Start with squares, circles, or triangles. Use backstitch for crisp outlines or running stitch for a softer, more sketched look. You can create a repeating pattern or a single focal point. These are fantastic for learning tension control and achieving clean lines.
2. Simple Outlines: Hearts, Stars, Leaves
These universally recognized shapes are wonderfully forgiving. A heart outline using backstitch, a starburst with straight stitches, or a basic leaf shape with a running stitch and a single straight vein. These projects build confidence rapidly because they quickly become recognizable forms.
3. Monograms or Single Letters
Personalize items with an initial. Backstitch is ideal for creating clear letterforms. Experiment with different fonts (keep them simple, block letters or a basic script). This is a fantastic way to create a thoughtful, custom gift or add a personal touch to your belongings. For more detailed explorations, you can even explore letter embroidery.
4. Tiny French Knot Flowers
Cluster a few French knots together to create small, textured flowers. Add a straight stitch stem and leaf. These designs are quick, satisfying, and introduce a charming three-dimensional element. Vary the number of wraps for different knot sizes.
5. Abstract Lines and Dots
Sometimes, the simplest designs are the most impactful. Create a pattern of parallel running stitches, scattered French knots, or a composition of intersecting straight lines. This allows for pure creative expression without needing to reproduce a specific image. It’s a great way to experiment with color and spacing.
6. Basic Nature Silhouettes
Think minimalist: a single tree silhouette, a simple mountain range, or a cloud with a few raindrops. Use backstitch for the outlines. These designs evoke a sense of calm and can be surprisingly sophisticated in their simplicity.
7. Small Scattered Motifs
Embroider tiny, repeated motifs like small bees, stars, moons, or tiny fruits (cherries, apples). These can be scattered randomly across fabric or arranged in a gentle pattern. They’re excellent for practicing small, precise stitches.
8. Wording or Short Quotes
Choose a short, meaningful word or phrase. “Breathe,” “Create,” “Joy,” or a favorite brief quote. Backstitch is your best friend here for readability. Keep the font simple and the text concise for quick completion. This lets you combine your love for words with your new craft.
9. Simple Borders
Add an embroidered border to a piece of fabric, like a tea towel or a plain napkin. A continuous running stitch, a repeated straight stitch pattern, or a simple backstitched line around the edge instantly elevates the item.
10. Patterned Fill with Running Stitch
Take a simple shape (like a circle or square) and fill it with parallel rows of running stitches. You can vary the spacing or use different colors for a striped effect. This introduces the concept of filling shapes without the demand of perfect satin stitch.
These easy hand embroidery designs provide a fantastic starting point, allowing you to develop essential skills and create genuinely beautiful pieces without intimidation.
Quick Project Ideas for Your Simple Designs
Once you’ve practiced a few simple embroidery designs, you’ll naturally want to apply them to practical items. These quick projects are perfect for showing off your new skills and creating personalized gifts or home decor.
- Tea Towels and Napkins: A simple border, a single initial, or a small nature motif in the corner of a plain tea towel or cloth napkin can add a charming, handmade touch to your kitchen or dining area.
- Tote Bags: Elevate a plain canvas tote bag with an embroidered monogram, a cluster of French knot flowers, or an abstract line design. It’s practical, stylish, and unique.
- Hoop Art: Frame your finished simple embroidery designs directly in the hoop. A small 4-inch or 6-inch hoop makes a lovely piece of wall art for a gallery wall or a thoughtful gift.
- Clothing Accents: Add a subtle embroidered detail to a plain T-shirt pocket, collar, or cuff. A tiny star, a single flower, or a simple geometric shape can make a garment feel custom-made. Consider subtle neckline embroidery designs or even small motifs for blouse embroidery designs for a touch of elegance.
- Patches: Embroider a simple design onto a piece of felt or sturdy fabric, trim it, and then stitch or glue it onto jackets, backpacks, or caps. These embroidery patch designs are a fun way to customize your accessories.
- Bookmarks: Embroider a thin strip of fabric with a simple design or a short word, then finish the edges. It’s a quick, thoughtful gift for a book lover.
These projects are designed to be completed quickly, giving you that satisfying sense of accomplishment and demonstrating the versatility of simple embroidery.
What Most People Get Wrong When Starting Simple Embroidery
While simple embroidery designs are forgiving, there are a few common pitfalls beginners often encounter. Recognizing these can help you avoid frustration and improve your results.
- Over-tightening Stitches: Pulling your floss too tightly can pucker your fabric, making your piece look uneven and distorting the design. Aim for gentle tension; stitches should lie flat on the fabric without pulling it.
- Using the Wrong Needle or Fabric: A dull needle can damage fabric, and a needle that’s too thick can leave large holes. Similarly, overly loose-weave fabric can make it hard to create neat stitches, while very dense fabric can be difficult to pierce. Always match your needle to your fabric and thread weight.
- Not Hooping Fabric Correctly: Fabric that isn’t taut in the hoop will result in uneven stitches and a messy appearance. Ensure the fabric is stretched evenly and drum-tight before you start stitching.
- Expecting Perfection Immediately: Embroidery is a skill that develops with practice. Your first projects won’t be flawless, and that’s perfectly fine. Embrace the learning process, and don’t be afraid to unpick stitches and try again.
- Trying Overly Complex Designs Too Soon: While enthusiasm is great, jumping into a design with many different stitches or intricate details can quickly lead to frustration for a beginner. Stick to truly simple embroidery designs with a limited number of stitches until you feel more confident.
- Not Separating Floss Strands: Embroidery floss comes with six strands twisted together. For most simple designs, you’ll want to use 2-3 strands to avoid bulky stitches and achieve a finer look. Many beginners stitch with all six strands, which often looks heavy and can make small details difficult.
Avoiding these common mistakes will make your early embroidery experience much more enjoyable and productive. Remember, every skilled embroiderer started exactly where you are now.
Caring for Your Embroidered Pieces
Proper care ensures your simple embroidery designs remain vibrant and intact for years. While embroidery is durable, a little mindful attention goes a long way.
For most hand-embroidered items, especially those made with cotton floss and fabric, hand washing in cold water with a mild detergent is recommended. Gently swish the item, avoid harsh scrubbing or wringing, which can distort stitches. Rinse thoroughly until the water runs clear.
To dry, gently roll the item in a clean towel to absorb excess water, then lay it flat on a clean surface or hang it to air dry, away from direct sunlight. This helps prevent stretching and keeps the fabric’s shape.
If ironing is needed, place the embroidered piece face down on a soft towel and iron on a low to medium setting, using steam if necessary. Ironing on the reverse helps to protect the stitches and keeps them from flattening too much. For decorative hoop art, consider a sealant spray for added protection if it will be handled frequently, though this is rarely necessary for wall display. You can find general care tips for textiles from reliable sources like the Smithsonian National Museum of Natural History’s conservation guides.
Frequently Asked Questions about Simple Embroidery Designs
How long does a simple embroidery project take?
Many simple embroidery designs, especially those using only one or two basic stitches and small in size (e.g., a 4-inch hoop design), can be completed in as little as 1-3 hours. Larger or more intricate “simple” designs might take 5-8 hours, spread over a few sessions. Your speed will increase with practice.
What’s the best fabric for beginner embroidery?
Plain-weave natural fabrics like cotton, linen, or a cotton-linen blend are excellent. Look for medium-weight fabrics with a relatively even weave, as they are easy to pierce, hold stitches well, and don’t fray excessively. Muslin or unbleached calico are budget-friendly options. For more insights on fabrics, you might explore resources like a detailed Wikipedia article on textile manufacturing.
Can I use regular sewing thread for embroidery?
While technically possible, it’s not recommended for most embroidery projects. Regular sewing thread is thinner, often has a sheen, and isn’t designed to create the same texture or coverage as embroidery floss. Embroidery floss (like DMC) is specifically designed to be separated into strands, giving you more control over the thickness and appearance of your stitches.
How do I finish the back of my embroidery?
For hoop art that will be displayed, you typically trim the fabric around the hoop, leaving an inch or two excess. You can then gather the edge with a running stitch and pull it tight, or glue the excess fabric to the inside of the hoop with fabric glue. For items that will be washed or handled, you usually leave the back as is, making sure all knots are small and secure, or you can add a backing fabric to protect the stitches.
Where can I find free simple embroidery patterns?
The internet is a treasure trove of resources. Websites like Pinterest, craft blogs (many independent artists offer free patterns), and even floss manufacturer websites often have free patterns. Searching for “free simple embroidery patterns” or “easy hand embroidery patterns PDF” usually yields many results. For inspiration, searching “embroidered ideas” can also lead to a wealth of creative projects.


