
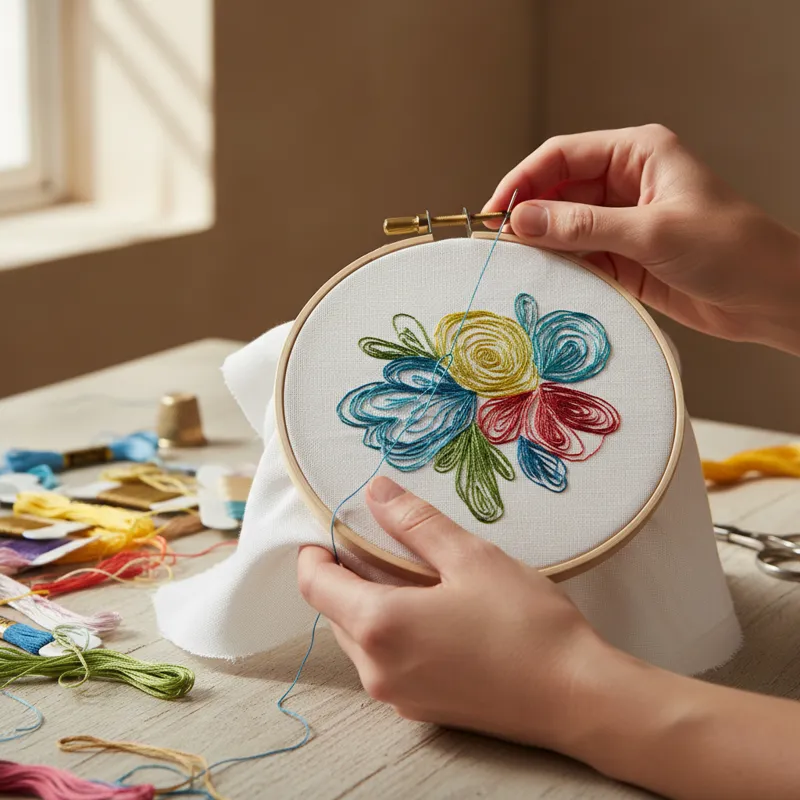
If you’re looking for that unique personal touch in home decor or fashion, particularly in terms of style & aesthetic, finding truly distinct pieces can often feel like a treasure hunt. Mass-produced items rarely capture the individuality that something handcrafted offers. This is where hand embroidery shines, offering a pathway to create bespoke items that resonate with your personal vision. Far from being an outdated craft, hand embroidery is experiencing a vibrant resurgence in 2026, appealing to a new generation eager to engage with textiles in a meaningful way. But for many, the idea of picking up a needle and thread can seem daunting, conjuring images of intricate, complex patterns only achievable by seasoned artisans. The truth is, hand embroidery for beginners is incredibly accessible, requiring minimal initial investment and offering a deeply rewarding creative outlet. You don’t need a high-tech machine or a vast studio; just a few basic supplies and a willingness to learn a few simple embroidery stitches are all it takes to start your journey into this captivating art form.
Understanding Hand Embroidery: An Accessible Art Form
Hand embroidery involves using a needle and thread to create decorative designs on fabric. Unlike machine embroidery, which relies on automated patterns and often a digital design, hand embroidery is a tactile, human-driven process where each stitch is individually formed. This direct connection to the material is a core part of its appeal. The deliberate act of placing stitches allows for unique textures, variations, and a truly handcrafted feel that automated processes simply cannot replicate.
Why is hand embroidery experiencing such a robust revival now? In 2026, many people are seeking ways to disconnect from digital overload and engage in mindful, creative activities. Hand embroidery offers exactly that: a meditative process that fosters concentration, reduces stress, and provides a tangible sense of accomplishment. It’s also a powerful tool for personalization and sustainable living, allowing you to mend, embellish, and customize items rather than discarding them. This blend of creative expression, mindfulness, and practical application makes learning how to do embroidery particularly relevant today.
While the craft itself boasts a rich history spanning thousands of years across diverse cultures, from ancient Egypt to elaborate medieval tapestries, its modern resurgence often focuses on simpler, more approachable styles. You don’t need to be an expert like some of the highly skilled embroidery artists around the globe to begin creating beautiful pieces. Today’s hand embroidery for beginners often champions minimalist designs, bold colors, and an emphasis on the joy of the process itself, rather than striving for historical grandeur.
Getting Started: Essential, Affordable Supplies for Beginners
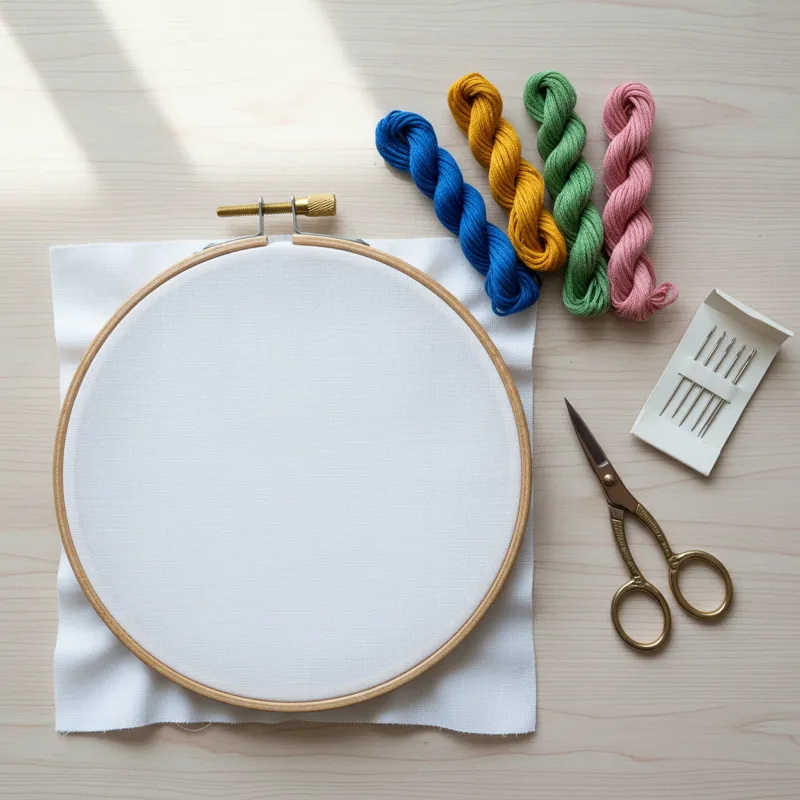
One of the biggest advantages of hand embroidery is its low barrier to entry. You don’t need to break the bank to gather your initial supplies. Focusing on affordability and utility for your first projects helps overcome that initial overwhelm and cost barrier. Here’s what you absolutely need to start, and a few helpful additions:
The Absolute Must-Haves
- Embroidery Hoops: These hold your fabric taut, making stitching much easier and more consistent. Wood or plastic hoops are common. For beginners, a 6-inch or 8-inch hoop is ideal, offering a good balance between manageable size and enough space for a simple design. You can often find a basic wooden hoop for just a few dollars.
- Embroidery Needles: These differ from regular sewing needles; they have a larger eye to accommodate multiple strands of floss and a sharp point for piercing fabric. A variety pack (often labeled “embroidery” or “crewel” needles) is a good starting point, usually containing sizes 3-9. Size 7 is a versatile choice for most beginner projects.
- Fabric: A plain-weave fabric with a stable structure works best. Cotton or linen are excellent choices. Look for materials that aren’t too thin or too stretchy. A fat quarter (18×22 inches) of plain white or natural colored cotton is more than enough for several beginner projects and very inexpensive. Muslin, broadcloth, or even old cotton sheets can work too.
- Embroidery Floss (Thread): This is the colorful star of your project. Six-strand divisible cotton floss (like DMC, Anchor, or generic craft store brands) is standard. Start with a small selection of 5-10 colors you love. Each skein typically costs less than a dollar and goes a long way.
- Small, Sharp Scissors: Precision is key for snipping threads cleanly. Any small, sharp pair will do, but dedicated embroidery scissors are often very sharp and have fine tips, making them a joy to use.
- Pattern Transfer Tools: You need a way to get your design onto the fabric. Water-soluble pens (disappear with water) or heat-erasable pens (disappear with heat from an iron) are fantastic for beginners. Another simple method is using carbon paper designed for fabric or tracing your design against a light source onto the fabric with a pencil.
Optional but Helpful Additions
- Thimble: If you find pushing the needle through fabric tough on your finger, a thimble protects it.
- Needle Minder: A magnetic gadget that holds your needle safely when you take a break, preventing it from getting lost in your fabric or falling to the floor.
- Storage Solutions: A small craft box or even a Ziploc bag keeps your floss organized and tangle-free.
You can find all these supplies at major craft stores like Michaels or JOANN, independent needlework shops, or online retailers. Many stores offer beginner embroidery kits that include a selection of these items, often centered around a simple design, which can be an excellent way to get started.
Your First Stitches: Mastering the Fundamentals of Hand Embroidery
Embarking on your first hand embroidered project begins with some basic setup and understanding how to form a few core stitches. Don’t worry about perfection; focus on understanding the mechanics and getting a feel for the needle and thread.
Preparing Your Hoop and Fabric
First, gently loosen the screw on your embroidery hoop and separate the two rings. Lay your fabric over the inner ring, ensuring it’s centered over your chosen design area. Place the outer ring over the fabric and inner ring, pressing down firmly. As you tighten the screw, gently pull the fabric taut from all sides until it’s as tight as a drum. This tension is crucial for even, neat stitches.
Threading Your Needle and Starting Your Thread
Embroidery floss comes as six strands twisted together. For most beginner projects, you’ll want to separate one, two, or three strands. Two strands are a good general-purpose thickness for outlines and medium fills. To separate, cut an arm’s length (about 18-24 inches) of floss, then pinch one strand at one end and gently pull it up and away from the rest. The remaining strands will gather, but they’ll untwist as you pull.
Thread your needle. To start your thread, you have a couple of options:
- Knotted Start: Tie a small knot at one end of your floss. Bring your needle up from the back of the fabric, through the design line, until the knot catches on the back. This is the simplest method for beginners.
- Waste Knot (Knotless Start): Tie a temporary knot a few inches away from your starting point. Make a few small stitches over your design line, securing the working thread as you go. Once secure, snip the waste knot. This creates a cleaner back for your piece.
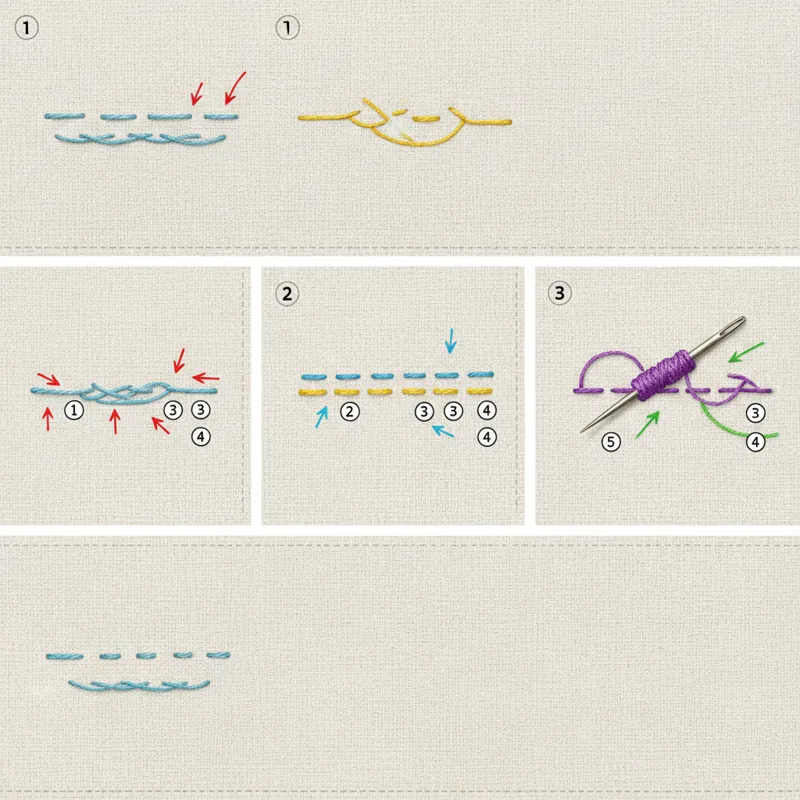
The Foundational Stitches
Learning how to embroider involves mastering a few core stitches. Here are some of the most useful for beginning embroidery:
- Running Stitch: This is a simple in-and-out stitch that creates a dashed line. It’s excellent for outlining shapes, creating borders, or adding texture. You can load several stitches onto your needle before pulling it through for speed.
- Backstitch: A strong, solid line stitch that’s perfect for crisp outlines and creating letter embroidery. You bring your needle up, make a stitch backward, then bring it up again a stitch length ahead and go back into the end of your previous stitch. This creates a continuous, unbroken line.
- Satin Stitch: Used for filling shapes with a smooth, solid block of color. You make long, parallel stitches close together across a shape. The key is to keep tension even and stitches very close, lying flat against each other to mimic silk.
- French Knot: This creates a small, textured dot, ideal for adding small details or for embroidery mini designs like flower centers, eyes, or tiny berries. Bring your needle up, wrap the thread around the needle 1-3 times, then reinsert the needle very close to where it emerged (but not in the exact same hole) before pulling the needle through.
- Stem Stitch: Perfect for creating smooth, rope-like lines, especially for flower stems, scrolling designs, or fine outlines. You work from left to right, keeping the working thread consistently to one side of the needle, creating a slightly raised, twisted line.
- Lazy Daisy (Detached Chain Stitch): Forms small, petal-like loops, great for individual flowers or leaves. You make a loop, secure it with a tiny straight stitch at its tip, then repeat.
Practice these stitches on a scrap piece of fabric until you feel comfortable. Don’t worry if they aren’t perfect right away; consistency comes with practice.
Easy Hand Embroidery Projects to Spark Your Creativity
Once you have a grasp of the basic stitches, you’re ready to tackle your first real project. The key to maintaining enthusiasm as a beginner is to start with simple, achievable designs. These ideas will give you practical applications for your new skills without overwhelming you.
Simple Quote or Monogram
Using backstitch for clear lines and running stitch for decorative borders, you can embroider a favorite short quote, a single initial, or a monogram onto a piece of fabric. This is a great way to practice letter embroidery and create a personalized gift or a small piece of wall art. Start with block letters before moving onto more intricate script.
Geometric Pattern
Draw simple geometric shapes like triangles, squares, or circles, or even a basic tessellating pattern. Use running stitch or backstitch to outline them, and maybe satin stitch to fill in a few. This project helps you get comfortable with even tension and straight lines. You can make a series of small designs and frame them as a minimalist embroidery border design for a larger piece, or even integrate them into a custom needle point piece.
Nature-Inspired Motifs
Simple flowers and leaves are classic hand embroidery elements. Use lazy daisy for petals, stem stitch for stems, and a French knot for the flower center. Even a single, simple flower on a piece of fabric can be surprisingly charming. Think about a small sprig of lavender or a single daisy. These organic shapes are forgiving and offer plenty of opportunities to experiment with color.
Personalized Gift Tags or Bookmarks
Cut small rectangles of sturdy felt or a stiff cotton blend. Embroider a tiny initial, a heart, or a star using backstitch. These quick projects are excellent for practicing small-scale work and make thoughtful, inexpensive gifts. They are fantastic examples of simple embroidery that can be finished in a short amount of time.
Upcycling Clothing
Give an old t-shirt, denim jacket, or canvas tote bag a new lease on life. Add a small embroidered motif to a collar, pocket, or cuff. A tiny bouquet, a single insect, or a personalized initial can transform an ordinary item into something unique. Consider a subtle floral detail near the neckline – a small neckline embroidery design can elevate a plain shirt. Or add a delicate accent to a blouse embroidery design to revitalize it. This DIY embroidery approach is both sustainable and stylish.
Small Wall Art
Once you feel a bit more confident, take one of your favorite small designs and frame it in its hoop. An embroidered hoop makes for delightful, inexpensive wall art for living room nearby, adding a personal and artistic touch to your space. You can even combine a few small hoops to create a gallery wall.
These easy embroidery projects are designed to build your confidence and help you enjoy the process of learning how to embroider without feeling overwhelmed. The satisfaction of completing even a simple piece is immense!
Navigating Common Beginner Challenges & What Most People Get Wrong
Every craft has its learning curve, and hand embroidery is no exception. It’s natural to encounter some frustrations as you learn. Understanding these common pitfalls and adjusting your approach will save you a lot of headache and keep your motivation high.
Tension Troubles: Too Tight, Too Loose
One of the most frequent issues for beginners is inconsistent thread tension. If your stitches are pulled too tightly, the fabric will pucker and distort, creating an uneven surface. If your stitches are too loose, they’ll appear sloppy and won’t define your design clearly. The key is to pull the thread just enough so the stitch lies flat on the fabric without pulling the fabric itself. This takes practice, but consciously thinking about it with each stitch helps. Always ensure your fabric is taut in the hoop before you start stitching.
Knots and Tangled Thread
Working with multiple strands of floss can lead to frustrating tangles and knots, especially if your thread is too long.
- Thread Length: Keep your working thread to about an arm’s length (18-24 inches). Longer threads are more prone to tangling.
- Twisting: Floss tends to twist as you stitch. Periodically let your needle and thread dangle freely to allow the thread to untwist.
- Separating Strands: When separating strands, pull one strand completely free before joining it with others. Don’t try to pull multiple strands simultaneously, as this causes tangles.
Fabric Distortion
Beyond tension issues, improper hooping can distort your fabric. Make sure your fabric is straight and centered in the hoop, not on a diagonal. Also, avoid leaving your fabric hooped for extended periods, especially if the tension is very tight, as it can leave permanent marks or stretch the fabric. Unhoop your project when you’re not working on it for long stretches.
What Most People Get Wrong: The Myth of “Perfection”
Many beginners approach hand embroidery with the expectation that every stitch must be absolutely perfect and identical. This is perhaps the biggest misconception. Machine embroidery strives for uniformity, but hand embroidery celebrates the human touch. Slight variations in stitch length, tension, or angle are part of what gives a hand-embroidered piece its unique character and charm. Trying to achieve machine-like perfection often leads to frustration and can stifle your creativity. Embrace the small imperfections; they tell the story of your handiwork. Focus on consistency rather than absolute flawless replication. Your initial pieces are about learning, not competing.
Choosing Overly Ambitious Projects
It’s tempting to jump into complex designs you see online, but starting with intricate patterns can quickly lead to overwhelm and burnout. This is one of the most common reasons people give up. Stick to simple embroidery for your first few projects. Master the basic stitches on small, straightforward designs, then gradually increase complexity as your skills and confidence grow. This gradual progression is crucial for long-term enjoyment and success in learning how to get into embroidery.
The Importance of Practice and Patience
Hand embroidery is a skill that develops over time. Don’t get discouraged if your first attempts don’t look exactly like the tutorials. Every stitch you make builds muscle memory and refines your technique. Be patient with yourself, enjoy the process, and remember that even experienced embroiderers have off days.
Tips for Advancing Your Hand Embroidery Skills
Once you’ve mastered the embroidery basics, you’ll likely want to expand your repertoire. Here’s how you can continue to grow your skills and really make hand embroidery your own.
Experimenting with Colors and Thread Types
Don’t limit yourself to the basic six-strand cotton floss. Explore other types of thread:
- Pearl Cotton: A mercerized, non-divisible thread with a lovely sheen, available in different weights. Great for bolder stitches.
- Silk Floss: Offers a luxurious sheen and smooth texture, though often more delicate and expensive.
- Metallic Threads: Add sparkle and glamour, but can be trickier to work with due to fraying. Use shorter lengths and a larger needle.
- Wool Yarn: For a more textural, rustic feel, often used in crewel embroidery.
Play with color palettes. Experiment with blending different shades of floss within a single element to create subtle gradients and depth. Consider how different colors interact and evoke different moods in your embroidery guide.
Exploring Different Fabrics
While cotton and linen are excellent starting points, different fabrics present new challenges and opportunities:
- Evenweave Fabrics: For counted cross-stitch or blackwork, where stitches are precise.
- Denim: Great for sturdy, casual embellishments.
- Felt: Doesn’t fray, making it easy for appliqué and dimensional work.
- Silk: Demands a very fine needle and gentle hand due to its delicate nature.
Understand how the fabric’s weave and weight affect your stitches and overall design.
Learning More Complex Stitches
Once you’re comfortable with the fundamentals, branch out. There are hundreds of embroidery stitches. Research stitches like the colonial knot, fly stitch, feather stitch, or various composite stitches. Stitch dictionaries and online tutorials are invaluable resources for expanding your stitch vocabulary. Look for an “embroidery stitch guide for beginners” to help you discover new techniques.
Finding Inspiration and Community
The embroidery community, both online and offline, is incredibly vibrant.
- Online Platforms: Instagram, Pinterest, and specialized forums are rich sources of inspiration and learning. Follow other embroiderers, explore hashtags (e.g., #handembroidery, #modernembroidery), and engage with the community.
- Books and Magazines: Classic embroidery books offer detailed instructions and historical context.
- Local Workshops: Many craft stores and community centers offer classes. Learning in person can provide direct feedback and camaraderie.
Don’t just copy; use what you see as a springboard for your own ideas.
Developing Your Unique Style
As you gain experience, you’ll naturally start to gravitate towards certain colors, stitches, and themes. This is where your personal artistic voice begins to emerge. Don’t be afraid to experiment, combine stitches in unconventional ways, or even design your own patterns. Your unique style is what will make your hand embroidery truly stand out and become recognized as elegant artwork. Over time, you’ll develop your own ‘signature’ feel.
Hand Embroidery in 2026: Trends and the Future
Hand embroidery is not static; it evolves with broader cultural and technological shifts. In 2026, we see several exciting trends shaping the future of this ancient craft.
Sustainable Practices and Upcycling
With a growing global emphasis on sustainability, hand embroidery has found a strong foothold in the slow fashion and upcycling movements. People are using embroidery to mend clothing (visible mending), personalize thrift store finds, and transform textile waste into new artistic pieces. This not only reduces waste but also infuses items with unique character. This focus on extending the life of textiles through repair and embellishment aligns perfectly with conscious consumption. For example, using vegetable dyes for floss and sourcing organic fabrics are growing practices.
Mindfulness and Wellness Aspect
The meditative quality of hand embroidery continues to be a major draw. In a fast- paced world, the slow, repetitive motion of stitching offers a form of active meditation. It helps reduce screen time, improve focus, and provides a tangible sense of accomplishment, contributing to mental well-being. This aspect of the craft is becoming increasingly recognized as a form of self-care.
Integration with Digital Design
While hand embroidery is tactile, it’s not immune to digital influence. Artists are increasingly using digital tools to design patterns, visualize color palettes, and even create templates before picking up a needle. Apps and software help generate complex geometric patterns or even translate photographs into stitchable guides. This fusion of digital planning and manual execution opens up new creative possibilities, making the design process more efficient and precise for those who desire it. This also includes the use of embroidery stamps for easily repeatable patterns or designs.
Customization and Personal Branding
The desire for unique, personalized items remains strong. Hand embroidery offers unparalleled customization, from bespoke initials on clothing to custom family portraits rendered in thread. This extends into personal branding for artisans who create custom needle point pieces or other embroidered goods, allowing them to offer truly one-of-a-kind products that stand out in a crowded market. This trend is amplified by social media, where unique, personalized pieces gain significant traction. The renewed appreciation for skilled handcrafts also means that professional embroiderers and artists are gaining more recognition for their intricate work. For historical context and broader trends in textiles, Wikipedia’s entry on embroidery provides an excellent overview. Additionally, the broader market for handmade goods is thriving, as noted by various business publications such as Forbes, underscoring the commercial viability and consumer interest in unique, handcrafted items.
Frequently Asked Questions About Hand Embroidery
When diving into a new craft like hand embroidery, it’s natural to have questions. Here are some common queries from beginners:
How long does it take to learn hand embroidery?
You can learn the basic stitches for hand embroidery in just a few hours. Mastering them and developing your own style, however, is a lifelong journey. Most beginners feel confident creating simple projects after a few weeks of consistent practice. Don’t rush; enjoy the process of learning how to get started embroidery.
What’s the best fabric for beginners?
Plain-weave cotton or linen are ideal. Look for fabrics that aren’t too thin, too thick, or too stretchy. A stable, medium-weight fabric like broadcloth or plain cotton sheeting provides a good surface for practicing stitches without too much resistance or distortion.
Can I use regular sewing thread for hand embroidery?
While you technically can, it’s not recommended for most hand embroidery projects. Regular sewing thread is typically much thinner, often made from polyester, and can break more easily when pulled through fabric repeatedly. Embroidery floss is specifically designed for this craft: it’s softer, comes in many colors, is easier to separate into strands, and provides a much better visual texture.
How do I transfer a design to fabric?
Several methods work well for beginners:
- Water-soluble or Heat-erasable Pens: Draw directly on the fabric; the lines disappear with water or heat.
- Light Box/Window Method: Tape your design and fabric to a window or light box, then trace with a pencil or pen.
- Carbon Paper: Place special fabric carbon paper between your design and fabric, then trace over the design.
Is hand embroidery difficult?
Hand embroidery is not inherently difficult, but it requires patience and practice. The initial learning curve for the basic stitches is quite gentle. The “difficulty” often comes from attempting overly complex designs too soon or expecting immediate perfection. By starting with simple embroidery and gradually challenging yourself, you’ll find it a very rewarding and accessible hobby.
For additional governmental resources on creative arts and education, you might explore sites like the National Endowment for the Arts, which supports various forms of artistic expression across the United States.


