Embroidery, in its myriad forms, continues to capture the imagination of crafters worldwide. For those seeking immediate satisfaction and a fresh avenue for creative expression, focusing on embroidery mini designs offers a particularly rewarding path. These small-scale projects aren’t just scaled-down versions of larger works; they represent a distinct approach to decorative stitching, emphasizing efficiency, versatility, and charming impact. If you’re looking for unique ways to inject personalized style & aesthetic into everyday items without committing to extensive, time-consuming endeavors, understanding the nuances of these compact designs is key. They allow both novices and seasoned embroidery artists to explore new ideas, refine techniques, and create something tangible and beautiful in a fraction of the time.
What Exactly Are Embroidery Mini Designs?
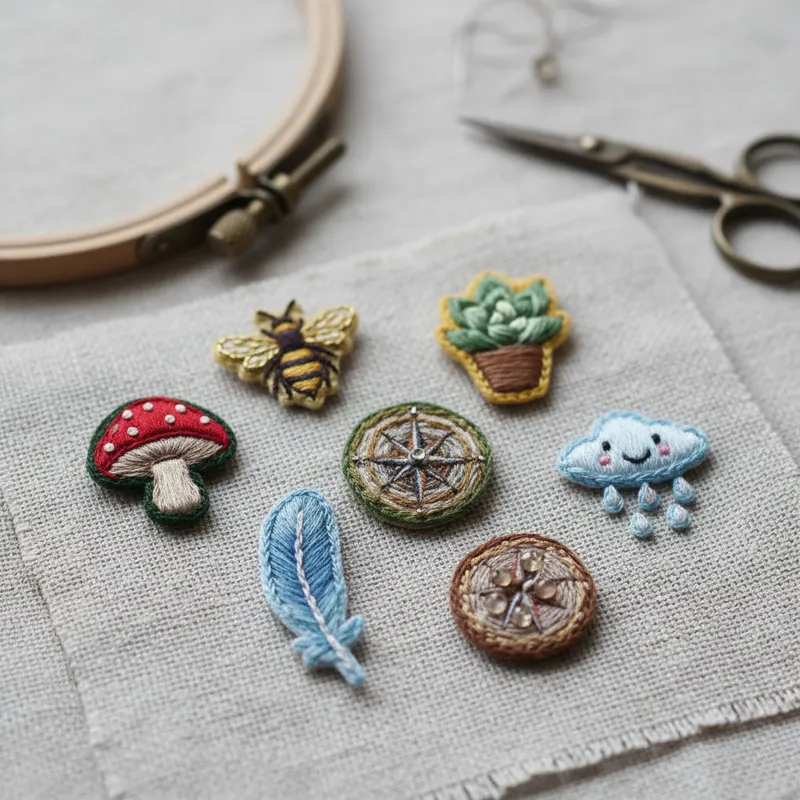
At their core, embroidery mini designs are small, focused stitched motifs, typically ranging from less than an inch up to about three or four inches in their largest dimension. Their defining characteristic is not just their size but their intent: to provide a quick, accessible, and impactful decorative element. Unlike large, complex pieces that might cover an entire garment or wall hanging, mini designs serve as accents, subtle touches, or focal points that don’t demand extensive time or a vast array of materials.
Think of them as embroidery’s equivalent of a decorative embellishment – a small flower, a single initial, a tiny animal, a minimalist geometric shape, or a simple cluster of stars. They are designed to be completed relatively quickly, often in a single sitting, making them perfect for testing new stitches, using up thread scraps, or adding a handmade touch to an item without overwhelming it. This focused scale encourages precision and thoughtful placement, as every stitch contributes significantly to the overall effect.
Why Choose Mini Designs? The Practical Advantages
The appeal of embroidery mini designs extends far beyond their aesthetic charm. They offer a host of practical advantages that make them a favorite among busy crafters, beginners, and anyone looking to maximize their creative output with minimal fuss.
Speed and Accessibility for Beginners
One of the most compelling reasons to delve into mini designs is their quick turnaround time. A complex piece can take weeks or months; a mini design might take an hour or two. This speed is incredibly encouraging, especially for those new to hand embroidery. Completing a project quickly builds confidence and provides immediate gratification, fueling the desire to try more. Beginners can practice fundamental stitches without the pressure of an intimidatingly large project, learning the mechanics of thread tension, needle handling, and fabric manipulation on a manageable scale. This low barrier to entry makes embroidery accessible to a broader audience.
Cost-Effectiveness and Material Efficiency
Mini designs are inherently economical. They require significantly less fabric and thread compared to larger projects, which means you can often work with scraps you already have on hand. This reduces material waste and allows you to experiment with a wider variety of colors and textures without a significant investment. You also won’t need specialized large hoops or frames, making your initial setup costs minimal. This efficiency is particularly valuable in 2026, where sustainability and mindful consumption are increasingly important considerations for crafters.
Versatility in Application
Perhaps the greatest strength of embroidery mini designs lies in their incredible versatility. Their small size means they can adorn almost anything without looking out of place or creating bulk. You can personalize clothing, accessories, home decor, and even stationery. From a tiny initial on a handkerchief to a subtle motif on a denim jacket, the possibilities are vast. They transform ordinary items into unique, personalized treasures, making them ideal for handmade gifts. You aren’t limited by space or the need for a cohesive, expansive theme; each mini design can stand alone or complement existing decor.
Essential Tools and Materials for Starting
Getting started with embroidery mini designs doesn’t require an overwhelming investment in tools. A few basic items are usually sufficient to embark on your creative journey.
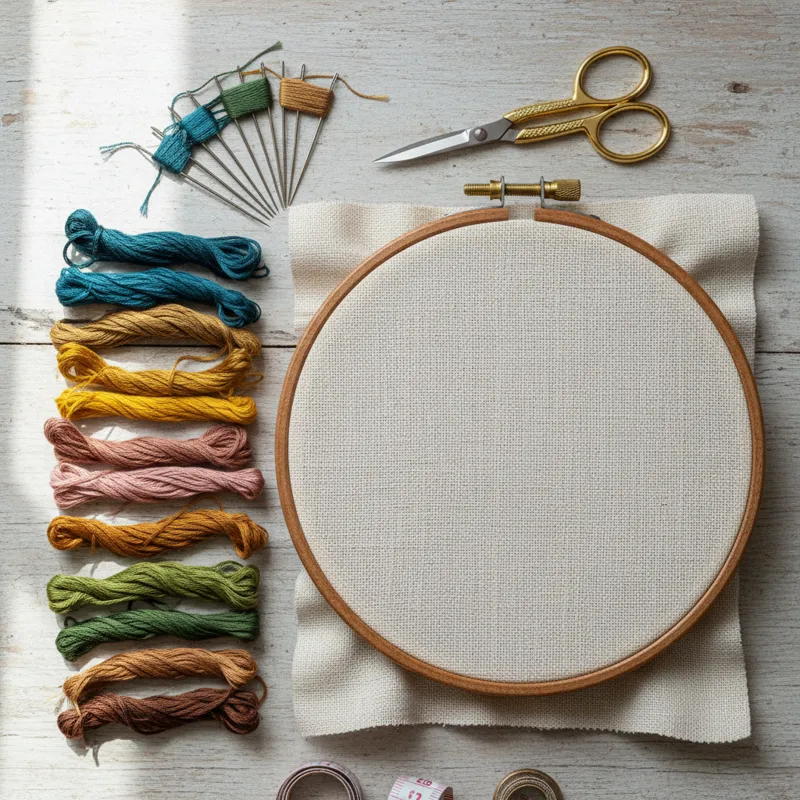
Hoops and Fabric Choices
A small embroidery hoop (typically 3-inch to 6-inch diameter) is indispensable. It holds your fabric taut, making stitching much easier and more consistent. For fabrics, opt for natural fibers that have a stable weave, making them easy to stitch through without snagging. Cotton, linen, and even denim work beautifully for mini designs. The tighter the weave, the more detailed your stitches can be. Always pre-wash and iron your fabric to prevent shrinkage and ensure a smooth surface for stitching. For fine details, a higher thread count fabric can be beneficial.
Needles and Threads
Embroidery needles, also known as crewel needles, have a sharp point and a larger eye to accommodate multiple strands of floss. A variety pack with sizes 3-9 is a good starting point. The specific size you choose depends on the fabric weight and the number of thread strands you’re using.
For threads, six-strand cotton embroidery floss is the standard. It’s versatile, comes in an enormous range of colors, and you can separate the strands to achieve different thicknesses and textures. For mini designs, using one, two, or three strands is common for delicate work, while four or six strands create a bolder, more textured effect. Beyond cotton, consider specialty threads like pearl cotton or even metallic threads for added sparkle on very small, impactful designs. For historical context on the evolution of thread and fabric, you might find resources like Wikipedia’s entry on Embroidery insightful.
Design Transfer Methods
Given the small scale of mini designs, accurate transfer is crucial.
- Water-soluble pens or pencils: These are excellent for drawing directly onto the fabric. The lines disappear with water, leaving no trace.
- Heat-transfer pens: Similar to iron-on transfers, these create lines that vanish with heat.
- Lightbox or window: For transparent fabrics, simply tape your design and fabric to a window or use a lightbox to trace.
- Sticky-backed, dissolvable stabilizers: These are fantastic for complex designs or challenging fabrics. You print or draw your design on the stabilizer, stick it to your fabric, stitch directly over it, and then rinse it away when done. This method is particularly helpful for `hand embroidery sweatshirt ideas` where fabric might be stretchy or textured.
- Tracing paper and tailor’s chalk: A classic method for transferring designs by pricking holes along the lines and pouncing chalk through.
Mastering Basic Stitches for Mini Projects
You don’t need to know dozens of complex stitches to create stunning embroidery mini designs. A solid grasp of a few fundamental stitches will unlock a world of creative possibilities. These are the workhorses of hand embroidery, especially for smaller, more defined motifs.
The Running Stitch and Backstitch
The running stitch is arguably the simplest. You weave the needle in and out of the fabric, creating a series of small, even stitches with gaps in between. It’s excellent for outlining shapes lightly or creating a delicate, dashed line. Think of it as a sketching stitch.
The backstitch builds upon the running stitch but creates a solid, continuous line. You bring the needle up, make a stitch, then bring the needle up a stitch length ahead, and go back down into the end of the previous stitch. This overlap makes it perfect for strong outlines, text, or filling in small, solid areas. For instance, if you’re creating `letter embroidery`, the backstitch will be your go-to for crisp, clear lines.
French Knots and Satin Stitch
French knots add texture and dimension. They are small, raised knots created by wrapping the thread around the needle a few times before pushing it back through the fabric very close to where it emerged. They can simulate berries, flower centers, or polka dots. Mastering them can take a little practice, but once you get the knack, they’re incredibly versatile for adding a pop to your mini designs.
The satin stitch is used for filling in shapes with smooth, lustrous coverage. You make parallel, close-together stitches that span the area you want to fill. The key is to keep tension even and stitches very close, creating a satin-like sheen. For very small shapes, it can be quite effective, but for slightly larger areas within a mini design, precision is paramount to avoid gaps or unevenness.
Lazy Daisy and Stem Stitch
The lazy daisy stitch (also known as detached chain stitch) forms individual petal shapes. It’s perfect for small flowers, leaves, or scalloped edges. Each “petal” is a single loop secured at its base.
The stem stitch creates a rope-like, slightly textured line. It’s ideal for curved lines, plant stems, or adding a decorative border. You work it by overlapping stitches slightly, always keeping the thread to one side of the needle. It provides a beautiful, flowing line that’s sturdier than a running stitch but less rigid than a backstitch, making it great for organic shapes within your embroidery mini designs.
Creative Applications for Embroidery Mini Designs
The true magic of embroidery mini designs lies in their adaptability. They offer an unparalleled opportunity to infuse personality and charm into a wide array of items, transforming them from mundane to memorable.
Personalizing Apparel and Accessories
This is where mini designs truly shine.
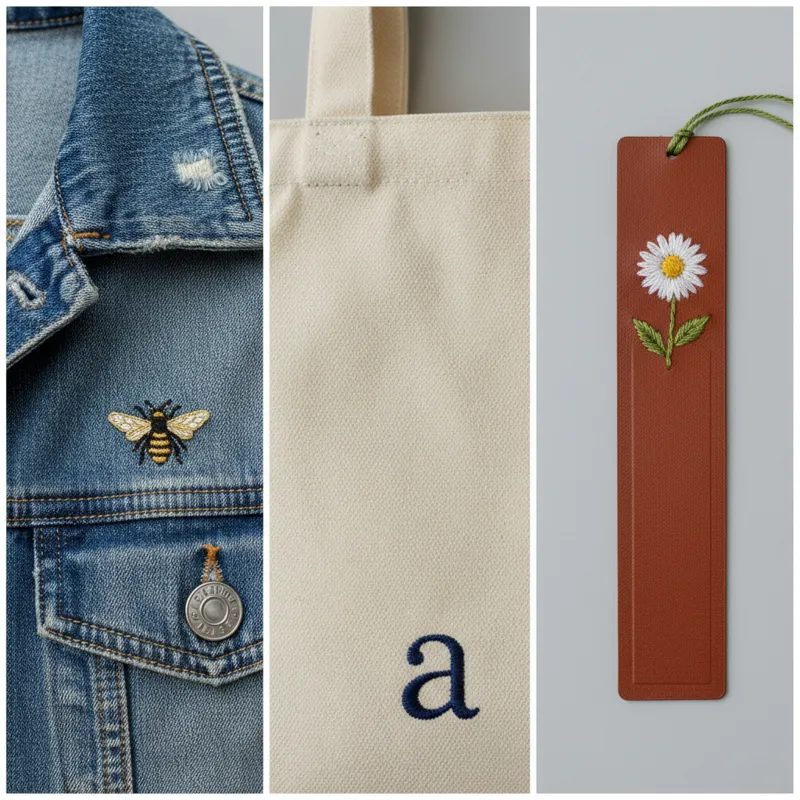
- Clothing: Add a subtle motif to a t-shirt collar, a small animal near the hem of a child’s shirt, or a tiny floral spray on a denim jacket pocket. Small neckline embroidery designs can be scaled down to a single corner, and `hand embroidery sweatshirt ideas` often feature small, meaningful motifs on the chest, sleeve cuffs, or near the hem. A tiny initial or symbol on a shirt cuff or near a pocket opening can make an item feel custom-made.
- Accessories: Think of small designs on canvas tote bags, fabric wallets, plain baseball caps, or even cloth headbands. A tiny embroidered bee or star on a plain scarf can elevate its look significantly. They are also perfect for customizing handkerchiefs, placemats, or creating charming accents on denim patches. For more formal items, a discreet mini design can add a unique touch to a `blouse embroidery designs` at the cuff or collar tip.
The key is thoughtful placement; often, less is more when it comes to these small embellishments.
Enhancing Home Decor
Don’t limit mini designs to wearables.
- Linens: Embellish napkins, tea towels, or pillowcases with small monograms, minimalist floral sprigs, or quirky icons.
- Wall Art: Frame a series of tiny embroidered motifs in small hoops to create a gallery wall effect. These can be abstract shapes, simple landscapes, or even tiny portraits. They add texture and warmth to a space. You might even consider how these small framed pieces complement larger `wall art for living room nearby` for a cohesive yet varied display.
- Bookmarks and Ornaments: Create small, flat designs that can be turned into bookmarks with a simple backing, or stitch tiny seasonal motifs to hang as ornaments.
Crafting Thoughtful Gifts
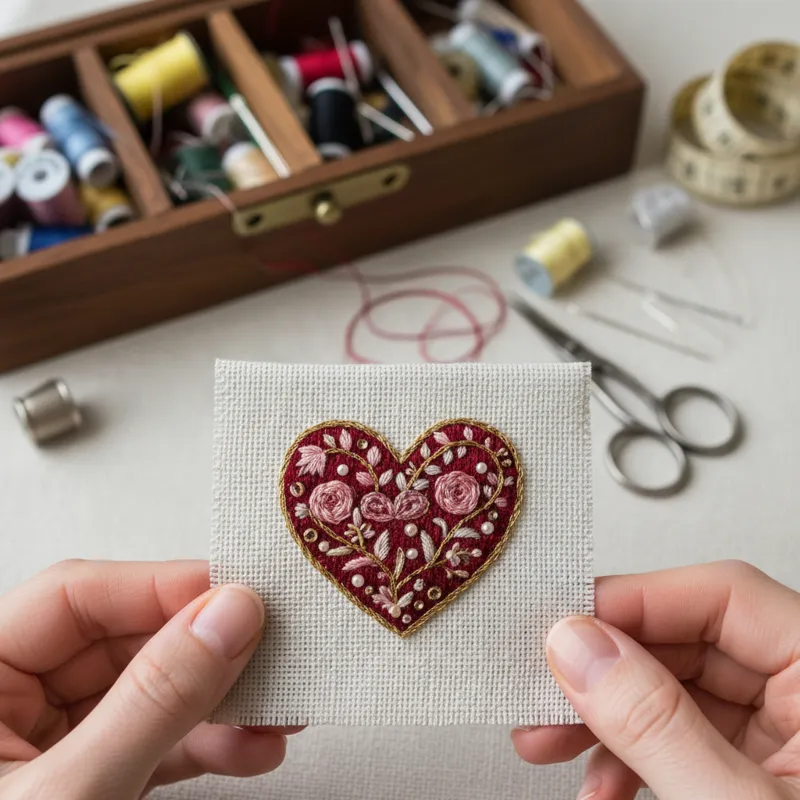
Handmade gifts carry an intrinsic value, and embroidery mini designs make that value accessible even when time is short.
- Personalized Items: A simple initial on a kitchen towel, a small heart on a pouch, or a tiny birth flower on a baby onesie makes for a deeply personal and cherished gift.
- Small Keepsakes: Stitch a significant date or a tiny symbol that holds meaning for the recipient. These can be framed, turned into keychains, or sewn onto small sachets.
- Cards: Embed a tiny embroidered element into a handmade greeting card for a truly unique and memorable touch.
Designing Your Own Mini Masterpieces
While pre-made patterns are plentiful and convenient, creating your own embroidery mini designs allows for unparalleled personalization. It’s a satisfying process that doesn’t require extensive artistic training.
Inspiration Sources
Look for inspiration everywhere. Nature offers an endless supply: tiny leaves, berries, insects, constellations. Everyday objects can be simplified: a coffee cup, a pair of glasses, a house silhouette. Minimalist graphic design, line art, and even simple emojis can be translated into charming stitched motifs. Pinterest, Instagram, and even children’s books are rich visual resources. Pay attention to how shapes can be distilled to their essential forms.
Sketching and Simplification
The key to successful mini design is simplification. Start by sketching your idea larger, then reduce it down. Focus on strong, clear lines and identifiable shapes. Eliminate unnecessary details. A tiny rose might become three lazy daisy stitches; a bird might be two simple arcs and a French knot eye. Consider the stitches you know and how they can best represent your simplified vision. Don’t be afraid to experiment with different scales on paper before transferring to fabric. This process is similar to creating an `embroidery border design` on a smaller, more focused scale.
Digital Tools for Design
For those comfortable with technology, basic vector drawing software or even simple photo editing apps can help refine your designs. You can easily scale, mirror, and trace images digitally. Printing out your scaled design gives you a crisp template for transfer. Many crafters use their tablets or phones to sketch directly onto digital canvases, allowing for easy adjustments before committing to paper or fabric.
Things People Usually Miss About Embroidery Mini Designs
Despite their apparent simplicity, a few crucial details can make or break your embroidery mini designs. Overlooking these aspects often leads to frustration or a less polished final product.
One common oversight is fabric preparation. Many beginners jump straight into stitching without adequately preparing their fabric. Skipping pre-washing can lead to your finished piece shrinking unevenly after its first wash, distorting your careful stitches. Not ironing before hooping can result in wrinkles being permanently set into your work or uneven tension. Always ensure your fabric is clean, pressed, and securely hooped for the best results.
Another frequent miss involves thread management. When working with small designs, every thread end and knot counts. Leaving loose, long tails on the back of your work can create bulk, shadows, or even unravel. Similarly, using large, bulky knots to start or end your thread on the back can create bumps that are visible from the front, especially on thin fabrics. Learn to start with a tiny waste knot that you stitch over, or use a small, secure loop method, and end by weaving your thread through existing stitches on the back.
People also often underestimate the importance of design placement. Because mini designs are so small, their exact position on an item significantly impacts the overall look. A design placed too high, too low, or slightly off-center on a pocket or cuff can throw off the balance of the entire garment. Take the time to measure, use temporary markings, and even pin your design outline in place to visualize before committing with your needle. For items like `custom needle point`, precision in placement is equally critical.
Finally, many new embroiderers neglect finishing techniques. Simply cutting the thread and removing the hoop isn’t always enough. For items that will be washed, learning how to properly back your embroidery (using a light interfacing or another piece of fabric) or securing all loose ends meticulously ensures durability. For framed pieces, mounting correctly prevents sagging or distortion over time. A professional finish elevates even the smallest design. For example, if you’re making `machine embroidery gift ideas`, you’d pay close attention to the backing for durability, and the same careful consideration applies to hand-stitched mini designs.
Caring for Your Embroidered Items
Once you’ve poured your effort into creating beautiful embroidery mini designs, proper care is essential to ensure they last. The way you clean and store your embroidered items can significantly impact their longevity and appearance.
For most hand-embroidered items, especially those using cotton floss, gentle hand washing is usually the safest approach. Use cool water and a mild, pH-neutral detergent. Avoid harsh scrubbing or twisting, which can distort stitches or damage the fabric. Gently agitate the item, then rinse thoroughly.
After washing, gently squeeze out excess water by pressing the item between clean towels. Avoid wringing. Lay the item flat on a clean, dry towel or hang it to air dry, away from direct sunlight or heat, which can fade colors. For garments, you can also roll them in a towel to absorb moisture.
When ironing, place a clean cloth or towel over the embroidered area and iron on the reverse side with a medium heat setting. This protects the stitches from being flattened or scorched. If the item has delicate knots or textured stitches, avoid direct heat on them.
For items that won’t be regularly washed, such as framed wall art or decorative pieces, occasional light dusting or vacuuming with a soft brush attachment can keep them clean. Store embroidered pieces out of direct sunlight to prevent fading, and avoid prolonged exposure to humidity, which can encourage mold or mildew. Knowing how to care for these small, delicate works ensures your creative efforts remain vibrant for years to come.
The Future of Mini Embroidery in 2026
In 2026, the world of crafting continues to evolve, and embroidery mini designs are no exception. We’re seeing a significant convergence of traditional craft with modern technology and a heightened appreciation for personalized, sustainable creations.
Digital tools for design are becoming more sophisticated and accessible, allowing crafters to effortlessly scale, mirror, and customize patterns on tablets and smartphones. We’re witnessing an increase in apps that offer design libraries and even augmented reality features to visualize how a mini design will look on an item before stitching. This lowers the barrier for custom design even further.
There’s also a strong trend towards integrating mini embroidery with other crafts. Imagine small stitched elements combined with visible mending on clothing, or miniature embroidered patches created with specialized `embroidery stamps` for unique texture and transfer methods. The movement towards upcycling and conscious consumption means that adding a small, hand-stitched detail to an old garment or accessory is more relevant and celebrated than ever.
The rise of online communities continues to foster innovation, with crafters sharing new `hand embroidery sweatshirt ideas` and techniques for quick projects. Mini designs perfectly align with the demand for quick, satisfying projects that offer immediate gratification and a tangible sense of accomplishment, fitting seamlessly into busy modern lifestyles.
Frequently Asked Questions
You likely have some practical questions as you delve into the world of embroidery mini designs. Here are answers to some common inquiries.
How long does a mini embroidery design take?
The time commitment can vary widely depending on the complexity of the design, the number of stitches involved, and your skill level. Very simple mini designs, like a single initial or a small star, can often be completed in as little as 30 minutes to an hour. More intricate designs with multiple colors or filling stitches might take 2-4 hours. The beauty of mini designs is their manageability; you can often finish them in a single dedicated crafting session.
What’s the best fabric for small designs?
For beginners, a medium-weight cotton or linen fabric (like a sturdy quilter’s cotton or linen blend) is ideal. These fabrics are stable, easy to hoop, and have a clear weave that makes it easy to count threads and place stitches accurately. As you gain experience, you can experiment with finer linens, denim, felt, or even silks, but start with something forgiving.
Can I machine wash embroidered items?
It depends on the specific item, fabric, and threads used. For many mini designs stitched with good quality cotton floss on durable fabric like denim or sturdy cotton, gentle machine washing on a cold, delicate cycle inside a mesh laundry bag can be acceptable. Always turn the item inside out to protect the stitches. However, hand washing is always the safest bet for preserving the integrity and vibrant colors of your embroidery. Avoid high heat in both washing and drying.
Where can I find patterns for embroidery mini designs?
You can find an abundance of patterns online. Websites like Pinterest, Etsy, and various craft blogs offer free and paid patterns. Many embroidery books also include sections on small motifs. Don’t underestimate the power of simplifying existing designs or sketching your own from nature or everyday objects. You’ll also find communities dedicated to `embroidery mini designs` sharing ideas and patterns, often tailored to specific applications like `hand embroidery sweatshirt ideas`.


