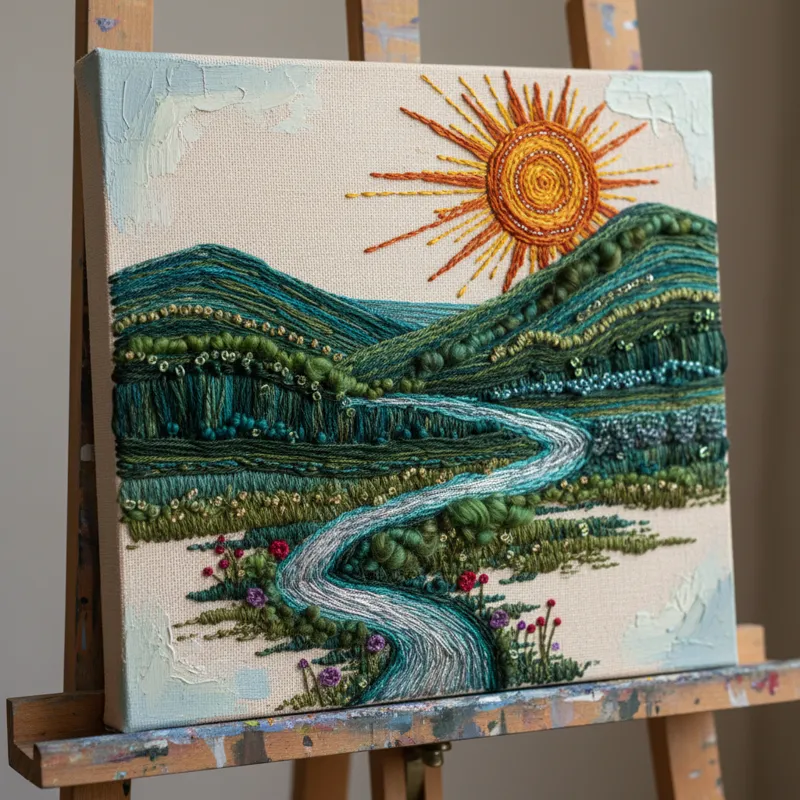
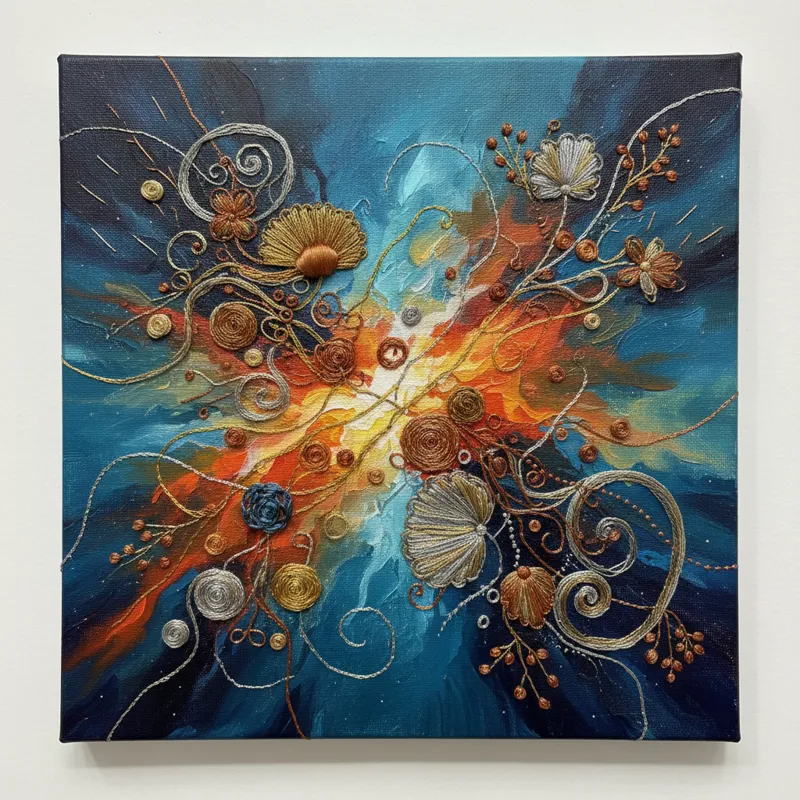
The intersection of textile art and traditional painting has given rise to a captivating and increasingly popular art form: embroidery on art canvas. This isn’t just about stitching a pattern onto fabric; it’s a deliberate act of transforming a painter’s staple into a dimensional, tactile surface for threadwork. Far from merely decorative, this technique elevates traditional embroidery into the realm of fine art, allowing artists to blend the texture of fiber with the structure of a stretched canvas. It’s a method that invites experimentation, offering a unique avenue for expression that paint alone often cannot achieve. This guide will explore everything you need to know to create lasting, impactful mixed-media art using embroidery on art canvas, from selecting your materials to finishing your masterpiece.
Understanding the Appeal of Embroidery on Art Canvas
The decision to combine embroidery with a conventional art canvas isn’t arbitrary; it stems from a desire for greater texture, depth, and a unique visual language. Unlike traditional fabric embroidery, working on a stretched canvas immediately frames the work as a piece of wall art, much like a painting. This brings a different perception to the viewer, one often associated with painting or sculpture rather than craft.
What makes embroidery on art canvas particularly compelling is its ability to create genuine three-dimensionality. Stitches rise from the surface, catching light and casting subtle shadows in a way that paint, even impasto, struggles to replicate. This interplay of light and shadow, combined with the inherent tactility of thread, adds a layer of engagement that invites closer inspection. Artists can use thread to mimic textures, define lines, or even create abstract sculptural forms that pop from the surface. Many find this an exciting frontier for embroidered pictures, pushing the boundaries of what thread can achieve.
Furthermore, this technique often involves a mixed-media approach. Artists frequently integrate embroidery with paint, drawing, or collage elements directly on the canvas. This fusion allows for a rich dialogue between different artistic disciplines, creating complex compositions where each medium enhances the other. The canvas provides a stable, archival base, ensuring that these multi-layered creations can endure for generations, much like traditional paintings.
Choosing Your Canvas: More Than Just a Surface

The foundation of any successful embroidery on art canvas project begins with selecting the right canvas. This choice impacts everything from stitchability to the final look and longevity of your artwork. Don’t assume all canvases are created equal for this purpose; their composition and preparation are critical.
Types of Canvas Materials
- Cotton Canvas: This is the most common and affordable option. Cotton offers a good balance of durability and flexibility. It’s generally easier to stitch through than linen, especially for beginners. However, lower-quality cotton canvas can be prone to sagging over time if not properly stretched or framed.
- Linen Canvas: Known for its strength, durability, and fine, consistent weave, linen is often favored by professional artists. It’s more expensive than cotton but resists stretching and warping better, making it an excellent choice for archival pieces. The tighter weave can make stitching a bit more challenging, requiring a sharper needle and more effort.
- Synthetic Canvas: Made from materials like polyester, these canvases offer excellent durability, resistance to mildew, and consistent texture. They are often very smooth and can be a good choice for fine detail work or if you plan to incorporate a lot of paint.
Primed vs. Unprimed Canvas
Most canvases you buy off the shelf are already primed, usually with acrylic gesso. This primer prepares the surface for paint, preventing it from soaking into the fibers and providing a smooth, bright ground. For embroidery, a primed canvas offers several advantages:
- Smooth Surface: Gesso creates a smoother surface, allowing needles to glide through more easily.
- Protection: It protects the canvas fibers from environmental factors and potential damage from thread acids (though modern threads are usually pH neutral).
- Stiffness: Primed canvas is stiffer, which can make it easier to maintain tension while stitching, especially without a hoop.
- Color Pop: If you’re painting sections, the gesso ensures colors appear vibrant.
Unprimed canvas is raw fabric. It’s more flexible and often has a visible weave texture. You’d choose unprimed if you want to apply your own specific gesso or primer, or if you prefer the natural, soft drape of the fabric for certain effects, though this can make it more challenging to work on for dense embroidery. For most embroidery on art canvas projects, a pre-primed canvas is the practical choice.
Stretched Canvas, Canvas Boards, or Rolls?
- Stretched Canvas: The most common format, ready to hang. It provides a firm surface for stitching and is ideal for projects that will be displayed without additional framing. Ensure the canvas is stretched tautly to prevent sagging as you work.
- Canvas Boards/Panels: These are canvas sheets glued onto rigid cardboard or MDF. They offer a very firm, stable surface that doesn’t require stretching. They’re typically more affordable and good for smaller pieces or experimental work. The rigidity can make it slightly harder to push needles through, especially with dense stitching.
- Canvas Rolls: If you’re working on very large pieces or want custom sizes, buying canvas by the roll allows you to stretch it yourself or mount it later. This requires more effort in preparation but offers maximum flexibility.
Consider the weave of the canvas too. A finer weave (like a portrait-grade canvas) will show more detail in your stitches, while a coarser weave might lend itself to bolder, more textural embroidery. For a truly robust surface, artists often turn to heavy-duty artist’s canvas, which offers superior strength and resilience.
Selecting the Right Threads for Lasting Art
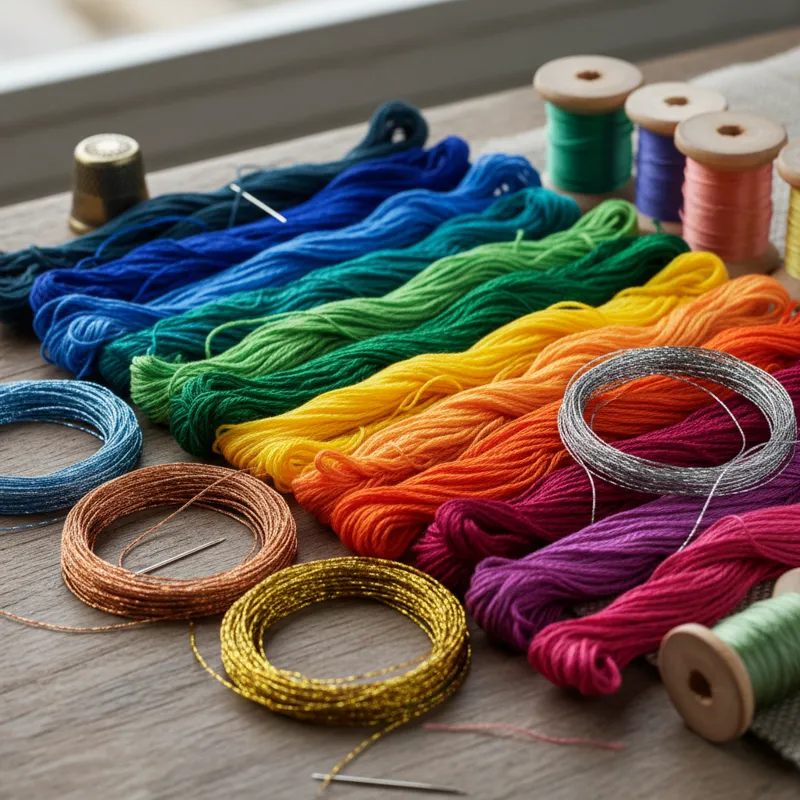
Just as crucial as your canvas choice is your thread selection. The threads you use will determine the texture, color, and longevity of your embroidery on art canvas. Prioritize quality, colorfastness, and archival properties to ensure your art piece endures.
Common Embroidery Thread Types
- Six-Strand Embroidery Floss: This is the most versatile and widely available thread. Brands like DMC and Anchor are renowned for their extensive color palettes and consistent quality. You can separate the six strands to use fewer strands for fine detail or use multiple for thicker lines and denser fill. It’s typically made of mercerized cotton, offering a subtle sheen and good strength.
- Perle Cotton: Unlike floss, perle cotton is a non-divisible, twisted thread with a distinct pearl-like sheen. It comes in various sizes (e.g., #3, #5, #8, #12), with #3 being the thickest and #12 the finest. Perle cotton adds a beautiful texture and definition, making it ideal for outlining, visible stitching, and creating raised effects.
- Tapestry Wool: For bolder, more textural work, especially on coarser canvas weaves, tapestry wool is an excellent choice. It’s thicker and softer than cotton floss, creating a matte, plush finish. It can add a painterly, dimensional quality.
- Silk Thread: Offering unparalleled luster and a luxurious feel, silk threads are perfect for adding highlights, delicate details, or an overall elegant sheen. They are more delicate to work with and typically more expensive.
- Specialty Threads: This category includes metallic threads, rayon (for high sheen), variegated threads (colors change along the length), and even specialty fibers like linen thread or raffia. These threads can add unique visual interest and textural diversity to your canvas piece. However, metallic threads can sometimes be prone to tangling and breaking, requiring patience.
Considerations for Archival Quality
When creating art meant to last, ‘lasting’ isn’t just a hopeful term; it’s a technical requirement.
- Colorfastness: Ensure your threads are colorfast, meaning they won’t bleed or fade over time or when exposed to light. High-quality brands explicitly state their threads are colorfast. Fading or bleeding can permanently damage your artwork.
- Fiber Content: Natural fibers like cotton, linen, and silk are generally robust. Synthetic fibers designed for art and craft are also stable. Avoid inexpensive, unbranded threads that may contain dyes or materials that could degrade or harm the canvas over time.
- UV Resistance: Even colorfast threads can fade significantly if exposed to direct sunlight for prolonged periods. While framing with UV-protective glass helps, choosing threads with good inherent UV resistance is a wise step for any embroidered ideas that will hang on a wall.
For longevity, sourcing threads from reputable art and craft suppliers is always the best practice. You can learn more about thread types and their historical uses at Britannica’s entry on embroidery.
Essential Tools for Canvas Embroidery
Having the right tools makes the process of embroidery on art canvas smoother and more enjoyable. While many tools are similar to those used in traditional embroidery, some specific considerations apply when working on a stiffer canvas surface.
Needles
This is where the canvas factor truly comes into play. You need needles that are strong enough to penetrate the canvas without bending or breaking, and sharp enough to pass through its tight weave.
- Sharps: These are long, very sharp needles with a round eye, perfect for general embroidery. They pierce through canvas fibers cleanly.
- Chenille Needles: These are similar to sharps but have a larger eye, making them suitable for thicker threads like perle cotton or tapestry wool. They are also very sharp.
- Tapestry Needles: While traditionally used for counted cross-stitch or needlepoint on open-weave fabrics because of their blunt tip, some artists find them useful for pushing through existing holes in canvas or if working with very thick threads and a looser weave. For most canvas embroidery, a sharp point is preferred.
Always have a variety of sizes. A smaller, finer needle for delicate work and a sturdier one for denser areas or thicker threads.
Hoops and Frames
Unlike working on loose fabric, a stretched canvas often means you can work without a hoop for smaller areas. However, for larger pieces or to maintain tension and prevent puckering, a hoop or frame can be invaluable.
- Embroidery Hoops: Standard wooden or plastic hoops work well. Choose a size that accommodates your working area. The tension provided by the hoop helps keep the canvas taut, leading to more even stitches.
- Q-Snaps or Stretcher Bars: These provide a more rigid grip than traditional hoops and are great for larger canvases where a hoop might obstruct your work. Stretcher bars are commonly used for framing canvases, and some artists choose to embroider directly on a canvas already mounted on a frame.
Cutting Tools
- Small, Sharp Scissors: Essential for cleanly snipping threads close to the canvas without damaging your work. Invest in a good pair of embroidery scissors.
Design Transfer Tools
These are critical for getting your vision onto the canvas accurately. This is also where printed embroidery patterns can be a huge time-saver.
- Fabric Marking Pens/Pencils: Water-soluble pens, heat-erasable pens, or chalk pencils are ideal. Test them on a scrap piece of canvas first to ensure they erase completely and don’t leave permanent marks.
- Carbon/Graphite Paper: Specifically designed for fabric or art, these papers allow you to trace a design onto the canvas. Place the carbon paper carbon-side down on the canvas, then your design on top, and trace with a stylus or dull pencil.
- Lightbox or Projector: For intricate designs, a lightbox or small art projector can be immensely helpful. You can project your design onto the canvas and trace it directly.
Other Useful Tools
- Thimble: Protects your finger as you push needles through the dense canvas.
- Needle Threader: Especially useful for fine needles or if you have difficulty threading.
- Magnifying Lamp: Provides excellent lighting and helps you see fine details, reducing eye strain.
- Awl or Stiletto: Occasionally, for very dense areas or very thick threads, an awl can help pre-pierce holes in the canvas, making it easier to stitch. Use sparingly and carefully to avoid damaging the canvas.
Design Transfer Techniques for Canvas
Transferring your design accurately to the canvas is a critical step. A precise transfer ensures your embroidery follows your artistic vision and saves you frustration later. Given the relatively stiff and often primed surface of an art canvas, some methods work better than others.
Graphite or Carbon Paper
This is one of the most reliable methods for transferring designs onto a primed canvas.
- Print or draw your design on regular paper.
- Place a sheet of graphite (or artist’s carbon) paper, carbon side down, onto your canvas where you want the design.
- Position your printed design on top of the carbon paper.
- Using a stylus, a dull pencil, or the back of a paintbrush, firmly trace over your design lines. The pressure will transfer the graphite onto the canvas.
- Lift the papers carefully to reveal your transferred design.
Tip: Test the graphite paper on a scrap piece of canvas first. Some graphite can be stubborn to remove if you make a mistake. Choose a light-colored graphite if your canvas is light-colored, and dark if your canvas is dark, so it’s visible but not overly prominent.
Water-Soluble or Heat-Erasable Pens
These pens offer excellent precision and the convenience of disappearing ink.
- Draw or print your design.
- If using a lightbox (see below), trace directly onto the canvas. Otherwise, freehand or use stencils.
- Once your embroidery is complete, remove the marks. Water-soluble pens disappear with a damp cloth or spray. Heat-erasable pens disappear with the heat from an iron or hairdryer (always test first!).
Caution: Ensure your entire design is stitched before erasing, as the marks can vanish. Also, heat-erasable ink can sometimes reappear if exposed to cold temperatures.
Lightbox Tracing
If your canvas is thin enough and you have a clear, light source, a lightbox works wonderfully.
- Place your design on the lightbox.
- Position your canvas directly over the design.
- The light shining through will make your design visible on the canvas surface.
- Trace the design with a water-soluble or heat-erasable pen/pencil.
This method is fast and accurate, but its effectiveness depends on the opacity and thickness of your canvas.
Projector Method
For large-scale designs or intricate artwork, an art projector can be a lifesaver.
- Set up a mini projector to project your design image onto the canvas.
- Adjust the size and position until it’s perfect.
- Trace the projected lines directly onto the canvas with your chosen marking tool.
This method allows for great flexibility in scaling and placement. It’s perfect if you’re translating a digital design to canvas.
Freehand Drawing/Stenciling
If you’re confident in your drawing skills, you can sketch your design directly onto the canvas with a light pencil (H or 2H lead) or a chalk pencil. For repetitive elements or specific shapes, stencils can also be used with a light dabbing of paint or a marking pen. Always draw lightly so your lines are covered by your stitches.
Embroidery Stitches That Work Well on Canvas
When embroidering on art canvas, the stiffness of the material often influences stitch choice. You’ll want stitches that provide good coverage, strong lines, or appealing texture without excessively puckering the canvas. Many classic embroidery stitches adapt beautifully.
Line Work and Outlines
- Backstitch: A fundamental stitch, perfect for crisp outlines, text, and fine details. It creates a solid, unbroken line that defines shapes clearly on the canvas.
- Stem Stitch: Creates a rope-like, slightly raised line, ideal for flowing curves, plant stems, and organic outlines. It has a beautiful texture that complements mixed media.
- Outline Stitch: Similar to stem stitch but worked in the opposite direction, creating a slightly different textured line.
- Split Stitch: Also creates a strong, solid line, similar to backstitch but with a slightly softer appearance. Excellent for filling small areas or creating fine outlines.
Filling and Coverage
- Satin Stitch: Used to fill shapes with a smooth, continuous block of color. On canvas, ensure your stitches aren’t too long, or they may snag. Keep thread tension even to avoid puckering. For larger areas, consider using long and short stitch.
- Long and Short Stitch: Often called “needlepainting,” this stitch is ideal for blending colors and creating nuanced shading. It involves varying stitch lengths to create a smooth transition, perfect for realistic elements like fur, feathers, or gradients.
- Couching: A technique where a thicker thread (or even multiple strands) is laid on the surface of the canvas and secured with smaller, perpendicular stitches. This is excellent for creating bold lines, textural elements, or even outlines that stand proud of the surface without having to pull a thick thread through the canvas repeatedly.
- Fishbone Stitch: Great for filling leaf shapes or other narrow, pointed areas, creating a textured, almost braided fill.
Texture and Dimensionality
- French Knot: A classic for adding small, raised dots of texture. Use them for eyes, berries, or simply to add visual interest. Can be challenging on stiff canvas; ensure you wrap the thread tightly around the needle.
- Colonial Knot: Similar to a French knot but forms a slightly tighter, more robust knot. Some find it easier to execute on canvas.
- Bullion Knot: Creates a cylindrical, worm-like shape, adding significant three-dimensional texture. Can be used for roses, braids, or abstract elements.
- Chain Stitch: A versatile stitch that forms a linked chain. It can be used for outlines, fills, or creating textured bands.
- Feather Stitch: Creates an open, branching pattern, great for foliage, decorative borders, or adding a light, airy texture.
- Woven Wheel Stitch: For a bold, circular, raised texture, this stitch creates a dense, woven “rose” effect.
Experiment with different combinations of these stitches. The true beauty of wall art for walls often comes from the interplay of varied textures and dimensions that different stitches provide.
Preparing Your Canvas for Embroidery
Proper preparation ensures a smooth stitching experience and a professional final result for your embroidery on art canvas. Don’t skip these foundational steps.
Inspecting and Cleaning the Canvas
Before you do anything, give your canvas a quick inspection. Look for any imperfections, loose threads, or dust. A soft brush or a lint roller can remove any surface debris. If your canvas feels particularly dusty, gently wipe it with a barely damp, clean cloth and let it dry completely.
Pre-Stretching (If Unstretched) or Ensuring Tension
If you’re working with canvas from a roll, you’ll need to stretch it onto stretcher bars. This is a skill in itself, but ensures your final piece will be taut. Most artists buy pre-stretched canvas. Even with a pre-stretched canvas, ensure it’s taut. A loose canvas will lead to uneven stitches and potential puckering as you embroider. If you feel any give, you might use canvas pliers to gently pull the canvas tighter around the stretcher bars and re-staple it.
For smaller areas or to maintain tension during stitching, especially if working on an unstretched canvas or a particularly loose area, use an embroidery hoop or a Q-snap frame. Place the canvas in the hoop, ensuring it’s taut like a drum, but not so tight that it distorts the canvas weave.
Priming (If Unprimed or Desired)
If you’re using an unprimed canvas, you’ll want to prime it yourself. Acrylic gesso is the standard. Apply thin layers, allowing each to dry thoroughly, and sand lightly between coats for a smooth finish. Even on pre-primed canvases, some artists choose to add another thin layer of gesso, especially if they plan on painting heavily before or after embroidering. This can further seal the surface and provide a consistent ground.
Marking Your Center and Layout
It’s often helpful to find the exact center of your canvas. You can do this by lightly drawing diagonal lines from corner to corner; their intersection is the center. This helps with design placement and ensures your composition is balanced. Lightly mark any major axes or compositional lines with a disappearing pen or pencil.
The Embroidery Process: Tips for Success
Once your canvas is prepared and your design transferred, it’s time to stitch. Here are practical tips for successful embroidery on art canvas.
Thread Management
- Use Shorter Lengths: Threads, especially floss and silk, can fray or tangle if cut too long. Aim for lengths no more than 18-24 inches. This reduces friction and keeps your thread looking fresh.
- Condition Your Thread: For metallic or tricky threads, consider using a thread conditioner (like Thread Heaven or beeswax) to reduce tangling and improve glide.
Needle and Canvas Interaction
- Push and Pull: With a stiffer canvas, you’ll often need to push the needle through from the top and pull it through from the back in two distinct motions, rather than a single fluid motion. A thimble is your friend here.
- Finding the Path: Try to pierce between the canvas fibers rather than through them, especially with a fine weave. This minimizes damage to the canvas and creates a cleaner stitch.
Tension Control
This is paramount to prevent puckering, especially when working on a stretched canvas.
- Consistent Pull: Apply consistent tension as you pull each stitch through. Too loose, and your stitches will look sloppy; too tight, and the canvas will pull and pucker.
- Hoop/Frame Use: If using a hoop or frame, ensure the canvas is taut. This provides a stable surface that resists puckering.
- Balance Stitches: Try to balance dense stitching with sparser areas, or alternate directions of pull, to distribute tension across the canvas.
Securing Threads
Neatness on the back of your work is important, especially for canvas art that might be viewed from multiple angles or if you want it to lay flat.
- Starting: Avoid knots on the back. Instead, leave a small tail on the back and secure it with your first few stitches. Alternatively, use a “waste knot” that you snip off once secured.
- Ending: Weave the working thread under 3-4 existing stitches on the back. This secures it without creating bulk. Snip any excess close to the stitches.
Preventing Puckering
- Smaller Stitches: For very dense areas, use slightly shorter stitches to distribute tension more evenly.
- Working from Center Out: Often, starting your embroidery in the center of a design and working outwards can help distribute tension and minimize puckering.
- Rotate Your Work: Don’t always stitch in the same direction. Rotate the canvas to work from different angles, which helps maintain overall canvas integrity.
Integrating Embroidery with Other Art Mediums
One of the most exciting aspects of embroidery on art canvas is its potential for mixed media. Combining thread with paint, drawing, or collage opens up a vast realm of creative possibilities. The canvas provides an ideal base for this artistic dialogue.
Paint (Acrylic, Oil, Watercolor)
- Paint First, Then Embroider: This is a common approach. You can paint your background, main shapes, or even detailed elements first, then add embroidery on top to enhance texture, define lines, or add new layers of detail. Acrylics are fast-drying and work well. Oils require longer drying times but offer rich color. Watercolors can be used for washes or delicate backgrounds, but be careful not to oversaturate the canvas where you plan to embroider.
- Embroider First, Then Paint: Less common, but can create interesting effects. You might embroider a basic structure or outline, then paint around and within the embroidered elements. This can make the embroidery feel like an integral part of the canvas surface, rather than just an addition.
- Layered Approach: Go back and forth! Paint a layer, embroider on it, then add more paint, perhaps washes or dry brushing, to integrate the threads. This creates a deeply textured and nuanced surface.
Drawing (Pencil, Charcoal, Ink)
- Underdrawing: Use pencil or charcoal to sketch initial ideas directly on the canvas, even before transferring a formal design.
- Outlining and Detailing: After some embroidery, use fine-liner pens, technical pens, or even brush pens to add sharp lines, intricate details, or shading directly onto the canvas, around or through the stitches. India ink can provide strong, permanent lines.
- Charcoal or Pastel Softness: Add soft smudges of charcoal or pastel around embroidered elements to create shadows or atmospheric effects. Fix these with a spray fixative to prevent smudging.
Collage Elements
Attach paper, fabric scraps, photographs, or other lightweight materials to your canvas using an archival adhesive. You can then embroider directly onto or around these elements, stitching them into the composition. This adds another layer of texture and narrative. For example, a piece of printed fabric could form a base for intricate embroidered tapestry elements.
Beads and Embellishments
Small beads, sequins, or tiny found objects can be stitched directly onto the canvas, often interspersed with threadwork. This adds sparkle, reflectivity, and even more three-dimensionality. Use beading needles and strong, fine thread for these additions.
When combining mediums, always consider compatibility and archival quality. Use artist-grade paints, inks, and adhesives that are acid-free and designed for longevity. Test combinations on a scrap piece of canvas if you’re unsure how they will interact.
Finishing and Archiving Your Embroidered Canvas Art
The final steps in creating your embroidery on art canvas are just as important as the stitching itself. Proper finishing and archiving ensure your artwork looks its best and lasts for years to come.
Removing Design Marks
Once your embroidery is complete, remove any visible transfer lines. If you used water-soluble pens, gently dab the area with a damp cloth or a spray bottle filled with distilled water. If using heat-erasable pens, a quick pass with a warm iron or hairdryer will make the marks vanish. Ensure the canvas is completely dry before proceeding.
Cleaning the Canvas
Avoid harsh chemicals. For general dust or light surface dirt, a soft, clean brush or a lint roller is usually sufficient. If minor spots are present, a barely damp, clean white cloth can be used with extreme care, testing on an inconspicuous area first. Allow it to air dry thoroughly.
Blocking or Re-stretching
If your canvas has warped or puckered despite your best efforts, you might be able to gently reshape it. For minor puckering, lightly dampening the back of the canvas (avoiding direct contact with embroidery threads, especially non-colorfast ones) and then allowing it to dry taut on stretcher bars can help. For more severe warping, professional re-stretching might be necessary.
Sealing or Varnishing (Use with Caution)
This is a nuanced step. While artists often varnish paintings, varnishing embroidery can be tricky.
- Acrylic Sprays: A light, even spray of an archival, clear acrylic matte or satin varnish can protect the painted areas of your mixed-media piece. However, spray varnishes can sometimes change the texture or color of certain threads. Test on a scrap first.
- Textile Sealants: There are some textile-specific sealants, but they are often designed for wearable art and might not be ideal for the texture you want on a canvas.
Often, simply framing the piece behind glass (especially UV-protective glass) offers the best protection for the embroidery itself without altering its texture.
Framing and Display
- Traditional Framing: Treat your embroidered canvas like a painting. It can be framed without glass, allowing the texture to be fully appreciated. If you do use glass, ensure there is a spacer or mat to prevent the glass from compressing the embroidery.
- Box Frames: For highly dimensional pieces, a shadow box frame can provide ample depth, protecting the artwork while showcasing its sculptural qualities.
- Mounting: If you worked on an unstretched canvas, you might mount it onto a rigid board before framing.
Environmental Considerations for Preservation
- Avoid Direct Sunlight: Even colorfast threads can fade over time with prolonged exposure to UV light.
- Stable Environment: Display your art in a room with stable temperature and humidity. Extreme fluctuations can cause the canvas to expand and contract, potentially stressing the stitches.
- Dust Protection: If not framed behind glass, periodically dust your artwork gently with a soft brush.
By taking these steps, your unique embroidery on art canvas will remain a beautiful and lasting testament to your artistic vision. For further guidance on art preservation, resources like the National Endowment for the Arts offer insights into archival practices.
What Most People Get Wrong About Embroidery on Art Canvas
Embroidery on art canvas is a rewarding medium, but it comes with its own set of challenges. Many common pitfalls stem from treating the canvas exactly like regular embroidery fabric or a flat painting surface. Here’s what people often misunderstand:
1. Underestimating Canvas Resistance
The most frequent mistake is assuming an art canvas will behave like linen or cotton embroidery fabric. It won’t. Canvas, especially when primed and stretched, is much stiffer and denser. This means you need sharper needles (often chenille or sharps), more effort to push the needle through, and a greater awareness of tension. Trying to force a dull needle through repeatedly can damage both the needle and the canvas.
2. Ignoring Canvas Weave and Prep
Many beginners overlook the weave of the canvas and whether it’s primed. A coarse weave can make fine detail difficult, while a very tight weave can be a battle for thick threads. Not considering if the canvas is adequately primed (or if it needs priming) can lead to paint bleeding or a rough surface that catches threads. The surface you start with dictates much of your experience.
3. Improper Thread Tension, Leading to Puckering
This is a major issue. Pulling threads too tightly will inevitably distort the canvas, causing unsightly puckering. Since the canvas is rigid, it resists this distortion less forgivingly than softer fabrics. Consistent, gentle tension is key. Working in smaller sections and securing threads well helps immensely.
4. Skipping the Design Transfer Step or Doing It Hastily
A hastily transferred design, or one done with a non-erasable marker, can ruin a piece before it even begins. You can’t easily un-paint a line on canvas once it’s there. Taking the time to use appropriate transfer methods (like water-soluble pens or graphite paper) and double-checking your design before stitching is crucial. What looks good freehand on paper might look very different when translated to the canvas surface.
5. Using Unsuitable Stitches for the Medium
While many stitches are versatile, some are less suited for the rigidity of canvas. Very dense, chunky stitches or those requiring a lot of fabric manipulation (like some smocking techniques) can be challenging or cause undue stress on the canvas. Prioritize stitches that build texture on the surface rather than heavily manipulating the underlying fabric.
6. Neglecting Archival Considerations
Embroidery on art canvas is often seen as fine art. Therefore, using non-colorfast threads, acidic adhesives for mixed media, or displaying the piece in direct sunlight without protection, can significantly shorten its lifespan. Treat it as a painting you want to preserve; this means choosing high-quality, archival materials from start to finish.
Frequently Asked Questions About Embroidery on Art Canvas
Q: Can I use any canvas for embroidery?
A: While you technically can stitch on almost any canvas, for best results and longevity, use artist-grade stretched canvas (cotton or linen) that is primed. Canvas boards are also a good option for rigidity. Avoid very thin, flimsy canvas if you want a durable piece.
Q: Do I need to use an embroidery hoop or frame on stretched canvas?
A: For smaller areas on a tautly stretched canvas, you might not need a hoop. However, for larger projects or to ensure even tension and prevent puckering, a hoop or a Q-snap frame can be very helpful. It provides a stable surface and prevents the canvas from distorting.
Q: How do I clean my finished embroidered canvas art?
A: For general dusting, use a soft, clean brush or a lint roller. Avoid water or chemicals on the embroidered areas unless you are absolutely certain of the threads’ colorfastness and the nature of the medium. If your piece incorporates paint, light dusting is usually sufficient. Consider framing behind UV-protective glass for optimal protection from dust and light.
Q: Can I mix paint and embroidery on the same canvas?
A: Absolutely, this is one of the greatest strengths of embroidery on art canvas! Many artists paint first, then embroider over the painted areas to add texture and depth. You can also embroider and then add paint, or even go back and forth, layering the mediums. Ensure your paints are artist-grade acrylics or oils for best results.
Q: What kind of needle is best for canvas?
A: You’ll typically need a sharp needle to penetrate the canvas fibers. Chenille needles (sharp point, large eye) are excellent for thicker threads, while sharps (sharp point, smaller eye) work well for embroidery floss. Have a few sizes on hand.
Q: How do I keep the back of my embroidered canvas neat?
A: Neatness on the back is important for canvas art, as it’s often displayed without backing. Avoid knots. Instead, start by leaving a small tail and securing it with your first few stitches. End by weaving your working thread under 3-4 existing stitches on the back of your work. Trim excess thread close to the canvas. A tidy back prevents bulk and helps the canvas lay flat.
Q: Will my embroidery on canvas last as long as a painting?
A: With proper materials and care, yes. Using archival-quality canvas, colorfast threads, and acid-free additional mediums (if applicable), along with proper finishing and display conditions (like avoiding direct sunlight), your embroidered canvas art can be just as durable and long-lasting as a traditional painting.
Bringing Your Vision to Life with Embroidery on Art Canvas
Embroidery on art canvas is more than a craft; it’s a dynamic art form that challenges traditional boundaries and opens up vast possibilities for creative expression. It invites artists to think beyond flat surfaces, embracing texture, dimension, and the tactile quality of thread to tell stories and evoke emotions. By understanding the nuances of canvas selection, thread quality, essential tools, and careful technique, you can elevate your practice from simple stitching to producing enduring, impactful mixed-media art. It’s about building a unique visual language, where the painter’s brush meets the embroiderer’s needle, creating pieces that resonate with depth and intricate beauty. As you embark on your own projects, remember that every stitch contributes to a larger narrative, transforming a blank canvas into a compelling work of art.


